
What is a Pay Period?
A pay period is the recurring payroll schedule you set up for your company drivers and owner operators. It decides two things: how often a driver gets paid (for example, every week, or every two weeks) and which loads fall into which payment cycle. Think of it as your payroll calendar for drivers. Instead of deciding on the fly every time you run payroll, you set the schedule once for a driver (or a group of drivers), and Alvys uses that schedule to group each driver’s delivered loads into the right payment cycle automatically. A pay period doesn’t calculate anyone’s pay by itself, the driver’s pay rates handle the actual math. The pay period’s job is simply to define the recurring time window and make sure every driver is on one before you try to pay them. Every driver must be assigned to a pay period before a statement (their pay stub) can be created for them.Where to Find Pay Periods
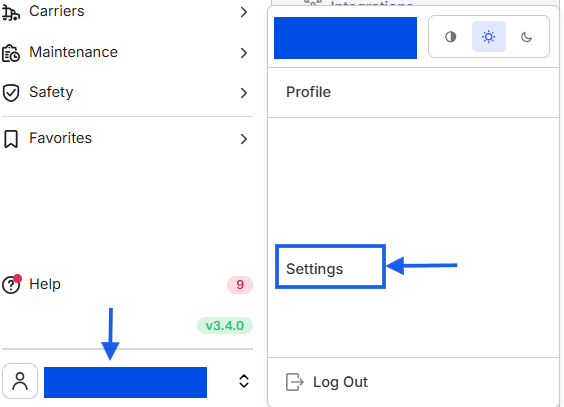
Who can access this: Pay Periods is an administrative page. It’s available to Admin and Partner Admin users on your account. If you don’t have one of those roles, ask an administrator at your company to set up pay periods for you, or to give you access if you need it regularly. How to get there, step by step:- Log in to Alvys and click your name in the bottom-left corner of the screen. This opens your account menu.
- In that menu, click Settings.
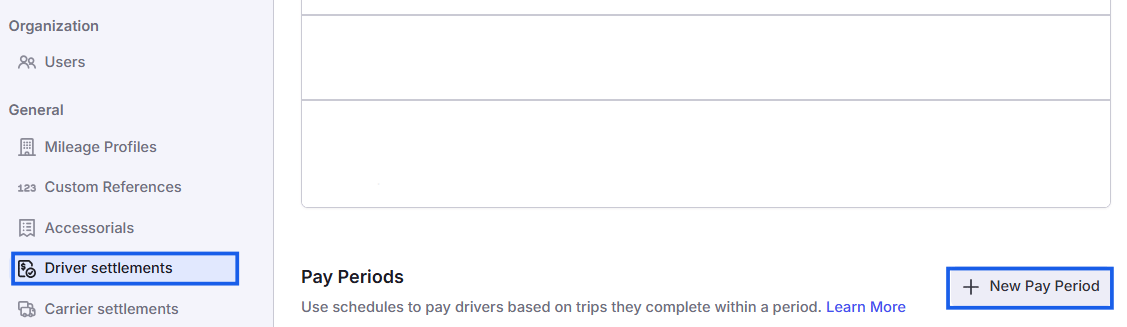
- In the Settings page that opens, click Pay Periods in the left-hand panel.
Setting Up a Pay Period
- Go to Settings, then Pay Periods (see “Where to Find Pay Periods” above for the exact click path).
- Click New Pay Period.

- Give the pay period a name. This name is only for your own internal organization, drivers never see it.
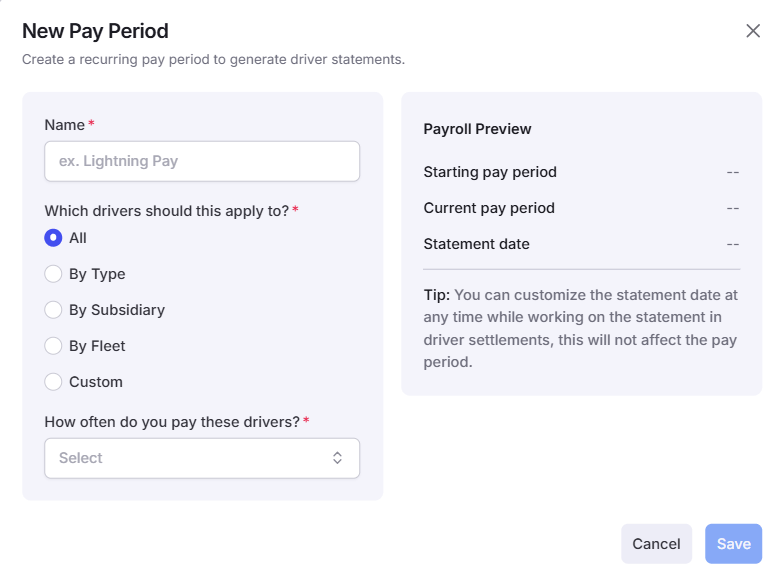
- Choose which drivers this schedule applies to: All drivers, By Type (Company Driver or Owner Operator), By Subsidiary, By Fleet, or a Custom list you build yourself. Most companies find it easiest to start with “All” drivers, and split things out later only if they need to.
- Choose how often you pay on this schedule: Daily, Weekly, or Bi-weekly.
- If you chose Weekly or Bi-weekly, pick the day the period starts. A Weekly period runs for a full week from that day, for example, if you start it on Monday, the period runs from Monday morning through the following Sunday night. A Bi-weekly period runs the same way but covers two full weeks.
- As you fill out the form, a Payroll Preview panel on the side fills in the starting pay period, the current pay period, and the statement date, so you can check your choices before saving. You can always change the statement date later, for any individual statement, without it affecting the pay period itself.
- Click Save.
Two Rules Worth Knowing Before You Run Your First Payroll
A driver can only have one active statement per pay period at a time. Once you’ve generated a statement for a driver covering a specific pay period window, that window is locked for that driver, you can’t generate a second statement covering the exact same dates until the first one is reverted (see “Managing a Pay Period” below). If you need to start over on a statement, reverting or deleting it is the way to free that window back up. The pay period and the statement date are chosen manually every single time you generate a statement, neither one remembers your last choice. Even if you run payroll on the same recurring schedule every week, double-check both fields before generating, since Alvys will not automatically pick up where last week’s run left off.Managing a Pay Period
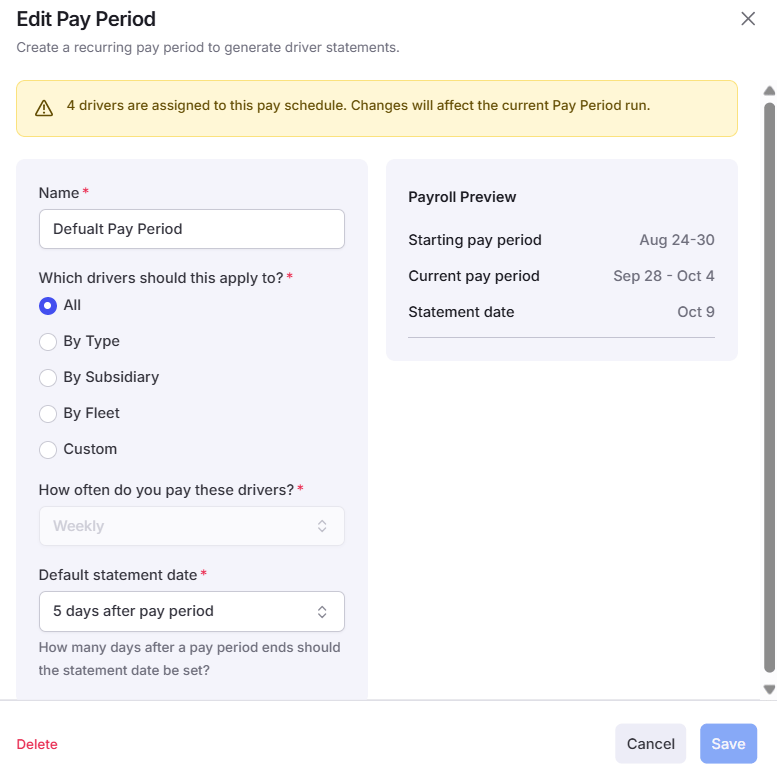
- To add or remove drivers from a pay period: open it for editing and change who it applies to — By Type, By Subsidiary, By Fleet, or Custom. If you remove a driver from a pay period, remember to assign them to a different one before you try to run payroll for them again, since every driver needs to be on some pay period.
- To change the schedule itself: update the frequency (Daily/Weekly/Bi-weekly), or change the day the period starts, and save.
- Delete the statement. Go to the driver’s Paystubs and click the trash can icon next to the statement, then create it again against the correct pay period.
- Revert the statement. This puts it back into Draft (or, if needed, all the way back to Open) so you can adjust it and regenerate it. Reverting a statement requires a specific permission — if you don’t see a way to revert, ask an administrator on your account to do it, or to grant you that permission.
Running Payroll With Pay Periods
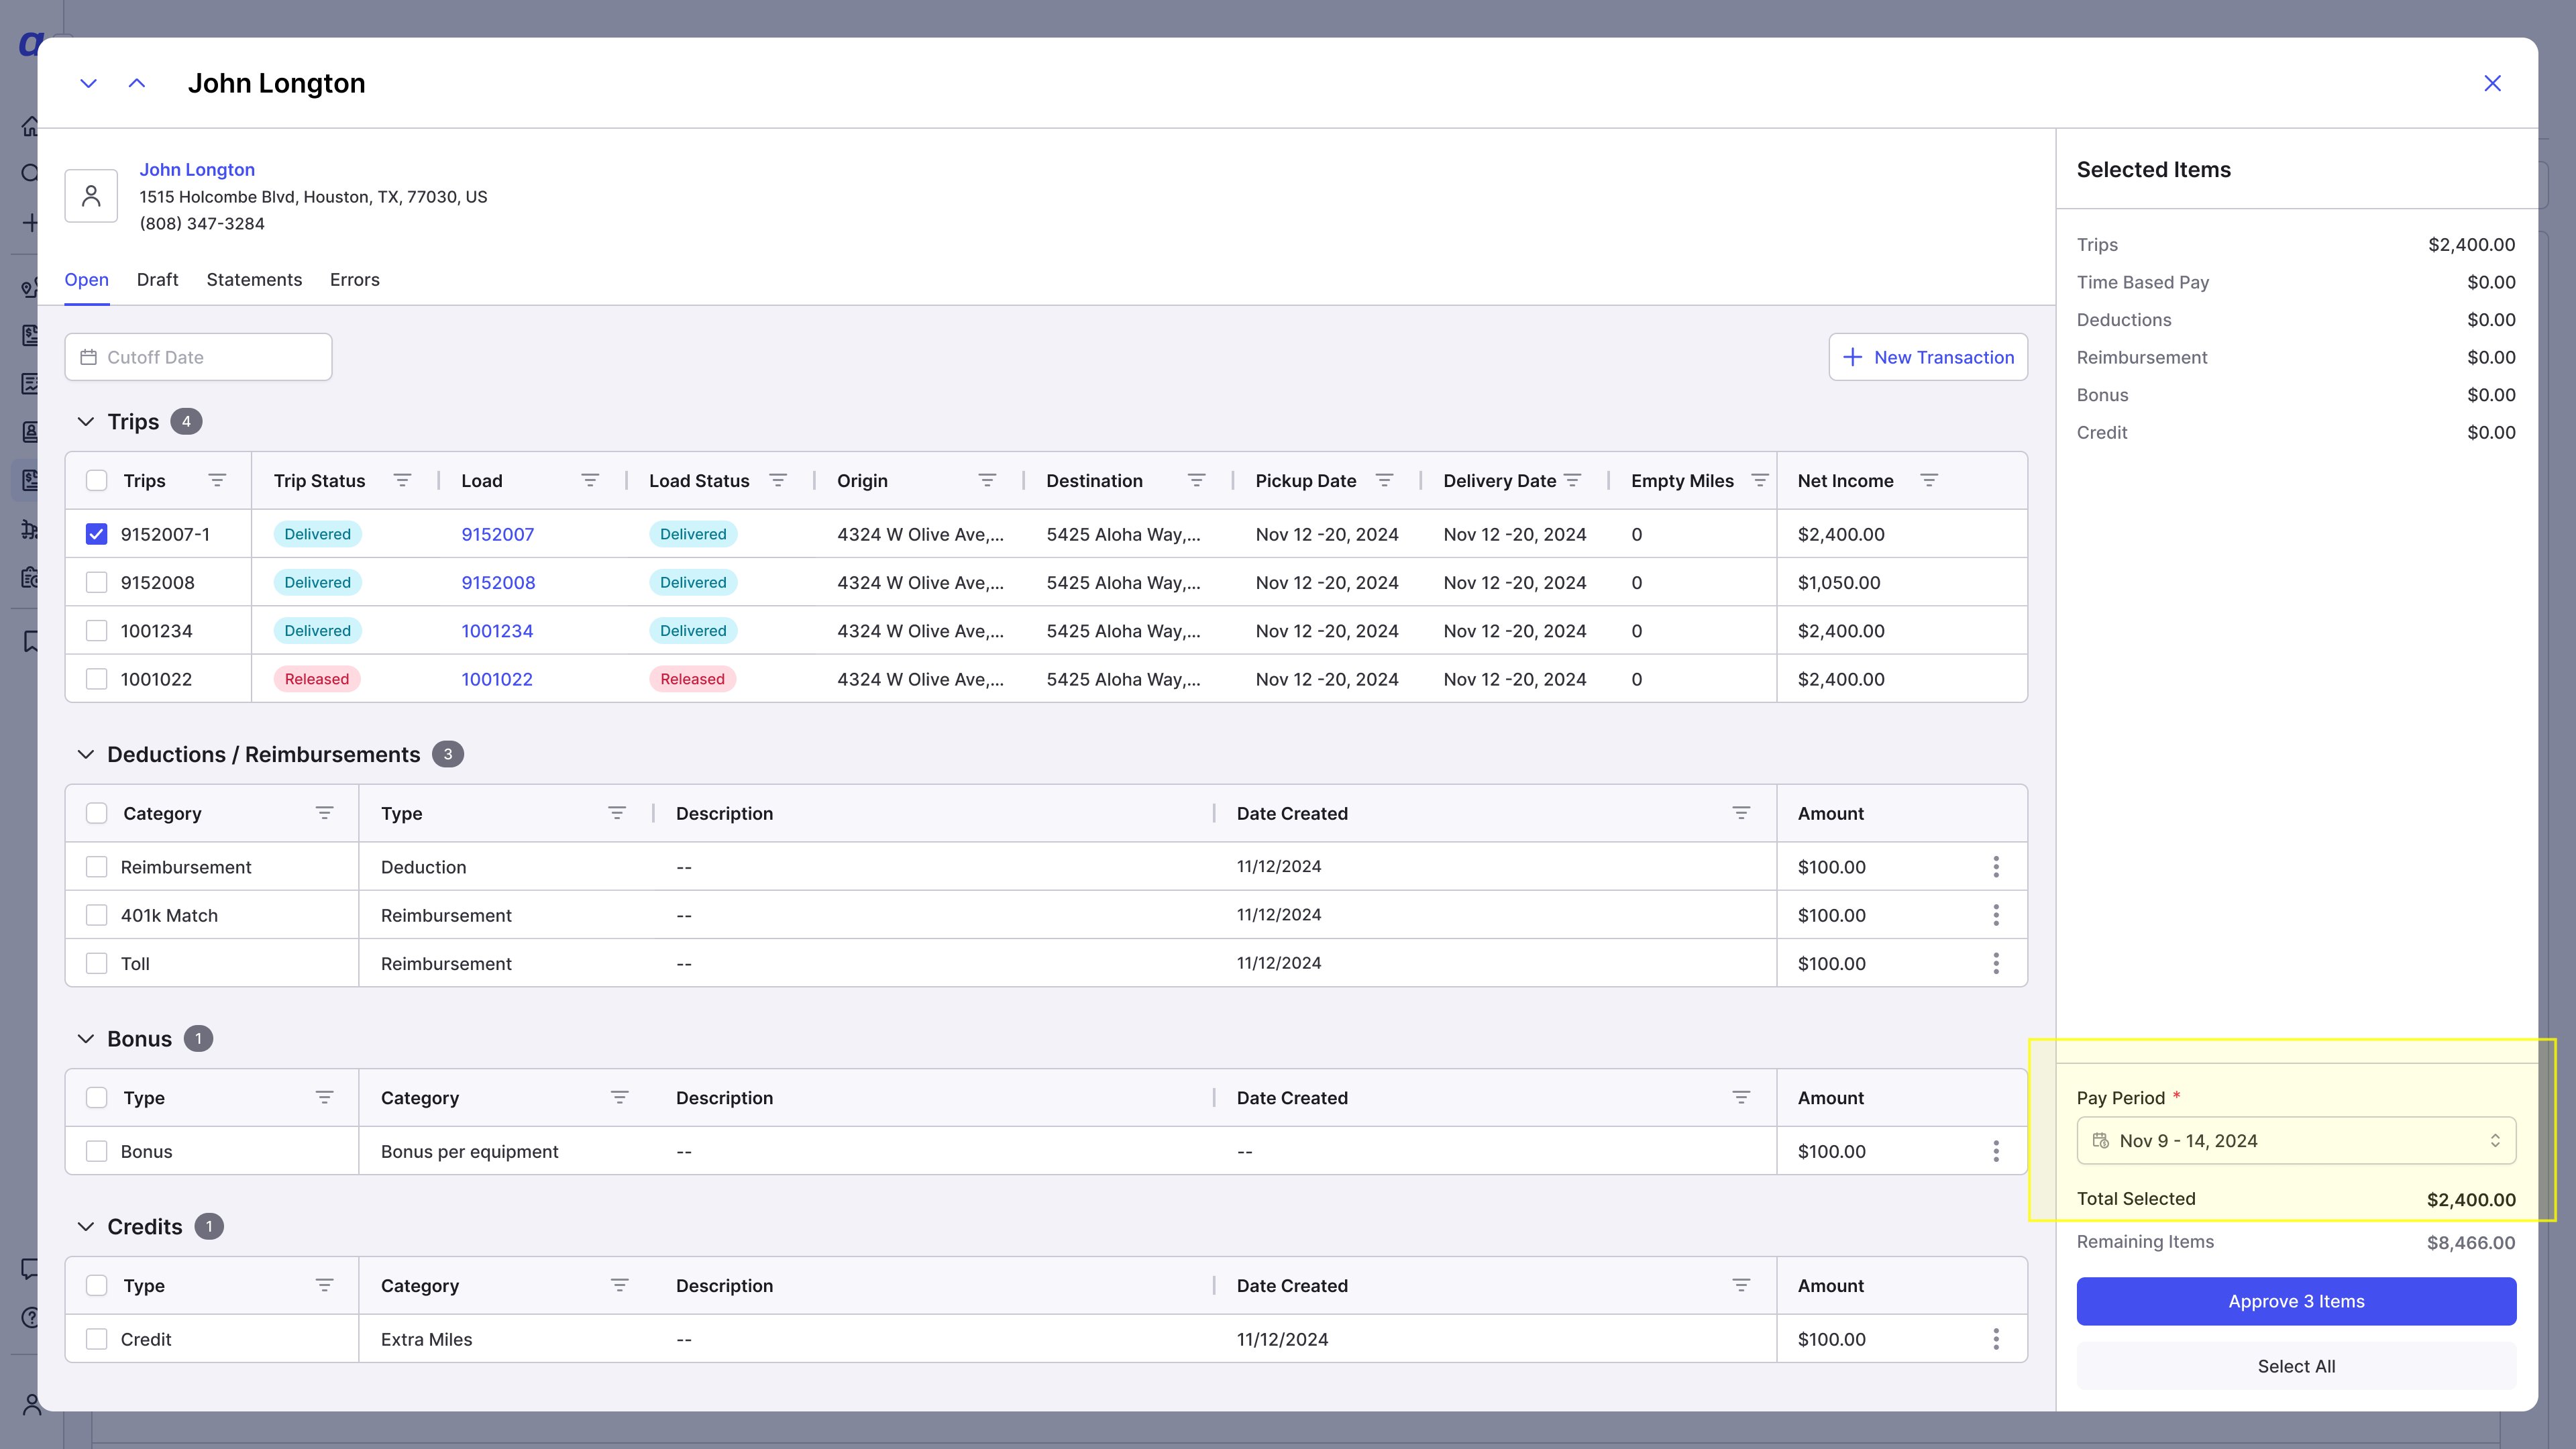
- Go to Accounting, then Driver Settlements, and open the Open tab.
- Select the loads and other transactions you want to include in this driver’s statement.
- Choose the pay period this statement belongs to. This is a manual choice every time you run payroll — see the rule above about pay periods and statement dates not carrying over automatically.
- Click Approve to move those items into a draft statement. You’ll find it on the Drafts tab.
- Open the Drafts tab whenever you’re ready to review and finalize statements.
A Few Terms That Are Easy to Mix Up
- Cutoff Date — the date, set in the Open tab, up to which delivered loads are pulled in and available to add to a statement. Loads delivered after the cutoff date won’t show up until you move the cutoff date forward.
- Pay Period — the recurring payment schedule (Daily, Weekly, or Bi-weekly, plus a start day) that a driver is assigned to. It controls how often they’re paid and which statements get grouped together. Drivers never see this name.
- Statement Date — the date that actually prints on one specific finished statement, chosen manually every time you build that statement.