
Overview
Fuel is one of the biggest recurring expenses in trucking. This article walks you through the complete fuel workflow in Alvys (fuel card setup, fuel transaction import, fuel deductions, fuel reporting): connecting your fuel card provider, linking cards to drivers, and importing fuel transactions, either automatically or by manual upload. Alvys supports fuel card integrations with providers like EFS, Comdata, TCS, QuikQ (Love’s), and Compass, offering automatic and manual fuel uploads, deductions, and reporting tied directly to your drivers. This guide covers the end-to-end fuel workflow: from connecting your provider to importing transactions into the Fuel Report.Before you start
Before setting up fuel management in Alvys:- You must have active fuel card credentials from your provider (EFS, Comdata, TCS, QuikQ/Love’s, or Compass).
- Some providers (such as QuikQ and EFS) require you to contact their support team and request API credentials or enable partner access before the Alvys integration will work. Complete that step with your provider before proceeding.
- Link fuel cards on driver profiles when you want driver matching from card numbers. Transactions can still import without a card match; Alvys may match a truck using Unit / vehicle # when the card number does not match a driver.
- Management > Integrations (connecting fuel providers) is limited to users with the Admin or Partner Admin role.
- Linking fuel cards on driver profiles requires the Edit Asset permission.
- Viewing and importing transactions on Assets > Fuel requires the Fuel Report permission. Contact your administrator if you do not see these pages or actions.
💡 The Import Report option only appears once a fuel integration is active. Enabling an integration is what registers that provider as an upload type on the Fuel page. If the ⋮ menu on Assets > Fuel shows only Export all as CSV and Export all as Excel, no fuel integration is active for your subsidiary yet. Connect one first, or record fuel individually with Add Transaction.
Steps
Connect your fuel provider
- Go to Management > Integrations.
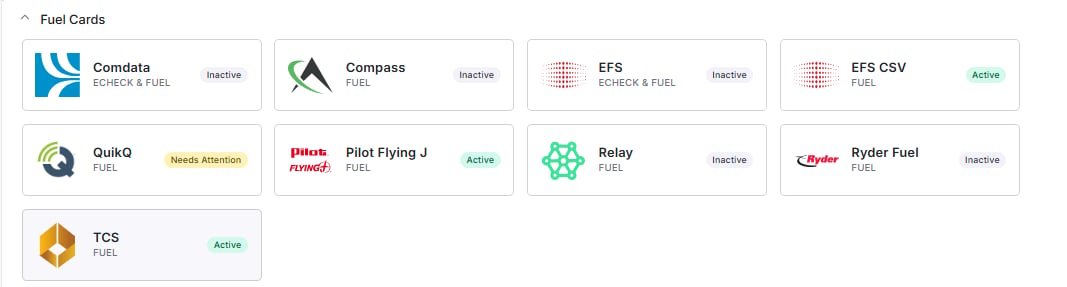
- Select the Fuel category.
- Find your provider and click its integration card (or the Inactive badge) to open settings.
- Enter the required credentials provided by your fuel card company.
- Choose the subsidiaries this provider should apply to.
- Click Save.
Link fuel cards to drivers
Once the integration is active, link each driver’s fuel card so Alvys can match transactions to that driver by card number.- Go to Assets > Drivers.
- Select a driver and open their profile.
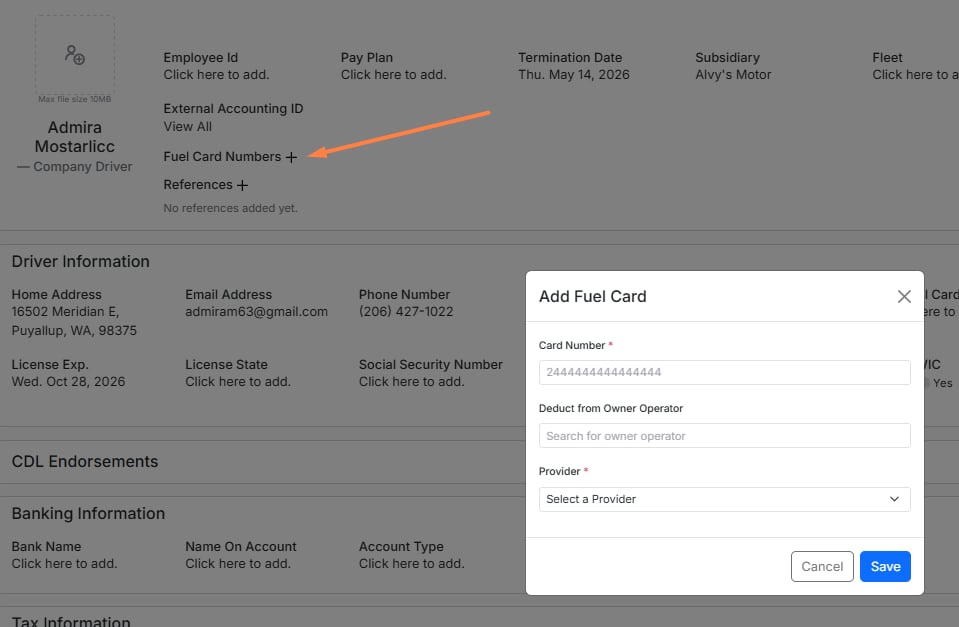
- Click the Fuel Card Numbers + button.
-
Complete the Edit Fuel Card form:
- Card Number — some providers require only part of the number (TCS uses the last 4 digits), so check your provider’s formatting guidelines.
- Deduct from Owner Operator — name an owner operator here when this card’s costs should come off their settlement instead of the driver’s. Leave it empty to deduct from the driver.
- Provider — for example Comdata, EFS, TCS, or Love’s.
- Deduct and Discount, per transaction type — the form lists each transaction type the card can carry (Reefer Diesel, Truck Diesel, Dyed Diesel, Cash Advance, Cash Advance Fee, DEF Fluid, Gas, Maintenance, and others), each with its own Deduct and Discount checkbox. Every provider has its own defaults. If you change them, Alvys marks the card as modified and offers Restore to return to that provider’s defaults.
- Click Save.
- Repeat for all drivers using fuel cards.
💡 These two checkboxes decide what happens to the money.Deduct controls whether a transaction type reaches a settlement at all. With Deduct off, that transaction type is treated as a company expense and never appears on a settlement. With it on, the transaction appears on the settlement of the owner operator named in Deduct from Owner Operator, or of the driver when that field is empty.Discount controls whether the provider’s discount is applied to the amount charged. Left unchecked, the driver or owner operator is charged the retail amount.
Import fuel transactions (recommended)
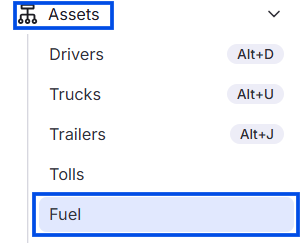
You can bring fuel data into Alvys through automatic sync (if your provider supports it) or manual import from a provider report file. Manual file import is available when you have an active integration for Compass, TCS, Pilot Flying J, or EFS CSV. Download the transaction report from your provider’s portal first, then import it from the Fuel page. When your account has the fuel import assistant enabled, use Import Report to upload a file, map columns, and review validation before rows are imported.- Go to Assets > Fuel. This page is also referred to as the Fuel Report — there is no separate Fuel Report entry in the navigation.
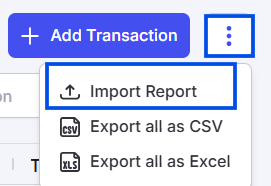
- Click the ⋮ menu in the page header (next to Add Transaction).
- Select Import Report.
- Choose your Integration type (for example, Compass, TCS, Pilot Flying J, or EFS CSV).
- Optional: check Update existing transactions if duplicates are found when you are re-importing a file and want Alvys to update matching transactions instead of creating duplicates.
- Upload your CSV or Excel file and follow the import assistant to map your file columns to Alvys fields.
- Review errors (blocking) and warnings (non-blocking), then finish the import.
Map columns to the fuel import template
After you upload your file, Alvys opens an import assistant where you match each column in your provider report to an Alvys template field. You only need to complete this mapping the first time you import a given file layout; Alvys can reuse your mapping on later uploads. The fuel import template uses one set of Alvys fields for Compass, TCS, Pilot Flying J, and EFS CSV. Your integration type is chosen once per upload (not a spreadsheet column). Subsidiary is not a template column — Alvys assigns subsidiary from linked truck or driver assets and your fuel integration scope, the same way legacy file uploads work. Some fields require you to map a column from your file (even when individual cells are blank). Others only need a value on each row when your file includes that data.
Alvys matches imported transactions to drivers using the fuel card numbers on driver profiles. Rows without a matching card number still import, but they are not linked to a driver until you add or correct the card number and re-import (with Update existing transactions checked if you are updating the same file).
Imported rows appear on Assets > Fuel after a short indexing delay.
For provider-specific download steps, see the integration guide for Compass, TCS, Pilot Flying J, or EFS (CSV upload).
Legacy file upload
Some accounts still see the Upload Fuel Report dialog: choose Integration type, attach the provider file, and click Save — without the column-mapping import assistant.The legacy upload still accepts standard Compass, TCS, Pilot Flying J, and EFS CSV export files and continues to work today. Alvys is replacing it with the import assistant described above. When you have access to Import Report with column mapping and validation, use that flow and provide data in the fuel import template format (or a native provider export the assistant can map). Legacy upload will be removed in a future release.
- Go to Assets and open Fuel.
- Open Import Report from the page header ⋮ menu.
- In the Upload Fuel Report popup, select Integration type (Compass, TCS, Pilot Flying J, or EFS CSV).
- Attach the CSV or Excel file from your provider (xlsx, xls, or csv).
- Click Save.
- Review the import summary (Imported, Duplicates, Failed), then click Done.
Automatic fuel sync
Some providers support scheduled automatic imports (for example EFS API sync and QuikQ / Love’s). Import timing depends on the provider — see that provider’s integration guide. For example, Love’s transactions are imported twice daily at 1 AM and 2 AM Eastern Time per the QuikQ (Love’s) integration guide. Once automatic sync is enabled:- Alvys pulls new transactions on the provider’s schedule — no manual file upload is required.
- Duplicate detection runs during automatic import.
Result
After completing these steps:- Your fuel provider is connected and active for the selected subsidiaries.
- Each driver’s fuel card is linked to their profile.
- Fuel transactions appear on Assets > Fuel, matched to the correct drivers where card numbers align.
- Transaction types with Deduct enabled reach the settlement of the driver, or of the owner operator named on the card. Types with Deduct off stay as company expenses.
- If automatic sync is enabled, transactions are imported daily without manual action.
Troubleshooting
Fuel appears in the Fuel Report but not on a settlement
Whether a transaction reaches a settlement is controlled by the fuel card, not by the import. A transaction can import correctly and still never appear on a statement.- Go to Assets > Drivers, open the driver’s profile, and open the card under Fuel Card Numbers.
- Find the transaction type in question — Truck Diesel, Cash Advance, DEF Fluid, and so on — and check its Deduct box. With Deduct off, that transaction type is treated as a company expense and does not appear on any settlement.
- If Deduct is on but the transaction is on someone else’s statement, check Deduct from Owner Operator. When an owner operator is named there, the card’s transactions go to that owner operator’s settlement rather than the driver’s.
- Confirm the card is still listed on the profile you expect. A transaction imports whether or not the card is linked to that profile, so a card that has been removed or moved will keep importing without reaching the settlement.
A driver is charged the retail amount instead of the discounted amount
The Discount checkbox for that transaction type is not selected on the fuel card. Open the card under Assets > Drivers > Fuel Card Numbers, then select Discount for each transaction type that should be charged at the discounted amount. This applies to transactions imported after the change. For transactions already imported at the retail amount, delete and re-import them, or adjust the settlement manually.You only see Export options in the ⋮ menu, not Import Report
The Import Report option appears only when a fuel integration is active for your subsidiary. Enabling an integration is what registers that provider as an upload type on the Fuel page.- Go to Management > Integrations and open the Fuel category.
- Confirm a provider is active for the subsidiary you are working in. An integration active on one subsidiary does not enable uploads on another.
- If no provider is connected, connect one first. For file uploads without an API connection, use the provider’s CSV option (for example EFS CSV).
- If Management > Integrations is not available to you, ask an admin at your company to connect the provider.
You cannot find the Fuel Report
The page is Assets > Fuel. It is referred to as the Fuel Report in several places, but there is no separate Fuel Report entry in the navigation — if you are on Assets > Fuel, you are in the right place.Transactions are not appearing in the Fuel Report
- Confirm the driver’s fuel card number is entered correctly under their profile (Assets > Drivers > fuel card). Check the formatting your provider requires (partial vs. full card number).
- Confirm the integration credentials are saved under Management > Integrations > Fuel for the correct subsidiary.
- For automatic sync, allow up to 24 hours after enabling the integration for the first transactions to appear.
- For manual imports with the import assistant, confirm you selected the correct Integration type, mapped required template fields (Transaction date and Net amount are required on every row; State, Product / fuel type, Quantity (gal), and Truck stop / chain must be mapped), and uploaded a file from that provider’s portal.
- If none of the above applies, contact Alvys support with the provider name, affected card number, and the date range of the missing transactions.
Some of a driver’s transactions imported, but not all
When a driver’s card is linked correctly and only part of their activity appears:- Check the date filter on Assets > Fuel. Transactions near the edge of your range can fall outside it — see the next section.
- Rows with a zero amount or no amount are skipped at import. Check whether the missing lines have an amount in your provider file.
- Confirm every row in the file carries the card number in the format your provider requires. Rows without a matching card number still import, but they are not linked to a driver.
- If the missing lines are not fuel purchases — cash advances, fees, maintenance — confirm that transaction type is present on the fuel card and that its settings are what you expect. Contact Alvys support with the card number and date range if they are still missing.