> ## Documentation Index
> Fetch the complete documentation index at: https://docs.alvys.com/llms.txt
> Use this file to discover all available pages before exploring further.
# How to Dispatch a Load
> Dispatch a load by assigning a driver, truck, and trailer to advance the trip to Covered status, using the standard flow or preference dialog.
Dispatching a load assigns a driver, truck, and trailer to a trip and advances the trip to **Dispatched** status, signaling the load is ready to move.
## Overview
Dispatching a load connects a trip to a driver and equipment so the load can move. Once dispatched, the trip advances to **Dispatched** status, which updates all parties that the load is assigned and ready.
There are two ways to dispatch: the standard flow, where you assign assets and then dispatch in separate steps, and the preference dialog flow, which appears when assignment preferences are configured and lets you assign and dispatch in a single action.
Synonyms: assign a load, cover a trip, send a load, book a driver, schedule a trip, undispatch a load, revert a dispatch, reassign driver after dispatch.
## Before You Start
Before dispatching a load, confirm the following:
* The trip you want to dispatch is in **Open**, **Planned**, or **Covered** status in the trips grid.
* You have a driver, truck, and trailer available to assign.
* All authenticated Alvys users can access Dispatch Planner v2, the Load board, or the load page.
* If you want the preference dialog flow to appear, dispatch preferences must be configured for the driver or carrier in advance.
* The driver you want to assign exists in Alvys under **Assets > Drivers**. If the driver does not appear in the **Manage Assets** assignment field, Alvys will not display an error: add the driver record under **Assets > Drivers** first, then return to dispatch.
* You have permission to access **Manage Assets**. To assign a driver from a load or trip, open the load, then click **Assign Carrier** or **Manage Assets** in the Carrier Details panel on the right side of the screen. If neither button appears, contact your administrator to confirm your account has the required view and assign permissions.
## Dispatch a load from different areas in Alvys
### Dispatch Planner v2
**Open the Dispatch Planner v2 module**
* In the left navigation menu, select the Loads and Trips icon.
* Click **Dispatch Planner v2** from the menu options.
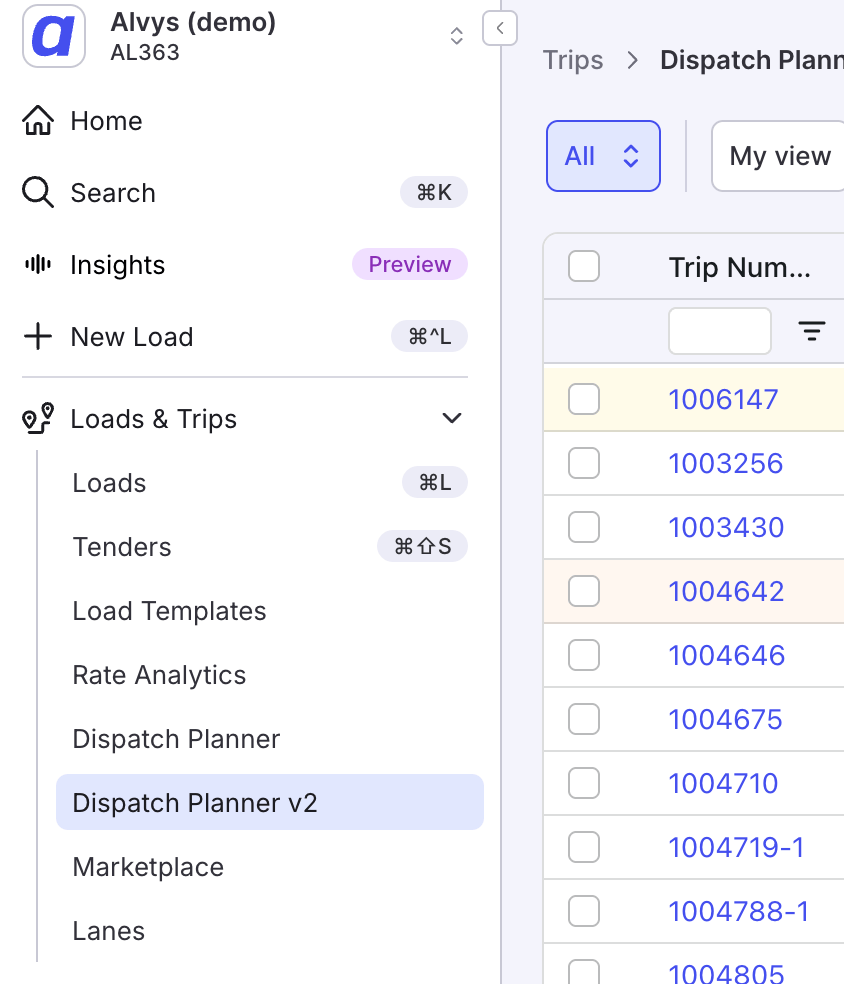 *The Loads and Trips left navigation menu expanded, showing the "Dispatch Planner v2" menu item highlighted.*
**Find and select the trip**
* In the trips grid, locate the load you want to dispatch. The trip must have a status of **Open** or **Covered** to be available for dispatch.
* Check the checkbox to the left of the trip row. When one or more rows are selected, action icons appear in the toolbar at the top right: **Unassign**, **Dispatcher**, **Priority**, **Find drivers**, and **Dispatch**.
* Click **Dispatch** in the toolbar. The trip advances to **Dispatched** status.
*The Loads and Trips left navigation menu expanded, showing the "Dispatch Planner v2" menu item highlighted.*
**Find and select the trip**
* In the trips grid, locate the load you want to dispatch. The trip must have a status of **Open** or **Covered** to be available for dispatch.
* Check the checkbox to the left of the trip row. When one or more rows are selected, action icons appear in the toolbar at the top right: **Unassign**, **Dispatcher**, **Priority**, **Find drivers**, and **Dispatch**.
* Click **Dispatch** in the toolbar. The trip advances to **Dispatched** status.
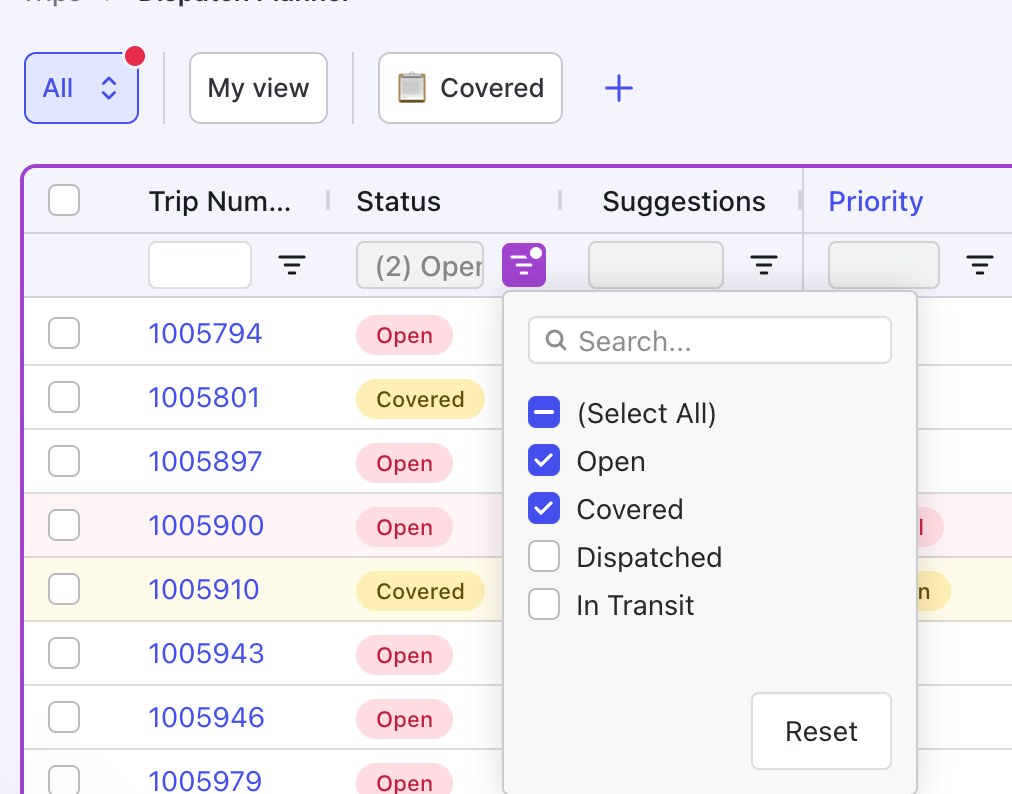 *The trips grid in Dispatch Planner v2 with an Open load row highlighted.*
### Load board
**Open the Load board module**
1. In the left navigation menu, select the Loads and Trips icon.
2. Click **Loads** from the menu options.
**Find the load or trip you want to dispatch**
1. In the Loads table, locate the load you want to dispatch. The load must have **Open** or **Covered** status in order to be dispatched.
2. Right-click the selected load or trip row to open the menu and choose **Manage Assets**.
### Load page
Also known as: load screen.
**Find the load in order to open the load page**
1. Use **Global Search** to find the item quickly from anywhere in the system.
2. Alternatively, open it directly from **Dispatch Planner v2**, the **Load board**, **Driver Settlements**, or any **Report**.
**Open the asset assignment panel**
* In the Carrier Details panel on the right side of the screen, click **Assign Carrier** or **Manage Assets** in the bottom left of that panel.
*The trips grid in Dispatch Planner v2 with an Open load row highlighted.*
### Load board
**Open the Load board module**
1. In the left navigation menu, select the Loads and Trips icon.
2. Click **Loads** from the menu options.
**Find the load or trip you want to dispatch**
1. In the Loads table, locate the load you want to dispatch. The load must have **Open** or **Covered** status in order to be dispatched.
2. Right-click the selected load or trip row to open the menu and choose **Manage Assets**.
### Load page
Also known as: load screen.
**Find the load in order to open the load page**
1. Use **Global Search** to find the item quickly from anywhere in the system.
2. Alternatively, open it directly from **Dispatch Planner v2**, the **Load board**, **Driver Settlements**, or any **Report**.
**Open the asset assignment panel**
* In the Carrier Details panel on the right side of the screen, click **Assign Carrier** or **Manage Assets** in the bottom left of that panel.
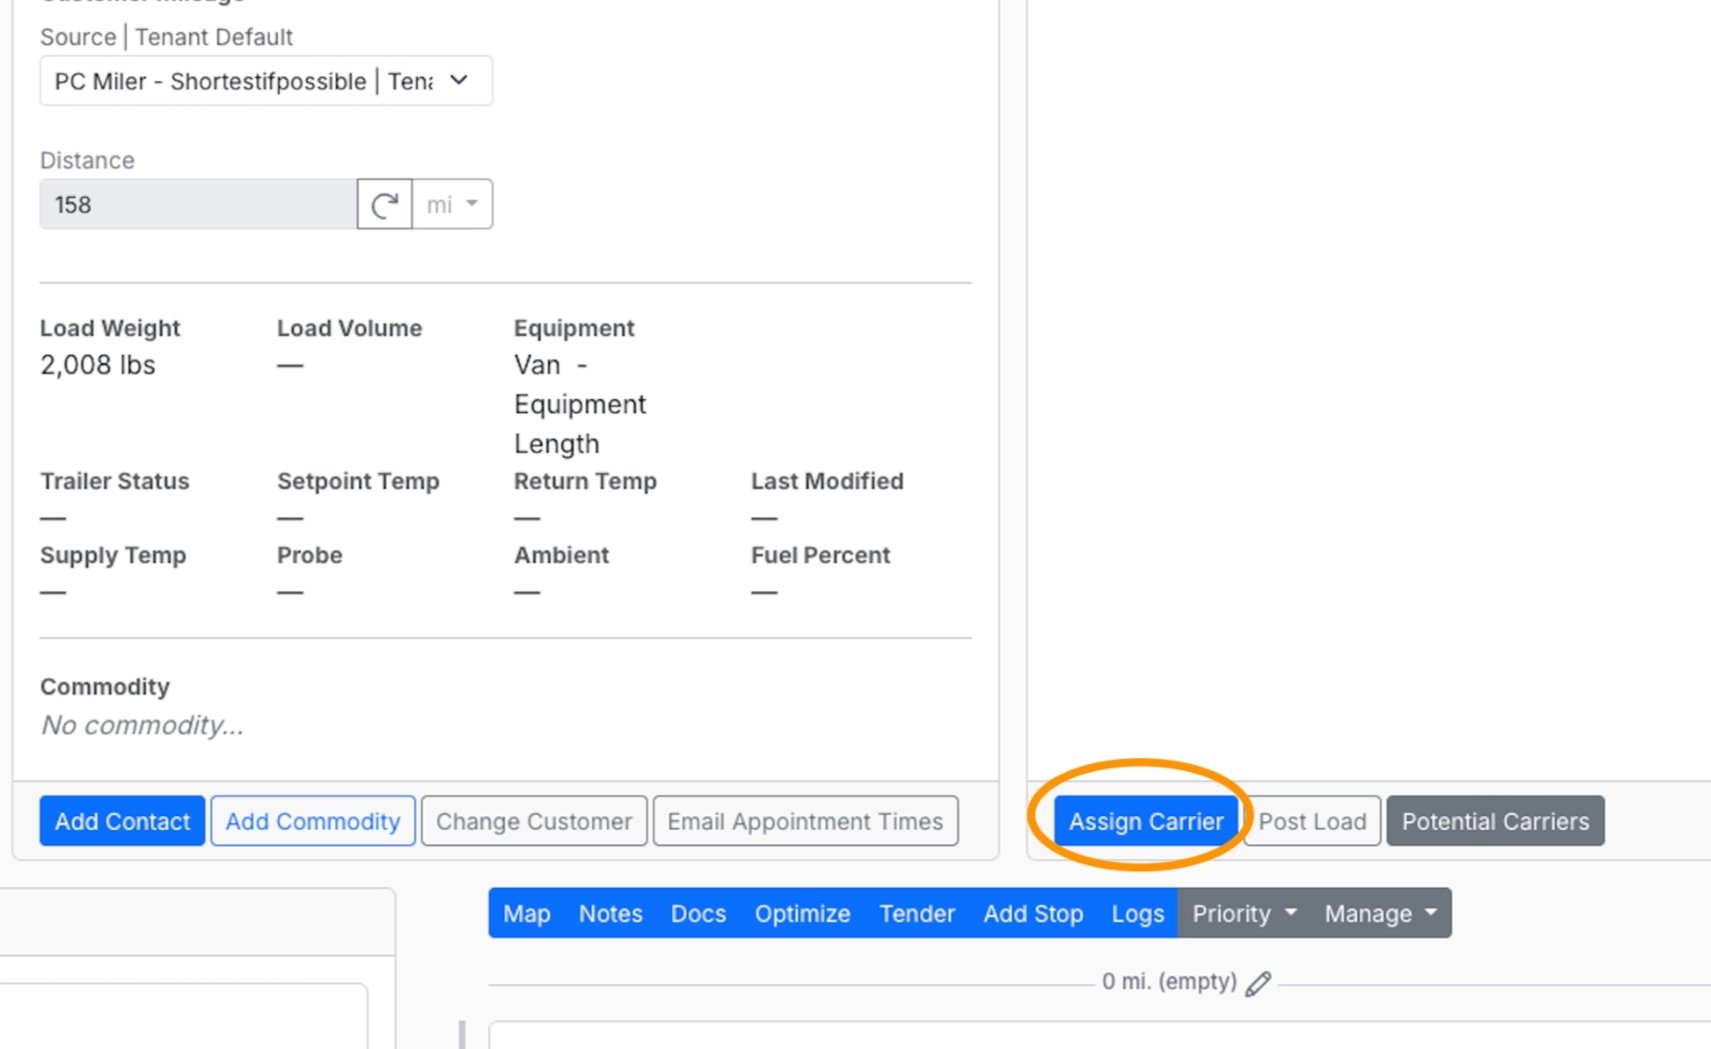 *The Carrier Details panel with the "Assign Carrier" button visible in the bottom left corner.*
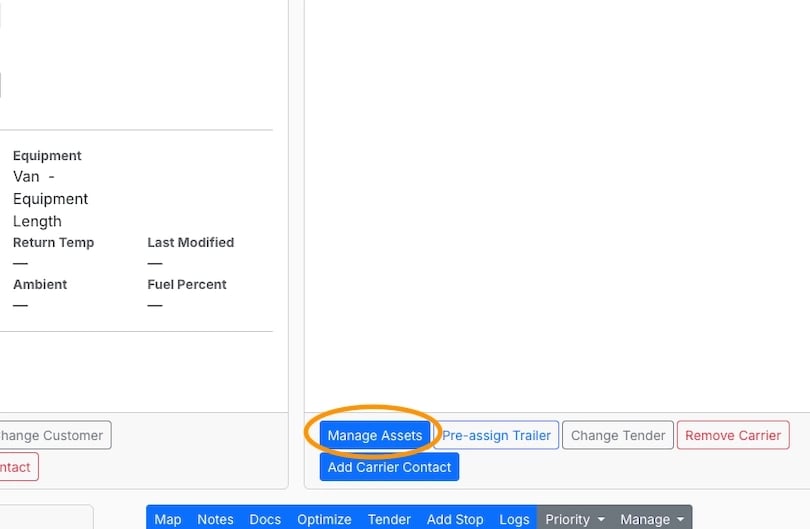 *The Carrier Details panel with the "Manage Assets" button visible in the bottom left corner.*
**Add the driver, truck, and trailer**
* In the asset assignment fields, select the driver for this trip.
* Select the truck.
* Select the trailer.
* Select the Dispatcher.
*The Carrier Details panel with the "Manage Assets" button visible in the bottom left corner.*
**Add the driver, truck, and trailer**
* In the asset assignment fields, select the driver for this trip.
* Select the truck.
* Select the trailer.
* Select the Dispatcher.
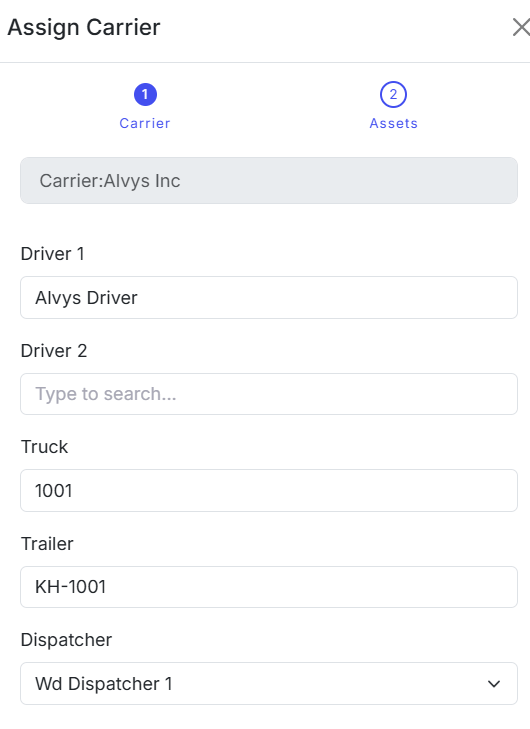 *The asset assignment fields showing the driver, truck, and trailer selection dropdowns populated.*
If no trailer is available for this trip, see Variations below for how to dispatch without a trailer.
**Assign and dispatch the trip**
* Click **Assign** to assign the assets to the trip. The trip advances to **Covered** status, and is not yet dispatched.
* Or click **Assign and Dispatch** to assign and dispatch the trip in a single step.
*The asset assignment fields showing the driver, truck, and trailer selection dropdowns populated.*
If no trailer is available for this trip, see Variations below for how to dispatch without a trailer.
**Assign and dispatch the trip**
* Click **Assign** to assign the assets to the trip. The trip advances to **Covered** status, and is not yet dispatched.
* Or click **Assign and Dispatch** to assign and dispatch the trip in a single step.
 *The Assign Carrier form showing the separate "Assign and Dispatch" and "Assign" buttons in the action area.*
## Result
After dispatching, the trip status updates to **Dispatched**. This status confirms that a driver and equipment have been assigned and the load is ready to move.
*The Assign Carrier form showing the separate "Assign and Dispatch" and "Assign" buttons in the action area.*
## Result
After dispatching, the trip status updates to **Dispatched**. This status confirms that a driver and equipment have been assigned and the load is ready to move.
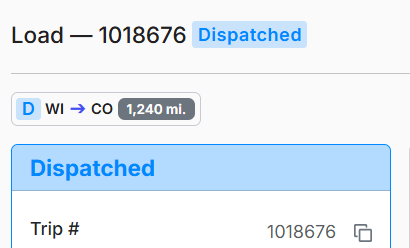 *The trip details page showing the dispatched load with "Dispatched" status.*
## Variations
### Dispatch using assignment preferences (assign and dispatch in one step)
When assignment preferences are configured for a driver or carrier, Alvys may display an assignment preferences suggestion modal when you open the trip. This modal offers two actions:
* **Assign:** assigns the suggested assets to the trip without dispatching. The trip advances to **Covered** status but is not yet dispatched.
* **Assign and dispatch:** assigns the suggested assets and dispatches the trip in a single step. The trip advances to **Dispatched** status immediately.
If assignment preferences are configured and a truck is paired with a driver, the truck auto-assigns when you select the driver. You do not need to select the truck separately.
### Dispatch without a trailer
If a trip does not require a trailer or no trailer is currently available:
1. Complete the steps above, leaving the trailer field empty.
2. Click **Assign and Dispatch** to assign and dispatch in a single step.
The trip can be dispatched without a trailer assigned. You can add the trailer to the trip later before the driver departs.
### Sequential Dispatch Enforcement
When Sequential Dispatch Enforcement is enabled for your tenant, Alvys blocks a dispatcher from assigning a driver or truck that already has a trip in **Dispatched** or **In Transit** status. A block message appears naming the conflicting driver or truck and the conflicting trip: the overlap must be resolved before the dispatch can proceed.
Sequential (back-to-back) trips are not affected. The block only fires when the earlier trip is still active. If the first trip is already **Delivered** before the second is dispatched, no conflict is raised.
**What is enforced:** Driver overlap and truck overlap. Both are controlled by a single toggle; there is no separate setting for each.
**What is not enforced:** Trailer overlap is not blocked. Trailers are commonly shared across trips (drop-and-hook operations), so trailer conflicts require manual review.
**To enable:** Navigate to **Tenant Settings > Sequential Dispatching** and turn the toggle on. The setting is off by default and only affects tenants who explicitly enable it.
## Troubleshooting
### Assign and Dispatch buttons are not available
1. Confirm that a driver and truck have been selected in the asset assignment fields. The dispatch action requires at least a driver and truck before it becomes available.
2. Confirm the trip is in **Open** or **Planned** status. Trips in other statuses may not support dispatch from this panel.
3. Check whether another user is editing the same trip simultaneously. If so, wait a moment and refresh the page.
4. If none of the above apply, contact Alvys support with the trip ID and a description of what you are seeing.
### Load does not appear in the trips grid
1. Check whether any column filters are active in the trips grid. Active filters may be hiding trips: clear all filters and check again.
2. Confirm the trip's current status. Trips in statuses other than **Open** or **Planned** may be filtered out of the default grid view.
3. Confirm you are in the correct view within Dispatch Planner v2 and that the correct date range is selected.
4. If the trip still does not appear, contact Alvys support with the load number and the status you expect the trip to be in.
### Trip status did not update after dispatching
1. Refresh the page. Status updates occasionally require a page refresh to display.
2. Confirm you clicked **Dispatch** (not just **Assign**) in the standard flow, or **Assign and dispatch** in the preference dialog flow. Clicking **Assign** alone advances the trip to **Covered** status but does not advance it to **Dispatched** status.
3. Check for any error notification that appeared when you clicked. An error indicates the action did not complete.
4. If the status is still incorrect after refreshing and confirming the correct button was used, contact Alvys support with the trip ID.
### Load belongs to a Brokerage subsidiary and does not appear
Dispatch Planner v2 shows trips for **Carrier** subsidiaries only. Loads created under a **Brokerage** subsidiary, where your company acts as a broker and tenders the load to an external carrier, do not appear in the Dispatch Planner v2 trips grid, but may still be visible on the Loads/Trips board. To assign a carrier and advance the status on a brokerage load, open the load from the Loads/Trips board or the load page, and use the **Manage Assets** dropdown on the load record.
## FAQs
**Q: What is the difference between Assign and Assign and dispatch?**
**A:** **Assign** adds a driver and equipment to the trip and advances it to **Covered** status, but does not dispatch it. **Assign and dispatch** (available in the preference dialog flow) assigns assets and advances the trip to **Dispatched** status in a single step. In the standard flow, you click **Assign** first (trip moves to **Covered**) and then **Dispatch** separately (trip moves to **Dispatched**) to achieve the same result.
**Q: How do I undispatch a load, or change the driver after dispatching?**
**A:** You do not need to cancel the load or revert the dispatch. Alvys lets you reassign the driver, truck, or trailer directly on a dispatched trip without changing its status or load number. To reassign assets after dispatching: open the trip in **Dispatch Planner v2** or from the load page, click **Manage Assets**, update the driver, truck, or trailer fields as needed, then click **Assign and Dispatch** to save. The trip remains in **Dispatched** status and the load number is preserved throughout.
**Q: Can I assign a driver directly from the load screen?**
**A:** Yes. The load screen (also called the load page) supports driver and asset assignment directly. Open the load from the Loads/Trips board, Global Search, or any report, then click **Assign Carrier** or **Manage Assets** in the Carrier Details panel to assign or update the driver, truck, and trailer. See the **Load page** section above for the full steps.
**Q: Is a special role required to dispatch?**
**A:** No special role is required. All authenticated Alvys users have access to Dispatch Planner v2 and can dispatch loads.
**Q: What if the driver or truck is already assigned to another active trip?**
**A:** This depends on whether **Sequential Dispatching** is enabled for your tenant. If it is enabled, Alvys blocks the dispatch and displays a message naming the conflicting driver or truck and the conflicting trip; you must resolve the overlap before proceeding. The block applies when the driver or truck already has a trip in **Dispatched** or **In Transit** status. Sequential (back-to-back) trips where the first is fully delivered before the second is dispatched are not affected. If Sequential Dispatching is not enabled for your tenant, Alvys completes the assignment without an alert, so always check the driver's and truck's schedules manually before assigning to avoid unintended double-booking. The setting is managed under **Tenant Settings > Sequential Dispatching**.
## Go Deeper
* [Dispatch Planner overview](/en/help/loads-trips/dispatch-planner)
* [How to Use Bulk Actions in Dispatch Planner](/en/help/loads-trips/how-to-use-bulk-actions-in-dispatch-planner)
*The trip details page showing the dispatched load with "Dispatched" status.*
## Variations
### Dispatch using assignment preferences (assign and dispatch in one step)
When assignment preferences are configured for a driver or carrier, Alvys may display an assignment preferences suggestion modal when you open the trip. This modal offers two actions:
* **Assign:** assigns the suggested assets to the trip without dispatching. The trip advances to **Covered** status but is not yet dispatched.
* **Assign and dispatch:** assigns the suggested assets and dispatches the trip in a single step. The trip advances to **Dispatched** status immediately.
If assignment preferences are configured and a truck is paired with a driver, the truck auto-assigns when you select the driver. You do not need to select the truck separately.
### Dispatch without a trailer
If a trip does not require a trailer or no trailer is currently available:
1. Complete the steps above, leaving the trailer field empty.
2. Click **Assign and Dispatch** to assign and dispatch in a single step.
The trip can be dispatched without a trailer assigned. You can add the trailer to the trip later before the driver departs.
### Sequential Dispatch Enforcement
When Sequential Dispatch Enforcement is enabled for your tenant, Alvys blocks a dispatcher from assigning a driver or truck that already has a trip in **Dispatched** or **In Transit** status. A block message appears naming the conflicting driver or truck and the conflicting trip: the overlap must be resolved before the dispatch can proceed.
Sequential (back-to-back) trips are not affected. The block only fires when the earlier trip is still active. If the first trip is already **Delivered** before the second is dispatched, no conflict is raised.
**What is enforced:** Driver overlap and truck overlap. Both are controlled by a single toggle; there is no separate setting for each.
**What is not enforced:** Trailer overlap is not blocked. Trailers are commonly shared across trips (drop-and-hook operations), so trailer conflicts require manual review.
**To enable:** Navigate to **Tenant Settings > Sequential Dispatching** and turn the toggle on. The setting is off by default and only affects tenants who explicitly enable it.
## Troubleshooting
### Assign and Dispatch buttons are not available
1. Confirm that a driver and truck have been selected in the asset assignment fields. The dispatch action requires at least a driver and truck before it becomes available.
2. Confirm the trip is in **Open** or **Planned** status. Trips in other statuses may not support dispatch from this panel.
3. Check whether another user is editing the same trip simultaneously. If so, wait a moment and refresh the page.
4. If none of the above apply, contact Alvys support with the trip ID and a description of what you are seeing.
### Load does not appear in the trips grid
1. Check whether any column filters are active in the trips grid. Active filters may be hiding trips: clear all filters and check again.
2. Confirm the trip's current status. Trips in statuses other than **Open** or **Planned** may be filtered out of the default grid view.
3. Confirm you are in the correct view within Dispatch Planner v2 and that the correct date range is selected.
4. If the trip still does not appear, contact Alvys support with the load number and the status you expect the trip to be in.
### Trip status did not update after dispatching
1. Refresh the page. Status updates occasionally require a page refresh to display.
2. Confirm you clicked **Dispatch** (not just **Assign**) in the standard flow, or **Assign and dispatch** in the preference dialog flow. Clicking **Assign** alone advances the trip to **Covered** status but does not advance it to **Dispatched** status.
3. Check for any error notification that appeared when you clicked. An error indicates the action did not complete.
4. If the status is still incorrect after refreshing and confirming the correct button was used, contact Alvys support with the trip ID.
### Load belongs to a Brokerage subsidiary and does not appear
Dispatch Planner v2 shows trips for **Carrier** subsidiaries only. Loads created under a **Brokerage** subsidiary, where your company acts as a broker and tenders the load to an external carrier, do not appear in the Dispatch Planner v2 trips grid, but may still be visible on the Loads/Trips board. To assign a carrier and advance the status on a brokerage load, open the load from the Loads/Trips board or the load page, and use the **Manage Assets** dropdown on the load record.
## FAQs
**Q: What is the difference between Assign and Assign and dispatch?**
**A:** **Assign** adds a driver and equipment to the trip and advances it to **Covered** status, but does not dispatch it. **Assign and dispatch** (available in the preference dialog flow) assigns assets and advances the trip to **Dispatched** status in a single step. In the standard flow, you click **Assign** first (trip moves to **Covered**) and then **Dispatch** separately (trip moves to **Dispatched**) to achieve the same result.
**Q: How do I undispatch a load, or change the driver after dispatching?**
**A:** You do not need to cancel the load or revert the dispatch. Alvys lets you reassign the driver, truck, or trailer directly on a dispatched trip without changing its status or load number. To reassign assets after dispatching: open the trip in **Dispatch Planner v2** or from the load page, click **Manage Assets**, update the driver, truck, or trailer fields as needed, then click **Assign and Dispatch** to save. The trip remains in **Dispatched** status and the load number is preserved throughout.
**Q: Can I assign a driver directly from the load screen?**
**A:** Yes. The load screen (also called the load page) supports driver and asset assignment directly. Open the load from the Loads/Trips board, Global Search, or any report, then click **Assign Carrier** or **Manage Assets** in the Carrier Details panel to assign or update the driver, truck, and trailer. See the **Load page** section above for the full steps.
**Q: Is a special role required to dispatch?**
**A:** No special role is required. All authenticated Alvys users have access to Dispatch Planner v2 and can dispatch loads.
**Q: What if the driver or truck is already assigned to another active trip?**
**A:** This depends on whether **Sequential Dispatching** is enabled for your tenant. If it is enabled, Alvys blocks the dispatch and displays a message naming the conflicting driver or truck and the conflicting trip; you must resolve the overlap before proceeding. The block applies when the driver or truck already has a trip in **Dispatched** or **In Transit** status. Sequential (back-to-back) trips where the first is fully delivered before the second is dispatched are not affected. If Sequential Dispatching is not enabled for your tenant, Alvys completes the assignment without an alert, so always check the driver's and truck's schedules manually before assigning to avoid unintended double-booking. The setting is managed under **Tenant Settings > Sequential Dispatching**.
## Go Deeper
* [Dispatch Planner overview](/en/help/loads-trips/dispatch-planner)
* [How to Use Bulk Actions in Dispatch Planner](/en/help/loads-trips/how-to-use-bulk-actions-in-dispatch-planner)