> ## Documentation Index
> Fetch the complete documentation index at: https://docs.alvys.com/llms.txt
> Use this file to discover all available pages before exploring further.
# How to Add a Custom Domain to Alvys
> Send Alvys email from your own company domain by adding the domain, creating CNAME records at your registrar, and validating it in Management > Email.
📋 **Applies to:** All users
**Module:** Management > Email
Adding a custom domain to Alvys (also called a sending domain or branded email domain) allows you to send emails from your own company domain instead of a default Alvys address.
## Overview
Adding a custom domain to Alvys (also called a sending domain or branded email domain) allows you to send emails from your own company domain instead of a default address. A custom domain lets you send emails from an address at your own company domain, such as [dispatch@mycompany.com](mailto:dispatch@mycompany.com), rather than from a generic Alvys address. This supports your branding and may improve email deliverability.
Setting up a custom domain requires two things: adding the domain in Alvys to generate the required DNS records, and then adding those records at your domain registrar (such as GoDaddy, Google Domains, or [Domain.com](http://domain.com/)).
## Before You Start
Before you begin, confirm the following:
* You have access to your company's domain registrar account (the service where your domain is registered, such as GoDaddy, Google Domains, or [Domain.com](http://domain.com/)).
* You are logged in to Alvys.
* No specific permission beyond being a logged-in Alvys user is required to add a custom domain.
## Steps
### Step 1: Add the domain in Alvys
1. Click your profile in the bottom-left corner of the screen.
2. Select the **Email** option from the menu.
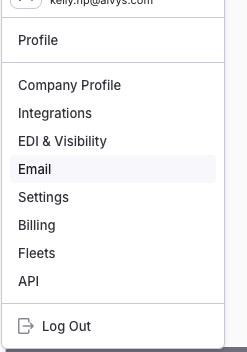 *Screenshot showing the profile menu in the bottom left corner with the Email option highlighted.*
3. Click the **ADD DOMAIN** button.
*Screenshot showing the profile menu in the bottom left corner with the Email option highlighted.*
3. Click the **ADD DOMAIN** button.
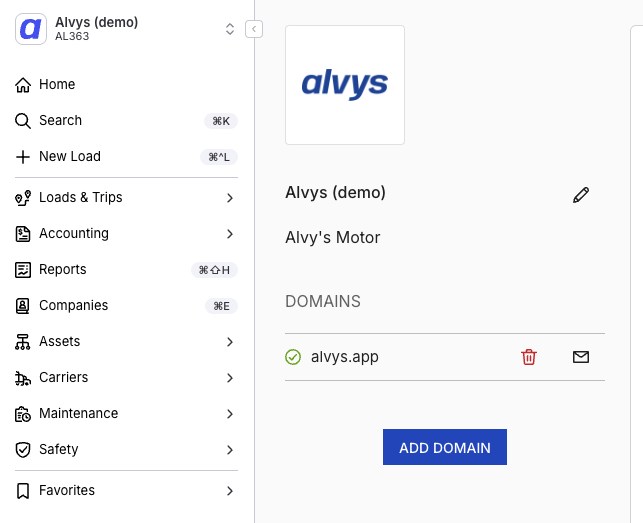 *Screenshot showing the Domains Management screen with the ADD DOMAIN button visible.*
4. Enter your domain name, for example [mycompany.com](http://mycompany.com/).
5. Click **ADD DOMAIN** to confirm. After adding the domain, Alvys displays the CNAME records you need to add at your domain registrar.
*Screenshot showing the Domains Management screen with the ADD DOMAIN button visible.*
4. Enter your domain name, for example [mycompany.com](http://mycompany.com/).
5. Click **ADD DOMAIN** to confirm. After adding the domain, Alvys displays the CNAME records you need to add at your domain registrar.
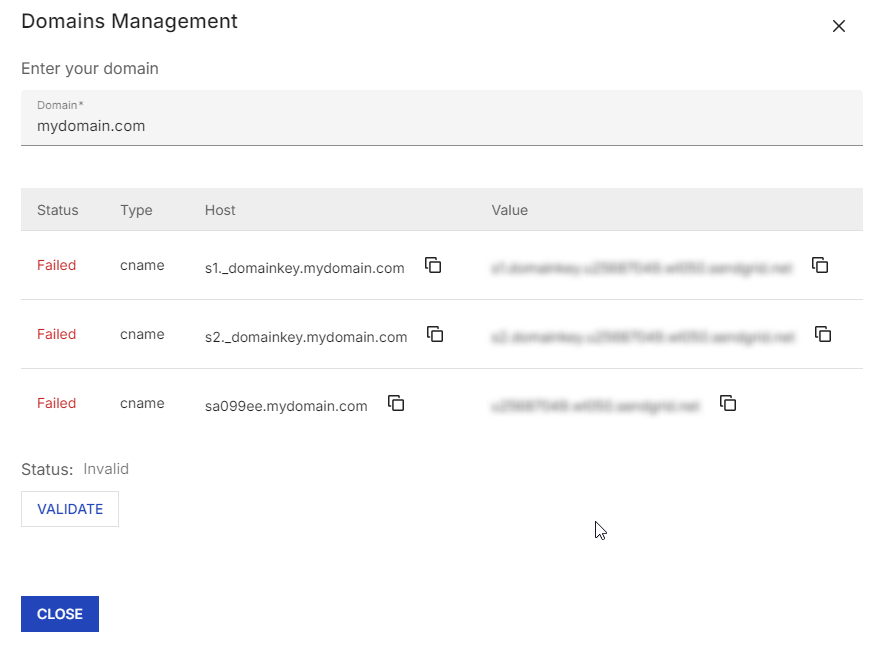 *Screenshot showing the CNAME records provided by Alvys after a domain is added.*
## Step 2: Access Your Domain Registrar
You'll now configure your DNS settings. Log into your domain registrar's management portal (e.g., GoDaddy, Google Domains, or [Domain.com](http://domain.com/)).
## How to Find DNS Settings in Popular Registrars:
* **GoDaddy**: Go to **My Products** > **DNS**.
* **Google Domains**: Go to **My Domains** > **DNS Settings**.
* [**Domain.com**](http://domain.com/): Navigate to **Domain Management** > **DNS**.
💡 For registrar-specific instructions, a simple Google search like "configure DNS CNAME records \[Registrar Name]" can be helpful.
## Step 3: Add CNAME Records
Once you're in your registrar's DNS settings, add the CNAME records provided by Alvys:
1. Look for an option like **Custom DNS Records** or **DNS Management**.
2. For each CNAME record, add the following:
* **Type**: CNAME
* **Host**: This will be the subdomain portion (e.g., `s1._`[`domainkey.alvys.com`](http://domainkey.alvys.com/)).
* **Value**: This is the value provided by Alvys, pointing back to our servers.
3. Save the records.
⚠️For Squarespace users (and legacy Google Domains), please only copy `s1._domainkey` instead of the full host address for all three records. The value can be left as is.
## Step 4: Validate the Domain in Alvys
After configuring the DNS records, return to Alvys and do the following:
1. Navigate back to **Domains Management**.
2. Click **Validate**.
* If your records are set up correctly, the status will update to **Valid**.
* If it doesn’t, wait a few minutes (up to 48 hours for DNS propagation) and try again.
* You may need to refresh the popup for updated status.
## 🌐 Understanding DNS Propagation Time
DNS changes may take time to propagate across the internet. Although most updates are processed within a few minutes to a couple of hours, it can take up to 48 hours in some cases.
## Common Signs of Propagation Issues:
* The domain status does not validate within Alvys after several attempts.
* The CNAME records aren’t reflecting as expected within your DNS checker.
If you're experiencing delays in validation, it’s most likely due to DNS propagation.
**Tip**: Use DNS lookup tools like [DNSChecker](https://dnschecker.org/) to verify if the CNAME records have propagated globally. Simply enter your domain and check whether your DNS settings have taken effect.
By following this guide, you can successfully add and validate your domain in Alvys. If you encounter any issues, don't hesitate to reach out to our support team at [support@alvys.com](mailto:support@alvys.com)
*Screenshot showing the CNAME records provided by Alvys after a domain is added.*
## Step 2: Access Your Domain Registrar
You'll now configure your DNS settings. Log into your domain registrar's management portal (e.g., GoDaddy, Google Domains, or [Domain.com](http://domain.com/)).
## How to Find DNS Settings in Popular Registrars:
* **GoDaddy**: Go to **My Products** > **DNS**.
* **Google Domains**: Go to **My Domains** > **DNS Settings**.
* [**Domain.com**](http://domain.com/): Navigate to **Domain Management** > **DNS**.
💡 For registrar-specific instructions, a simple Google search like "configure DNS CNAME records \[Registrar Name]" can be helpful.
## Step 3: Add CNAME Records
Once you're in your registrar's DNS settings, add the CNAME records provided by Alvys:
1. Look for an option like **Custom DNS Records** or **DNS Management**.
2. For each CNAME record, add the following:
* **Type**: CNAME
* **Host**: This will be the subdomain portion (e.g., `s1._`[`domainkey.alvys.com`](http://domainkey.alvys.com/)).
* **Value**: This is the value provided by Alvys, pointing back to our servers.
3. Save the records.
⚠️For Squarespace users (and legacy Google Domains), please only copy `s1._domainkey` instead of the full host address for all three records. The value can be left as is.
## Step 4: Validate the Domain in Alvys
After configuring the DNS records, return to Alvys and do the following:
1. Navigate back to **Domains Management**.
2. Click **Validate**.
* If your records are set up correctly, the status will update to **Valid**.
* If it doesn’t, wait a few minutes (up to 48 hours for DNS propagation) and try again.
* You may need to refresh the popup for updated status.
## 🌐 Understanding DNS Propagation Time
DNS changes may take time to propagate across the internet. Although most updates are processed within a few minutes to a couple of hours, it can take up to 48 hours in some cases.
## Common Signs of Propagation Issues:
* The domain status does not validate within Alvys after several attempts.
* The CNAME records aren’t reflecting as expected within your DNS checker.
If you're experiencing delays in validation, it’s most likely due to DNS propagation.
**Tip**: Use DNS lookup tools like [DNSChecker](https://dnschecker.org/) to verify if the CNAME records have propagated globally. Simply enter your domain and check whether your DNS settings have taken effect.
By following this guide, you can successfully add and validate your domain in Alvys. If you encounter any issues, don't hesitate to reach out to our support team at [support@alvys.com](mailto:support@alvys.com)