> ## Documentation Index
> Fetch the complete documentation index at: https://docs.alvys.com/llms.txt
> Use this file to discover all available pages before exploring further.
# QuickBooks Online: Connect & configure
> Authorize the OAuth connection to QuickBooks Online in Alvys and configure sync settings for invoices, bills, driver pay, and QBO class or location mapping.
This article walks through authorizing the OAuth connection between Alvys and QuickBooks Online, then configuring sync settings for revenue, expenses, driver bills, carrier invoice requirements, and subsidiary or fleet mapping to QBO classes or locations.
## What This Integration Does
Alvys connects to QuickBooks Online (QBO, Intuit QuickBooks) via OAuth 2.0, which means you authenticate (sign in and authorize) through Intuit's login portal and Alvys receives a secure token; no passwords are stored in Alvys. Once connected, Alvys automatically exports, syncs, and pushes customer invoices and carrier or vendor bills when loads are processed for billing. When payments are recorded in QBO, QBO sends the payment status back to Alvys.
## Prerequisites
Before connecting, complete all steps in [QuickBooks Online Prerequisites (Start Here)](/help/integrations/quickbooks-online-prerequisites):
* Confirm your QBO subscription is Essentials, Plus, or Advanced.
* Verify that your Chart of Accounts includes accounts for Accounts Receivable, Accounts Payable, income, and expenses.
* Enable Custom transaction numbers in QBO at Settings > Account and Settings > Sales > Sales form content if you want QBO invoices to use Alvys load numbers.
* Confirm there are no closed accounting periods that would cover the dates of loads you plan to export.
## Connect / Authenticate
* **Open the Integrations page.** Navigate to Management > Integrations in Alvys and locate the QuickBooks Online tile.
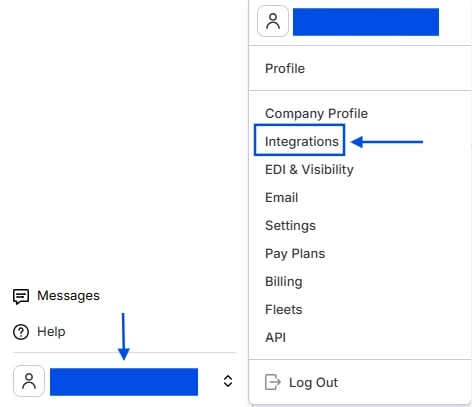 *Management menu with Integrations highlighted*
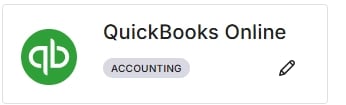 \*QuickBooks Online Tile under the accounting section of the Integrations List. \*
* **Initiate the connection.** Click **Connect** on the QuickBooks Online tile. Alvys redirects you to the Intuit authorization page.
* **Sign in and authorize.** Sign in with your QBO credentials and click **Connect**. Once authorized, Intuit redirects you back to Alvys and the connection status shows as connected.
* **Select the QBO company file.** If your Intuit account has access to more than one QBO company file, select the correct one from the dropdown. Only one company file can be connected per Alvys legal entity.
\*QuickBooks Online Tile under the accounting section of the Integrations List. \*
* **Initiate the connection.** Click **Connect** on the QuickBooks Online tile. Alvys redirects you to the Intuit authorization page.
* **Sign in and authorize.** Sign in with your QBO credentials and click **Connect**. Once authorized, Intuit redirects you back to Alvys and the connection status shows as connected.
* **Select the QBO company file.** If your Intuit account has access to more than one QBO company file, select the correct one from the dropdown. Only one company file can be connected per Alvys legal entity.
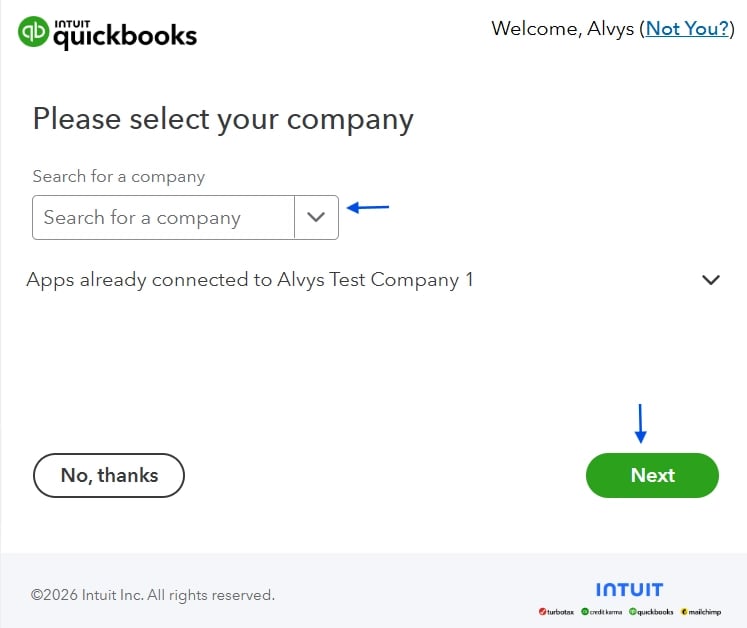 *Intuit authorization page after clicking Connect.*
## Field & Data Mapping
After connecting, configure the sync settings. Each section below maps Alvys data to the corresponding QBO field or behavior.
*Intuit authorization page after clicking Connect.*
## Field & Data Mapping
After connecting, configure the sync settings. Each section below maps Alvys data to the corresponding QBO field or behavior.
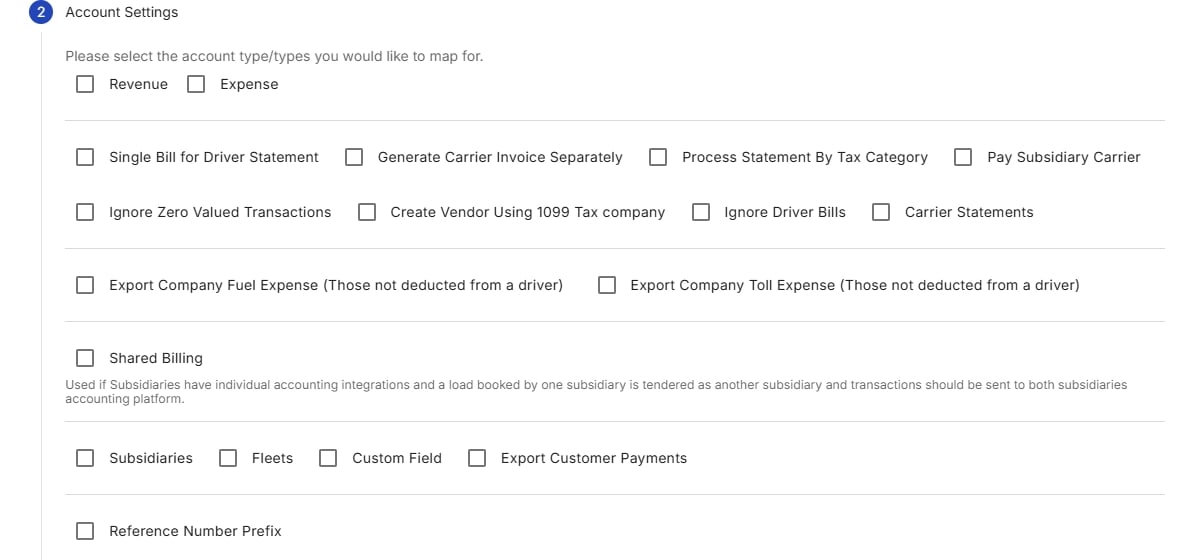 *QuickBooks Online Account Settings dialogue in Alvys integrations page*
### Transactions Type
There are two transaction types available for synchronization:
1. **Revenue** This option determines whether revenue transactions are synchronized with QBO. When enabled, income related financial data such as customer invoices will be exported to QBO.
2. **Expense** This option determines whether expense transactions are synchronized with QBO. When enabled, cost related financial data such as driver pay and carrier bills will be exported to QBO.
💡 Your selection here takes precedence over all other configuration settings. These options determine the type of financial data that will be integrated. Enable only the options you intend to export to QBO. Once selected, additional settings are available to further control how transactions are exported.
### Ignore Driver Bills
This setting allows users to prevent the export of all driver bills, including company drivers and owner operators, to QuickBooks Online (QBO). When enabled, bills associated with drivers will not be exported, giving users greater control over which transactions are sent to external accounting systems. This option is commonly enabled when driver pay is managed outside of QBO, such as through a payroll system or a separate driver settlement solution. Please note that even when this setting is enabled, external carrier bills, subsidiary carrier bills, and company expenses such as fuel and tolls may still be exported if those options are configured.
### Single Bill for Driver Statement
This setting controls how driver bills for company drivers and owner operators are exported to QuickBooks Online (QBO). It is used to consolidate all charges and transactions related to a driver, including trips, fuel, tolls, and other expenses, into a single bill per driver statement.
When this setting is enabled and a driver paystub or statement is generated, a **single bill** is exported to QuickBooks Online for the **total net amount** of the paystub. All components of driver pay are consolidated into this bill, including trip pay, accessorials, deductions, credits, reimbursements, and any other adjustments. Each component appears as a **separate line item** on the bill, providing detailed visibility while keeping the accounting export grouped into one transaction. This option is commonly used when driver pay is processed on a scheduled basis, such as weekly or biweekly payroll cycles.
When this setting is disabled, generating a customer invoice will also export the driver bill for the individual trip. Each trip or delivery is exported as a separate bill. When a paystub is generated, multiple bills are exported for each transaction type on the paystub, including separate bills for credits, deductions/reimbursements.
### Generate Carrier Invoice Separately
This setting applies to brokerage-type trips where an external carrier and its assets are assigned to a load. When enabled, the system checks for an uploaded carrier invoice before exporting the carrier bill to QuickBooks Online (QBO). Specifically, when a brokerage trip is delivered or released and the user uploads a document of the type carrier invoice, the system will export the carrier bill to QBO. This can also be triggered when a user generates the customer invoice for a load; the system will verify that a carrier invoice has been uploaded, and if no carrier invoice is found, the carrier bill will not be exported to QBO. This setting should only be enabled when carrier invoices are required as part of the workflow prior to exporting external carrier bills for payment.
If this setting is disabled, generating the customer invoice for a trip with an external carrier will automatically export the carrier bill to QuickBooks Online, even if the carrier invoice has not been uploaded.
💡 If this setting was previously enabled but no carrier invoice document was uploaded, the carrier bill was not created and therefore was not exported to QuickBooks Online. To resolve this, upload a document of type Carrier Invoice to the trip, then select Regenerate Invoice. This will create the carrier bill and initiate its export to QuickBooks Online.
### Process Statement by Tax Category
When enabled, only bills for 1099 drivers are exported to QuickBooks Online (QBO). Bills for W-2 drivers are excluded, allowing users to manage W-2 driver payments in a separate payroll system.
When disabled, bills for both W-2 and 1099 drivers are exported to QBO.
This setting is typically enabled by tenants that handle W-2 driver compensation outside of QBO and want to prevent those bills from being sent to QBO while still exporting 1099 driver expenses.
*QuickBooks Online Account Settings dialogue in Alvys integrations page*
### Transactions Type
There are two transaction types available for synchronization:
1. **Revenue** This option determines whether revenue transactions are synchronized with QBO. When enabled, income related financial data such as customer invoices will be exported to QBO.
2. **Expense** This option determines whether expense transactions are synchronized with QBO. When enabled, cost related financial data such as driver pay and carrier bills will be exported to QBO.
💡 Your selection here takes precedence over all other configuration settings. These options determine the type of financial data that will be integrated. Enable only the options you intend to export to QBO. Once selected, additional settings are available to further control how transactions are exported.
### Ignore Driver Bills
This setting allows users to prevent the export of all driver bills, including company drivers and owner operators, to QuickBooks Online (QBO). When enabled, bills associated with drivers will not be exported, giving users greater control over which transactions are sent to external accounting systems. This option is commonly enabled when driver pay is managed outside of QBO, such as through a payroll system or a separate driver settlement solution. Please note that even when this setting is enabled, external carrier bills, subsidiary carrier bills, and company expenses such as fuel and tolls may still be exported if those options are configured.
### Single Bill for Driver Statement
This setting controls how driver bills for company drivers and owner operators are exported to QuickBooks Online (QBO). It is used to consolidate all charges and transactions related to a driver, including trips, fuel, tolls, and other expenses, into a single bill per driver statement.
When this setting is enabled and a driver paystub or statement is generated, a **single bill** is exported to QuickBooks Online for the **total net amount** of the paystub. All components of driver pay are consolidated into this bill, including trip pay, accessorials, deductions, credits, reimbursements, and any other adjustments. Each component appears as a **separate line item** on the bill, providing detailed visibility while keeping the accounting export grouped into one transaction. This option is commonly used when driver pay is processed on a scheduled basis, such as weekly or biweekly payroll cycles.
When this setting is disabled, generating a customer invoice will also export the driver bill for the individual trip. Each trip or delivery is exported as a separate bill. When a paystub is generated, multiple bills are exported for each transaction type on the paystub, including separate bills for credits, deductions/reimbursements.
### Generate Carrier Invoice Separately
This setting applies to brokerage-type trips where an external carrier and its assets are assigned to a load. When enabled, the system checks for an uploaded carrier invoice before exporting the carrier bill to QuickBooks Online (QBO). Specifically, when a brokerage trip is delivered or released and the user uploads a document of the type carrier invoice, the system will export the carrier bill to QBO. This can also be triggered when a user generates the customer invoice for a load; the system will verify that a carrier invoice has been uploaded, and if no carrier invoice is found, the carrier bill will not be exported to QBO. This setting should only be enabled when carrier invoices are required as part of the workflow prior to exporting external carrier bills for payment.
If this setting is disabled, generating the customer invoice for a trip with an external carrier will automatically export the carrier bill to QuickBooks Online, even if the carrier invoice has not been uploaded.
💡 If this setting was previously enabled but no carrier invoice document was uploaded, the carrier bill was not created and therefore was not exported to QuickBooks Online. To resolve this, upload a document of type Carrier Invoice to the trip, then select Regenerate Invoice. This will create the carrier bill and initiate its export to QuickBooks Online.
### Process Statement by Tax Category
When enabled, only bills for 1099 drivers are exported to QuickBooks Online (QBO). Bills for W-2 drivers are excluded, allowing users to manage W-2 driver payments in a separate payroll system.
When disabled, bills for both W-2 and 1099 drivers are exported to QBO.
This setting is typically enabled by tenants that handle W-2 driver compensation outside of QBO and want to prevent those bills from being sent to QBO while still exporting 1099 driver expenses.
 *Image showing the Tax Category on driver profile.*
⚠️ Some settings must be used together, while others should not be enabled at the same time. Refer to the **Configuration Dependencies and Incompatible Settings** section for guidance.
### Pay Subsidiary Carrier
This setting applies to trips involving a subsidiary carrier (i.e., a carrier operating under a subsidiary of the main company) that is assigned alongside the tenant’s internal assets. By default, when a driver statement is generated and assuming the Single Bill for Driver Statement setting is enabled, a bill is exported for the tenant’s driver on the trip.
When Pay Subsidiary Carrier is enabled, this behavior changes: instead of exporting a bill for the driver when a paystub is generated, the system exports a bill for the subsidiary carrier when the load invoice is generated.
⚠️ Certain settings are mutually exclusive and should not be enabled at the same time. The Pay Subsidiary Carrier setting should not be configured together with the Single Bill for Driver Statement setting. Refer to the \*\*Configuration Dependencies and Incompatible Settings \*\*section for guidance.
### Ignore Zero Valued Transactions
When enabled, this setting excludes invoices and bills with a **total financial value of zero**, meaning transactions that have no overall impact on the accounts will not be exported.
*Image showing the Tax Category on driver profile.*
⚠️ Some settings must be used together, while others should not be enabled at the same time. Refer to the **Configuration Dependencies and Incompatible Settings** section for guidance.
### Pay Subsidiary Carrier
This setting applies to trips involving a subsidiary carrier (i.e., a carrier operating under a subsidiary of the main company) that is assigned alongside the tenant’s internal assets. By default, when a driver statement is generated and assuming the Single Bill for Driver Statement setting is enabled, a bill is exported for the tenant’s driver on the trip.
When Pay Subsidiary Carrier is enabled, this behavior changes: instead of exporting a bill for the driver when a paystub is generated, the system exports a bill for the subsidiary carrier when the load invoice is generated.
⚠️ Certain settings are mutually exclusive and should not be enabled at the same time. The Pay Subsidiary Carrier setting should not be configured together with the Single Bill for Driver Statement setting. Refer to the \*\*Configuration Dependencies and Incompatible Settings \*\*section for guidance.
### Ignore Zero Valued Transactions
When enabled, this setting excludes invoices and bills with a **total financial value of zero**, meaning transactions that have no overall impact on the accounts will not be exported.
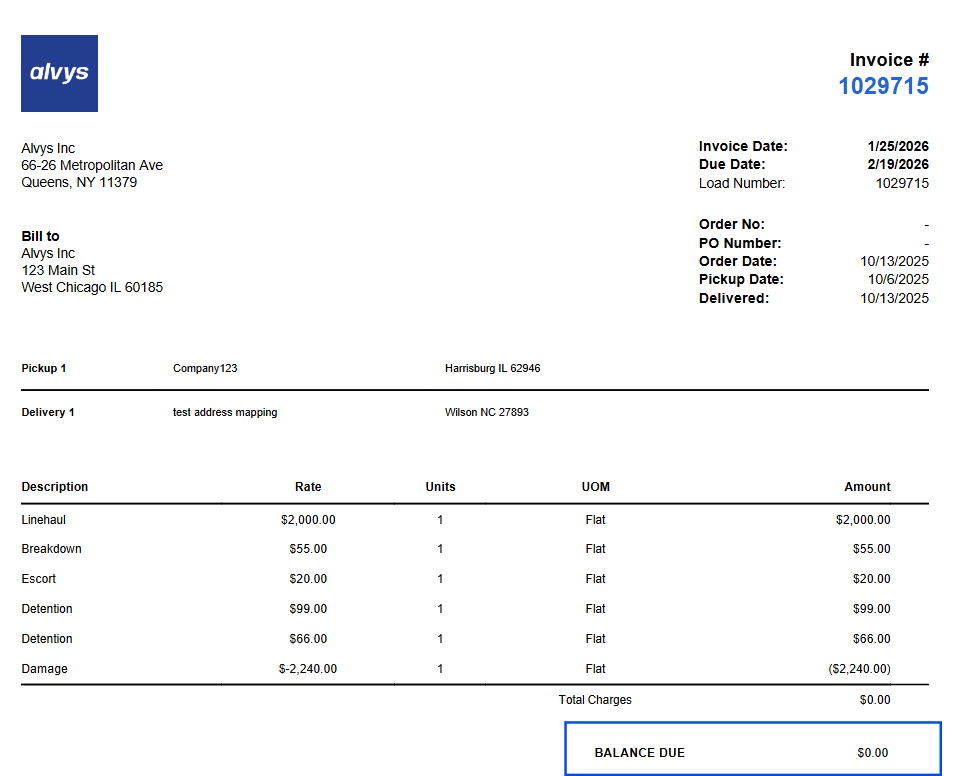 *Image showing sample Alvys Invoice with total billable of \$0*
### Create Vendor Using 1099 Tax Company
The **“Create Vendor Using 1099 Tax Company”** setting allows users to determine whether vendors should be created in QuickBooks Online (QBO) using the tax company details (Tax Company Name and Address) specified in the **Tax Information** section of the Alvys driver profile (for either company drivers or owner-operators with the tax category of 1099).
**When this setting is enabled:**
If the vendor does **not** exist in QBO, a vendor will be automatically created when the driver statement is generated, using the Tax Company Name as the vendor's name and the Tax Company Address as the vendor address.
If the vendor **already exists** in QBO, the user must ensure that the vendor's name matches the Tax Company Name specified in the Alvys driver profile to avoid conflicts and create duplicates.
*Image showing sample Alvys Invoice with total billable of \$0*
### Create Vendor Using 1099 Tax Company
The **“Create Vendor Using 1099 Tax Company”** setting allows users to determine whether vendors should be created in QuickBooks Online (QBO) using the tax company details (Tax Company Name and Address) specified in the **Tax Information** section of the Alvys driver profile (for either company drivers or owner-operators with the tax category of 1099).
**When this setting is enabled:**
If the vendor does **not** exist in QBO, a vendor will be automatically created when the driver statement is generated, using the Tax Company Name as the vendor's name and the Tax Company Address as the vendor address.
If the vendor **already exists** in QBO, the user must ensure that the vendor's name matches the Tax Company Name specified in the Alvys driver profile to avoid conflicts and create duplicates.
 *Image showing the Tax Company Name and Company Address*
### Carrier Statements
This setting must be enabled to export carrier statements as bills when generating a Carrier Statement from the [Carrier Settlements module](https://app.alvys.com/#/accounting/settlements).
If you use the Carrier Settlements module to generate statements for external carriers and want these statements automatically exported to QuickBooks Online (QBO) upon generation, this setting must be enabled. This is the **only** scenario in which this option should be turned on.
If you do not use the Carrier Settlements module and want carrier statements to be exported only when the carrier invoice is manually uploaded for a trip, this setting should be **disabled**, and the option to generate carrier invoices separately should be **enabled**.
Alternatively, if you prefer carrier statements to be exported only when the customer invoice is generated on a load, this setting should also be **disabled**, and the option to generate carrier invoices separately should remain **disabled**.
### Export Company Fuel Expense
The TMS allows users to record fuel transactions, either manually or imported directly from the fuel provider. These transactions can be viewed in the\*\* \*\*[Alvys Fuel Report](https://app.alvys.com/#/reports/fuel).
In the fuel report, if a transaction is marked “Deduct Transaction” true, the cost will be deducted from the linked driver during payroll (statement generation). If it is not deducted, Deduct Fuel false **(-)**, the transaction is treated as a company expense.
*Image showing the Tax Company Name and Company Address*
### Carrier Statements
This setting must be enabled to export carrier statements as bills when generating a Carrier Statement from the [Carrier Settlements module](https://app.alvys.com/#/accounting/settlements).
If you use the Carrier Settlements module to generate statements for external carriers and want these statements automatically exported to QuickBooks Online (QBO) upon generation, this setting must be enabled. This is the **only** scenario in which this option should be turned on.
If you do not use the Carrier Settlements module and want carrier statements to be exported only when the carrier invoice is manually uploaded for a trip, this setting should be **disabled**, and the option to generate carrier invoices separately should be **enabled**.
Alternatively, if you prefer carrier statements to be exported only when the customer invoice is generated on a load, this setting should also be **disabled**, and the option to generate carrier invoices separately should remain **disabled**.
### Export Company Fuel Expense
The TMS allows users to record fuel transactions, either manually or imported directly from the fuel provider. These transactions can be viewed in the\*\* \*\*[Alvys Fuel Report](https://app.alvys.com/#/reports/fuel).
In the fuel report, if a transaction is marked “Deduct Transaction” true, the cost will be deducted from the linked driver during payroll (statement generation). If it is not deducted, Deduct Fuel false **(-)**, the transaction is treated as a company expense.
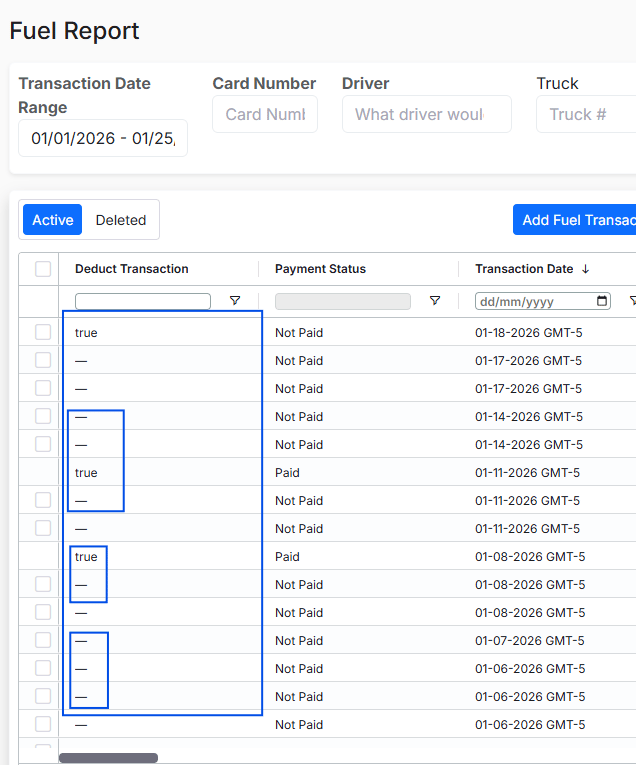 *Image showing the Alvys Fuel Report with the Deduct Transaction highlighted*
When the “Export Company Fuel Expense” setting is enabled, fuel transactions where Deduct Fuel is set to false (-) (i.e., fuel costs not deducted from drivers) are exported to QuickBooks Online as bills. This allows the company to track and manage fuel expenses not charged to drivers, such as those for company-owned vehicles. Exports are scheduled daily at 6:30 AM UTC
⚠️ Please note: if a user was not previously configured to export company fuel transactions and later enables this setting, past transactions will not be exported automatically. Additionally, if an export fails for any reason, contact\*\* \*\*[Alvys Support](mailto:support@alvys.com)[ ](mailto:support@alvys.com)to have those transactions exported.
### Export Company Toll Expense
The TMS allows users to record toll transactions, either manually or imported directly from the toll provider. These transactions can be viewed in the [Alvys Toll Report](https://app.alvys.com/#/reports/toll).
If a transaction is marked “Deduct Toll” true, the cost will be deducted from the linked driver during payroll. If it is not deducted, Deduct Toll false (-), the transaction is treated as a company expense.
*Image showing the Alvys Fuel Report with the Deduct Transaction highlighted*
When the “Export Company Fuel Expense” setting is enabled, fuel transactions where Deduct Fuel is set to false (-) (i.e., fuel costs not deducted from drivers) are exported to QuickBooks Online as bills. This allows the company to track and manage fuel expenses not charged to drivers, such as those for company-owned vehicles. Exports are scheduled daily at 6:30 AM UTC
⚠️ Please note: if a user was not previously configured to export company fuel transactions and later enables this setting, past transactions will not be exported automatically. Additionally, if an export fails for any reason, contact\*\* \*\*[Alvys Support](mailto:support@alvys.com)[ ](mailto:support@alvys.com)to have those transactions exported.
### Export Company Toll Expense
The TMS allows users to record toll transactions, either manually or imported directly from the toll provider. These transactions can be viewed in the [Alvys Toll Report](https://app.alvys.com/#/reports/toll).
If a transaction is marked “Deduct Toll” true, the cost will be deducted from the linked driver during payroll. If it is not deducted, Deduct Toll false (-), the transaction is treated as a company expense.
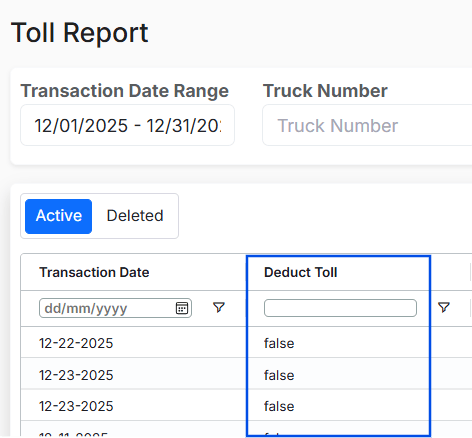 *Image showing the Alvys Toll Report with the Deduct Transaction highlighted*
When the “**Export Company Toll Expense**” setting is enabled, toll transactions where Deduct Toll is set to false (i.e., toll costs not deducted from drivers) are exported to the external accounting system as bills. This allows the company to track and manage toll expenses not charged to drivers, such as those incurred by company-owned vehicles. Exports are scheduled daily at 7:30 AM UTC.
### Reference number prefix
This setting allows Alvys’ predefined prefixes to be applied to transaction reference numbers, altering how transactions are identified when sent from Alvys to QuickBooks Online (QBO). Different transaction types, such as Load Invoices, Bills from Trips, and Bills from Paystubs, have specific prefixes. For example, an invoice might appear as **ALD-100000**.
**Alvys Predefined Prefixes:**
* **ALD** – Load
* **ATP** – Trip
* **APS** – Paystub
* **AEK** – E-Check
* **AFL** – Fuel
* **ADT** – Deduction
* **ATL** – Toll
* **AAC** – Accessorial
Users should enable this setting **only** if reference numbers will help organize and identify transactions originating from Alvys. To locate transactions with prefixes, simply enter the reference number, including the prefix, into the QuickBooks search field.
*Image showing the Alvys Toll Report with the Deduct Transaction highlighted*
When the “**Export Company Toll Expense**” setting is enabled, toll transactions where Deduct Toll is set to false (i.e., toll costs not deducted from drivers) are exported to the external accounting system as bills. This allows the company to track and manage toll expenses not charged to drivers, such as those incurred by company-owned vehicles. Exports are scheduled daily at 7:30 AM UTC.
### Reference number prefix
This setting allows Alvys’ predefined prefixes to be applied to transaction reference numbers, altering how transactions are identified when sent from Alvys to QuickBooks Online (QBO). Different transaction types, such as Load Invoices, Bills from Trips, and Bills from Paystubs, have specific prefixes. For example, an invoice might appear as **ALD-100000**.
**Alvys Predefined Prefixes:**
* **ALD** – Load
* **ATP** – Trip
* **APS** – Paystub
* **AEK** – E-Check
* **AFL** – Fuel
* **ADT** – Deduction
* **ATL** – Toll
* **AAC** – Accessorial
Users should enable this setting **only** if reference numbers will help organize and identify transactions originating from Alvys. To locate transactions with prefixes, simply enter the reference number, including the prefix, into the QuickBooks search field.
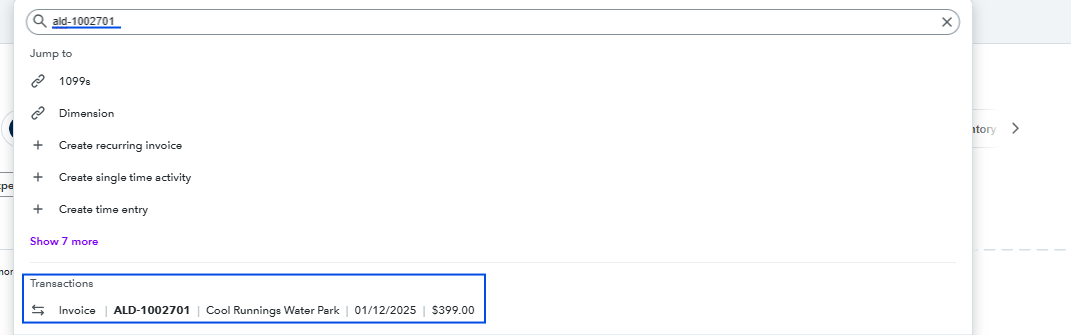 *Image showing the QuickBooks Online global search with the exported invoice with Alvys predefined prefix*
In addition to the reference number prefix, users can configure a **fleet prefix**, which applies only to customer invoices exported to QBO. Adding a fleet-specific prefix allows invoices to be easily differentiated across multiple fleets. See the following help center article to configure\*\* \*\*[fleet prefixes](/help/assets-fleet/how-to-add-and-manage-fleets-in-alvys)
**Priority of Prefixes (Reference Number Prefix vs Fleet Prefix):**
If both the external accounting setting for the reference number prefix and the fleet prefix are enabled, the fleet prefix takes precedence for invoices and will be prepended to the invoice number. Other transaction types, such as bills, will continue to use the standard reference number prefix.
### Custom Field
QuickBooks Online (QBO) Custom Fields are user-defined fields that allow additional data to be captured on transactions, such as invoices, to support reporting, tracking, or other operational needs.
In Alvys, the **Custom Field option** currently supports mapping **only the Load Order Number** from a load to a QBO custom field on **customer invoices**. When enabled this ensures that each invoice exported from Alvys with the load order number set is mapped to the custom field.
The custom field mapping applies **only to invoices**; it does not affect other transactions such as bills, from paystubs, or other transaction types. To use this feature, a custom field must first be **created in QBO** and **enabled for invoices**.
\*\*Steps to create and enable a custom field in QBO: \*\*[Create and edit custom fields](https://quickbooks.intuit.com/learn-support/en-global/help-article/custom-templates/create-edit-custom-fields-quickbooks-online/L56PQNif3_ROW_en)
💡 In **QuickBooks Online**, the maximum number of characters you can enter in a **custom field** is **30 characters**.
### Subsidiaries
Alvys subsidiaries can be mapped to **QuickBooks Online (QBO) Classes** (also called departments) or **Locations**. This mapping allows you to track transactions and generate reports for each subsidiary in QBO.
* **Classes (Departments):** Use classes if you want to track income, expenses, and transactions at a more detailed, departmental level within a subsidiary. Classes can be assigned **per transaction line item** or to the entire transaction.
* **Locations:** Use locations if you want to track financial activity at a broader, global level for the entire subsidiary. Locations are applied **transaction-wide**, not per line item.
⚠️ **A subsidiary can only be assigned to either Classes or Locations, not both.**
**Prerequisites Before Mapping Subsidiaries in Alvys:**
Before you map fleets in Alvys, you need to **set up the corresponding Classes or Locations in QuickBooks Online**:
1. **Decide how you want to track subsidiaries in QBO**
2. **Enable Classes or Locations in QBO**
3. **Create Classes or Locations in QBO**
Use the provided links below to learn more about setting up QBO classes and locations in QBO
* [Get started with class tracking](https://quickbooks.intuit.com/learn-support/en-global/help-article/class-list/get-started-class-tracking-quickbooks-online/L04INPWiy_ROW_en)
* [Using classes and locations](https://quickbooks.intuit.com/au/blog/product-update/using-classes-and-locations-in-quickbooks-online/)
* [Create and manage classes](https://quickbooks.intuit.com/learn-support/en-global/help-article/class-list/create-manage-classes-quickbooks-online/L1QzEOUxM_ROW_en)
* [Track locations](https://quickbooks.intuit.com/learn-support/en-global/help-article/track-location/set-use-location-tracking/L2raFkEBC_ROW_en)
### Fleets
Alvys fleets can also be mapped to Classes or Locations in QBO. This allows your company to track revenue, costs, and other financial activity associated with each fleet individually.
* **Classes (Departments/Fleets):** Ideal if you want to assign each fleet to a separate department or category. Classes can be applied **per line item or per transaction**, giving granular insight into performance and profitability.
* **Locations:** Can be used if you want to track the fleet’s transactions at a **broader, global level**, but this is less common for fleets since line-item granularity is usually preferred.
**Fleets can only be assigned to Classes or Locations, not both.**
**Prerequisites Before Mapping Fleets in Alvys:**
Before you map fleets in Alvys, you need to **set up the corresponding Classes or Locations in QuickBooks Online**:
1. Decide how you want to track fleets in QBO
2. Enable Classes or Locations in QBO
3. Create Classes or Locations in QBO
### Export Customer Payments
When enabled, customer payments recorded manually against a load or uploaded via a factoring report are exported to QuickBooks Online every five minutes.
**The following customer payments are included in the export:**
* Payments added **manually** on loads
* Payments added through **factoring report uploads** for factoring loads
**Please note:**
* Uploading a purchase report on the factoring page does not affect payments sent to the external accounting system. Additionally, any factoring fees applied to loads during the purchase report upload are not exported to QuickBooks Online.
* Only the **final payment amount** is exported to QBO. If multiple payments are recorded for a load, **partial payments are not exported**. The payment is sent only when the total paid amount equals the total billable amount.
After enabling this option, you will be prompted to select a **deposit account** in the setup where customer payments should be recorded. Accounts such as **Accounts Receivable** are **not valid deposit accounts** and should not be used for customer payment configuration.
*Image showing the QuickBooks Online global search with the exported invoice with Alvys predefined prefix*
In addition to the reference number prefix, users can configure a **fleet prefix**, which applies only to customer invoices exported to QBO. Adding a fleet-specific prefix allows invoices to be easily differentiated across multiple fleets. See the following help center article to configure\*\* \*\*[fleet prefixes](/help/assets-fleet/how-to-add-and-manage-fleets-in-alvys)
**Priority of Prefixes (Reference Number Prefix vs Fleet Prefix):**
If both the external accounting setting for the reference number prefix and the fleet prefix are enabled, the fleet prefix takes precedence for invoices and will be prepended to the invoice number. Other transaction types, such as bills, will continue to use the standard reference number prefix.
### Custom Field
QuickBooks Online (QBO) Custom Fields are user-defined fields that allow additional data to be captured on transactions, such as invoices, to support reporting, tracking, or other operational needs.
In Alvys, the **Custom Field option** currently supports mapping **only the Load Order Number** from a load to a QBO custom field on **customer invoices**. When enabled this ensures that each invoice exported from Alvys with the load order number set is mapped to the custom field.
The custom field mapping applies **only to invoices**; it does not affect other transactions such as bills, from paystubs, or other transaction types. To use this feature, a custom field must first be **created in QBO** and **enabled for invoices**.
\*\*Steps to create and enable a custom field in QBO: \*\*[Create and edit custom fields](https://quickbooks.intuit.com/learn-support/en-global/help-article/custom-templates/create-edit-custom-fields-quickbooks-online/L56PQNif3_ROW_en)
💡 In **QuickBooks Online**, the maximum number of characters you can enter in a **custom field** is **30 characters**.
### Subsidiaries
Alvys subsidiaries can be mapped to **QuickBooks Online (QBO) Classes** (also called departments) or **Locations**. This mapping allows you to track transactions and generate reports for each subsidiary in QBO.
* **Classes (Departments):** Use classes if you want to track income, expenses, and transactions at a more detailed, departmental level within a subsidiary. Classes can be assigned **per transaction line item** or to the entire transaction.
* **Locations:** Use locations if you want to track financial activity at a broader, global level for the entire subsidiary. Locations are applied **transaction-wide**, not per line item.
⚠️ **A subsidiary can only be assigned to either Classes or Locations, not both.**
**Prerequisites Before Mapping Subsidiaries in Alvys:**
Before you map fleets in Alvys, you need to **set up the corresponding Classes or Locations in QuickBooks Online**:
1. **Decide how you want to track subsidiaries in QBO**
2. **Enable Classes or Locations in QBO**
3. **Create Classes or Locations in QBO**
Use the provided links below to learn more about setting up QBO classes and locations in QBO
* [Get started with class tracking](https://quickbooks.intuit.com/learn-support/en-global/help-article/class-list/get-started-class-tracking-quickbooks-online/L04INPWiy_ROW_en)
* [Using classes and locations](https://quickbooks.intuit.com/au/blog/product-update/using-classes-and-locations-in-quickbooks-online/)
* [Create and manage classes](https://quickbooks.intuit.com/learn-support/en-global/help-article/class-list/create-manage-classes-quickbooks-online/L1QzEOUxM_ROW_en)
* [Track locations](https://quickbooks.intuit.com/learn-support/en-global/help-article/track-location/set-use-location-tracking/L2raFkEBC_ROW_en)
### Fleets
Alvys fleets can also be mapped to Classes or Locations in QBO. This allows your company to track revenue, costs, and other financial activity associated with each fleet individually.
* **Classes (Departments/Fleets):** Ideal if you want to assign each fleet to a separate department or category. Classes can be applied **per line item or per transaction**, giving granular insight into performance and profitability.
* **Locations:** Can be used if you want to track the fleet’s transactions at a **broader, global level**, but this is less common for fleets since line-item granularity is usually preferred.
**Fleets can only be assigned to Classes or Locations, not both.**
**Prerequisites Before Mapping Fleets in Alvys:**
Before you map fleets in Alvys, you need to **set up the corresponding Classes or Locations in QuickBooks Online**:
1. Decide how you want to track fleets in QBO
2. Enable Classes or Locations in QBO
3. Create Classes or Locations in QBO
### Export Customer Payments
When enabled, customer payments recorded manually against a load or uploaded via a factoring report are exported to QuickBooks Online every five minutes.
**The following customer payments are included in the export:**
* Payments added **manually** on loads
* Payments added through **factoring report uploads** for factoring loads
**Please note:**
* Uploading a purchase report on the factoring page does not affect payments sent to the external accounting system. Additionally, any factoring fees applied to loads during the purchase report upload are not exported to QuickBooks Online.
* Only the **final payment amount** is exported to QBO. If multiple payments are recorded for a load, **partial payments are not exported**. The payment is sent only when the total paid amount equals the total billable amount.
After enabling this option, you will be prompted to select a **deposit account** in the setup where customer payments should be recorded. Accounts such as **Accounts Receivable** are **not valid deposit accounts** and should not be used for customer payment configuration.
 *Image showing the Deposit Account mapping in the Alvys QBO setup.*
Although exporting payments to QBO is supported, it is **recommended** to record customer payments directly in QuickBooks Online and allow them to sync back to Alvys.
If a payment export is missed or fails for any reason and the payment is not reflected in QuickBooks Online, contact [Alvys Support](mailto:support@alvys.com) to request a re-export.
### Shared Billing/Intercompany Billing
Shared Billing is used when a load is **invoiced by one subsidiary** (Invoice As) and **tendered by another subsidiary** (Tender As), and both subsidiaries have separate accounting integrations. This setting ensures that all financial transactions are correctly recorded across the two subsidiaries.
**Invoice As Subsidiary (e.g., Alvys Inc)**
*Image showing the Deposit Account mapping in the Alvys QBO setup.*
Although exporting payments to QBO is supported, it is **recommended** to record customer payments directly in QuickBooks Online and allow them to sync back to Alvys.
If a payment export is missed or fails for any reason and the payment is not reflected in QuickBooks Online, contact [Alvys Support](mailto:support@alvys.com) to request a re-export.
### Shared Billing/Intercompany Billing
Shared Billing is used when a load is **invoiced by one subsidiary** (Invoice As) and **tendered by another subsidiary** (Tender As), and both subsidiaries have separate accounting integrations. This setting ensures that all financial transactions are correctly recorded across the two subsidiaries.
**Invoice As Subsidiary (e.g., Alvys Inc)**
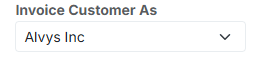 *Image showing the Alvys Invoice Customer As field.*
Creates a **customer invoice** for the load
Creates an **intercompany bill to the Tender As subsidiary** (Alvys Brokerage) for the carrier/driver cost
**Tender As Subsidiary (e.g., Alvys Brokerage)**
*Image showing the Alvys Invoice Customer As field.*
Creates a **customer invoice** for the load
Creates an **intercompany bill to the Tender As subsidiary** (Alvys Brokerage) for the carrier/driver cost
**Tender As Subsidiary (e.g., Alvys Brokerage)**
 *Image showing the Tendering As field.*
Creates an **intercompany invoice back to the Invoice As subsidiary**
Creates a **vendor bill to the carrier or driver** for the load
⚠️ Shared Billing must be enabled on **both subsidiaries**. Without it, the intercompany transactions or carrier/vendor bills will not export correctly.
## Limits / Unsupported
* Only one QBO company file can be connected per Alvys legal entity. Multi-entity setups require a separate connection for each legal entity.
* QBO Simple Start is not supported because it does not include the Accounts Payable module.
* Location and Class Tracking in QBO require QBO Plus or QBO Advanced.
## FAQs
**Q: Can I connect more than one QBO company file to a single Alvys account?**
**A:** No. Each Alvys legal entity can be connected to one QBO company file.
**Q: What QBO plan do I need to use Class or Location Tracking with Alvys?**
**A:** QBO Plus or QBO Advanced. Class and Location Tracking are not available on Essentials or Simple Start.
**Q: What does the Carrier Invoice Requirement setting do?**
**A:** When enabled, Alvys requires a carrier invoice number to be recorded on a load before that load's carrier bill can be exported to QBO.
**Q: What happens to the QBO connection if my Intuit session is invalidated?**
**A:** The OAuth token expires. Disconnect and reconnect to generate a new token.
**Q: How do I export invoices manually if auto-export is disabled?**
**A:** Open the load, navigate to the Transactions tab, and click **Export to QBO**.
## Go Deeper
* [QuickBooks Online Prerequisites (Start Here)](/help/integrations/quickbooks-online-prerequisites)
* [How to Map Accounts for QuickBooks Online](/help/integrations/how-to-map-accounts-for-quickbooks-online)
* [How to Export and Manage Transactions in QuickBooks Online](/help/integrations/how-to-export-and-manage-transactions-in-quickbooks-online)
* [QuickBooks Online: Identifying and Resolving Failed Transactions](/help/integrations/quickbooks-online-identifying-and-resolving-failed-transactions)
*Image showing the Tendering As field.*
Creates an **intercompany invoice back to the Invoice As subsidiary**
Creates a **vendor bill to the carrier or driver** for the load
⚠️ Shared Billing must be enabled on **both subsidiaries**. Without it, the intercompany transactions or carrier/vendor bills will not export correctly.
## Limits / Unsupported
* Only one QBO company file can be connected per Alvys legal entity. Multi-entity setups require a separate connection for each legal entity.
* QBO Simple Start is not supported because it does not include the Accounts Payable module.
* Location and Class Tracking in QBO require QBO Plus or QBO Advanced.
## FAQs
**Q: Can I connect more than one QBO company file to a single Alvys account?**
**A:** No. Each Alvys legal entity can be connected to one QBO company file.
**Q: What QBO plan do I need to use Class or Location Tracking with Alvys?**
**A:** QBO Plus or QBO Advanced. Class and Location Tracking are not available on Essentials or Simple Start.
**Q: What does the Carrier Invoice Requirement setting do?**
**A:** When enabled, Alvys requires a carrier invoice number to be recorded on a load before that load's carrier bill can be exported to QBO.
**Q: What happens to the QBO connection if my Intuit session is invalidated?**
**A:** The OAuth token expires. Disconnect and reconnect to generate a new token.
**Q: How do I export invoices manually if auto-export is disabled?**
**A:** Open the load, navigate to the Transactions tab, and click **Export to QBO**.
## Go Deeper
* [QuickBooks Online Prerequisites (Start Here)](/help/integrations/quickbooks-online-prerequisites)
* [How to Map Accounts for QuickBooks Online](/help/integrations/how-to-map-accounts-for-quickbooks-online)
* [How to Export and Manage Transactions in QuickBooks Online](/help/integrations/how-to-export-and-manage-transactions-in-quickbooks-online)
* [QuickBooks Online: Identifying and Resolving Failed Transactions](/help/integrations/quickbooks-online-identifying-and-resolving-failed-transactions)