> ## Documentation Index
> Fetch the complete documentation index at: https://docs.alvys.com/llms.txt
> Use this file to discover all available pages before exploring further.
# Business Central: Connect & configure
> Connect a Business Central company to an Alvys subsidiary, then configure transaction export types, vendor matching, and fleet-to-dimension mapping for BC.
Connect (authenticate and link) your Business Central accounting system to Alvys and configure how transaction types, drivers, carriers, subsidiaries, and fleets are exported and synced.
## Overview
The Alvys to Business Central integration exports, syncs, and posts customer invoices, carrier bills, and driver settlements from Alvys to Business Central (also called Microsoft Dynamics 365 Business Central or BC) and imports payment updates back into Alvys. After connecting, you configure which transaction types to export, how vendors are matched or created, and how subsidiaries and fleets map to Business Central dimensions.
Each Alvys subsidiary is connected to Business Central separately. Complete this process once per subsidiary.
## Before You Start
Before initiating the connection within the Alvys platform, your Business Central environment must be structurally and administratively prepared. Ensure that your tenant has an active Business Central subscription with an administrator user and that the following items are configured:
* **Company Architecture Setup** (Standard Multiple Companies or MEM Entity Codes)
* **Account Licensing & Permissions** (Essentials/Premium License and Permission Sets)
* **Chart of Accounts Configuration** (Active Revenue/Expense Accounts with Direct Posting enabled)
* **Posting Groups** (Customer, Vendor, and General Business Posting Groups)
* **Tax Setup & Calculation** (Tax Groups and Tax Area Codes)
* **General Journal Setup**
* **IRS 1099 Configuration** (1099 Form Boxes and Vendor Card assignment)
💡 If these are not set up, refer to the Business Central: Prerequisites article before proceeding to the connection steps below.
## Steps
Navigate to the [Alvys Integrations Page](https://app.alvys.com/#/manage/integrations) by clicking your username in the bottom-left corner and selecting **Integrations**, or by copying and pasting the following URL into your browser: [https://app.alvys.com/#/manage/integrations](https://app.alvys.com/#/manage/integrations).
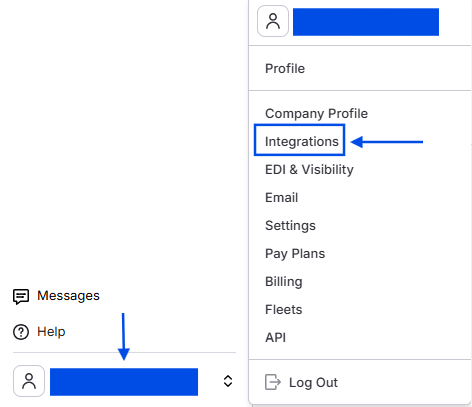 *Management menu with Integrations highlighted*
From the list of integration types, select **Accounting**.
*Management menu with Integrations highlighted*
From the list of integration types, select **Accounting**.
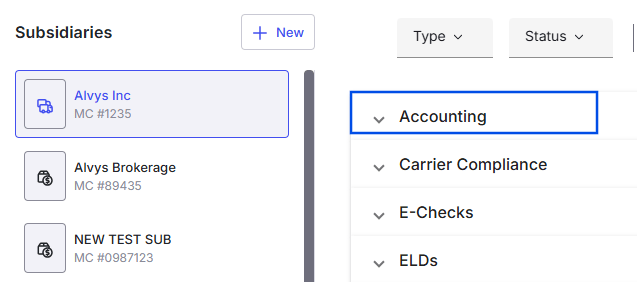 *Image showing accounting Integration category dropdown*
By default, the first subsidiary in your list is selected. If needed, choose a different subsidiary to add the integration to. Click the ✏ (edit) icon next to Business Central to open the integration dialog box.
*Image showing accounting Integration category dropdown*
By default, the first subsidiary in your list is selected. If needed, choose a different subsidiary to add the integration to. Click the ✏ (edit) icon next to Business Central to open the integration dialog box.
 \*Business Central Tile under the accounting section of the Integrations List. \*
Select the subsidiary you want to connect to Business Central, then click Save.
\*Business Central Tile under the accounting section of the Integrations List. \*
Select the subsidiary you want to connect to Business Central, then click Save.
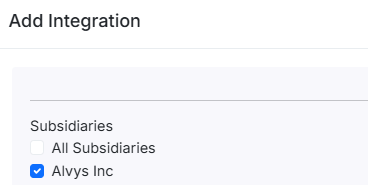 *Shows the "Add Integration" modal with **Alvys Inc** selected under the Subsidiaries configuration options.*
⚠️ The integration must be completed one subsidiary at a time. After configuring a subsidiary, return to the Integrations page and repeat these steps for any remaining subsidiaries.
In the dialog box, click Login. You will be redirected to sign in using the integration user credentials. Enter the user email and password.
*Shows the "Add Integration" modal with **Alvys Inc** selected under the Subsidiaries configuration options.*
⚠️ The integration must be completed one subsidiary at a time. After configuring a subsidiary, return to the Integrations page and repeat these steps for any remaining subsidiaries.
In the dialog box, click Login. You will be redirected to sign in using the integration user credentials. Enter the user email and password.
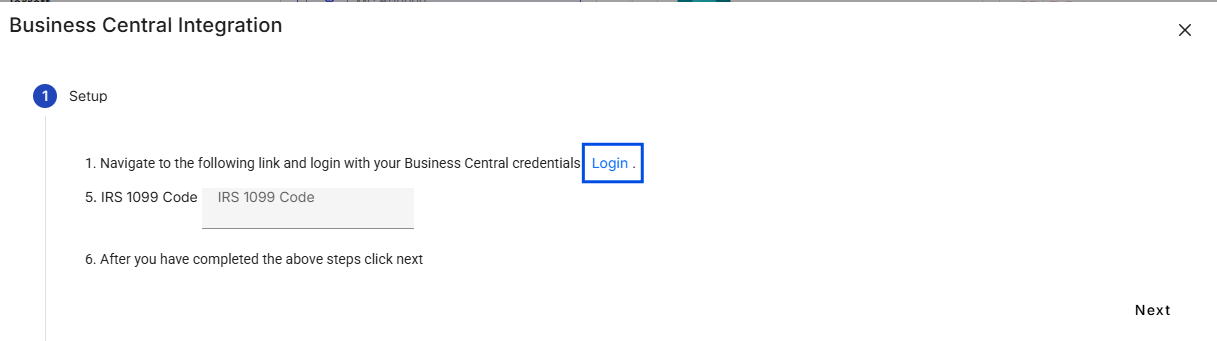 *Displays the "Business Central Integration" setup step with a blue box highlighting the clickable **Login** link.*
After successful login, select the appropriate **Business Central Company** from the list.
*Displays the "Business Central Integration" setup step with a blue box highlighting the clickable **Login** link.*
After successful login, select the appropriate **Business Central Company** from the list.
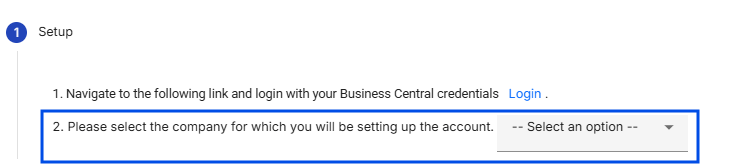 *Features step 2 of the integration wizard with a blue box focusing on the company selection dropdown field.*
The companies shown here are those that exist within your Business Central environment. To view your companies within Business Central:
1. Click the **Search** icon (magnifying glass) in the top right of the Business Central header.
2. Search for **Companies** and select the related link.
*Features step 2 of the integration wizard with a blue box focusing on the company selection dropdown field.*
The companies shown here are those that exist within your Business Central environment. To view your companies within Business Central:
1. Click the **Search** icon (magnifying glass) in the top right of the Business Central header.
2. Search for **Companies** and select the related link.
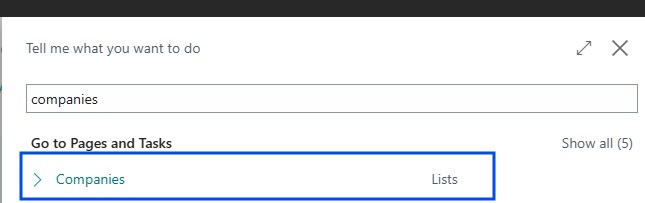 * Shows Business Central application menu search bar with a blue box highlighting the **Companies** task list option.\*
Next, select the Default Journal you would like Alvys to use.
* Shows Business Central application menu search bar with a blue box highlighting the **Companies** task list option.\*
Next, select the Default Journal you would like Alvys to use.
 *Shows step 3 of the configuration setup, prompting the user to assign a default general journal for journal entries.*
Then, select the Default Payment Methods for Carriers. This configuration is relevant for vendor-related transactions, such as Purchase Invoices. When Alvys exports a bill to Business Central, it "stamps" that specific Purchase Invoice with the Payment Method Code you select during this setup to define the settlement type. Furthermore, if a vendor match is not found in Business Central during the export process, Alvys creates the vendor record and assigns this selected payment code directly to the Vendor Card.
*Shows step 3 of the configuration setup, prompting the user to assign a default general journal for journal entries.*
Then, select the Default Payment Methods for Carriers. This configuration is relevant for vendor-related transactions, such as Purchase Invoices. When Alvys exports a bill to Business Central, it "stamps" that specific Purchase Invoice with the Payment Method Code you select during this setup to define the settlement type. Furthermore, if a vendor match is not found in Business Central during the export process, Alvys creates the vendor record and assigns this selected payment code directly to the Vendor Card.
 *Shows step 4 of the setup, prompting the selection of a default payment method for carriers.*
To create or view payment methods in Business Central, use the **Search** icon to find **Payment Methods**.
💡 Selecting a default payment method for vendors is not mandatory, but it offers ease to users.
Next, input the **IRS 1099 Code**. This is for vendors/carriers who are 1099-liable. If you do not have these types of vendors, you do not have to input this information. The IRS code must be configured in Business Central for the vendor to be reported correctly.
*Shows step 4 of the setup, prompting the selection of a default payment method for carriers.*
To create or view payment methods in Business Central, use the **Search** icon to find **Payment Methods**.
💡 Selecting a default payment method for vendors is not mandatory, but it offers ease to users.
Next, input the **IRS 1099 Code**. This is for vendors/carriers who are 1099-liable. If you do not have these types of vendors, you do not have to input this information. The IRS code must be configured in Business Central for the vendor to be reported correctly.
 *Displays step 5 of the setup tracking the input field for the IRS 1099 Code.*
Once these steps are completed the user can click the **“Next”** button to move on to the configuration settings
*Displays step 5 of the setup tracking the input field for the IRS 1099 Code.*
Once these steps are completed the user can click the **“Next”** button to move on to the configuration settings
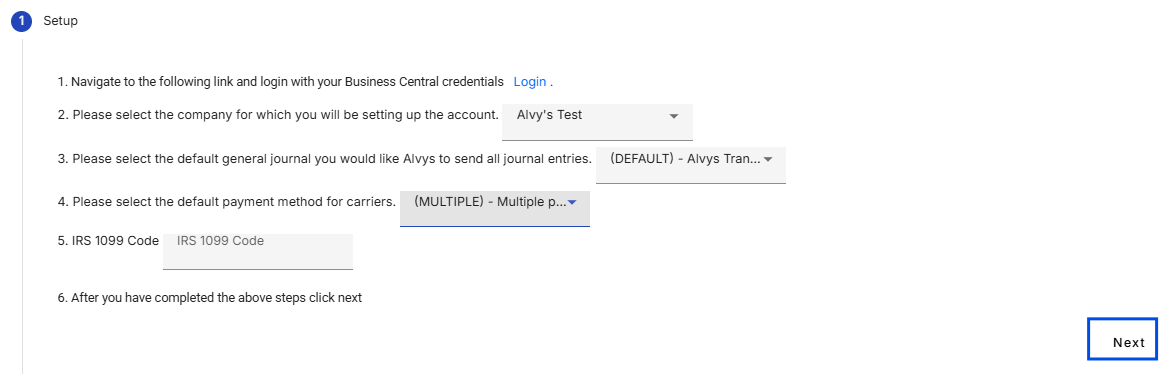 *Shows the finalized Step 1 configuration screen with a blue box highlighting the Next navigation button.*
## Configuration Settings
After successful validation, use this section to define how transactions flow from Alvys to Business Central (BC). These settings determine what data is sent, when it is triggered, and how it appears in your General Ledger.
*Shows the finalized Step 1 configuration screen with a blue box highlighting the Next navigation button.*
## Configuration Settings
After successful validation, use this section to define how transactions flow from Alvys to Business Central (BC). These settings determine what data is sent, when it is triggered, and how it appears in your General Ledger.
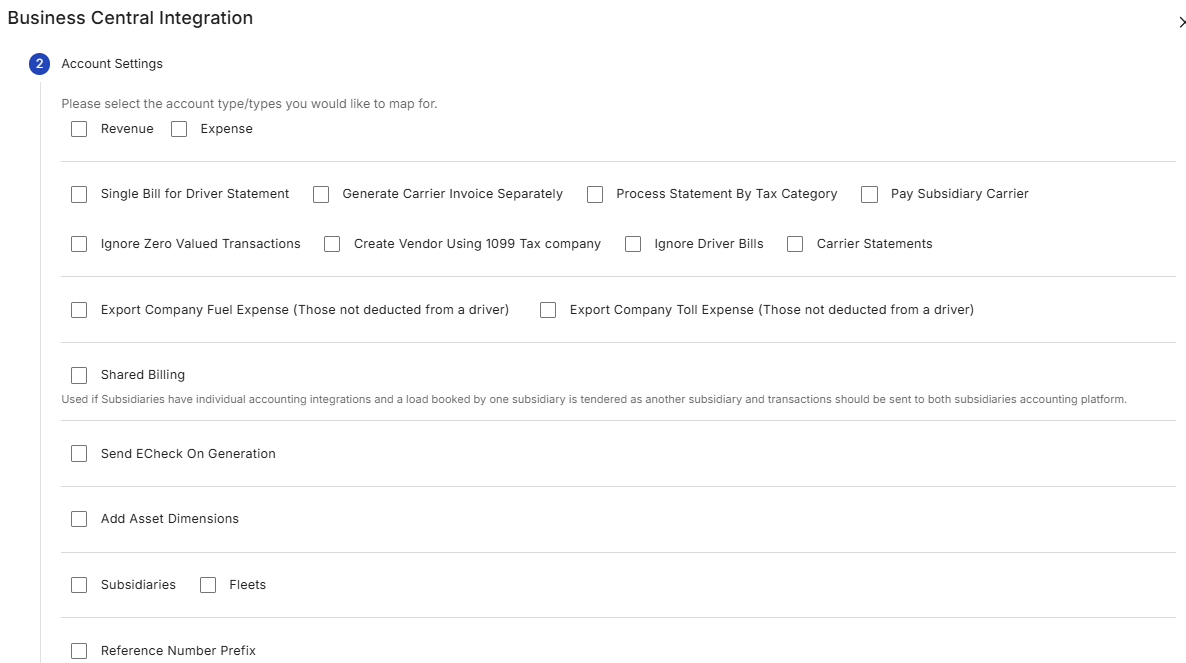 *Account Settings dialogue in Alvys integrations page*
### Transaction Types
**There are two (2) transaction types available for synchronization:**
1. **Revenue** This option determines whether revenue transactions are synchronized. When enabled, income-related financial data such as customer invoices (sales invoices) will be exported.
2. **Expense** This option determines whether expense transactions are synchronized. When enabled, cost-related financial data, such as driver pay and carrier bills (purchase invoices), will be exported.
*Account Settings dialogue in Alvys integrations page*
### Transaction Types
**There are two (2) transaction types available for synchronization:**
1. **Revenue** This option determines whether revenue transactions are synchronized. When enabled, income-related financial data such as customer invoices (sales invoices) will be exported.
2. **Expense** This option determines whether expense transactions are synchronized. When enabled, cost-related financial data, such as driver pay and carrier bills (purchase invoices), will be exported.
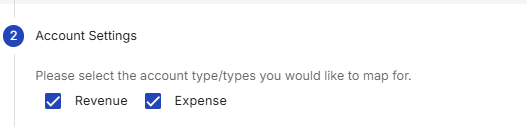 *Displays Step 2 (Account Settings) with active checkboxes enabling both Revenue and Expense mappings.*
⚠️ Your selection here takes precedence over all other configuration settings. These options determine the type of financial data that will be integrated. Enable only the options you intend to export to Business Central. Once selected, additional settings are available to further control how transactions are exported.
### Ignore Driver Bills
This setting prevents the export of all driver bills, including company drivers and owner-operators, to Business Central. When enabled, driver-associated bills will not be exported, giving users greater control over which transactions are sent to external accounting systems. This option is commonly enabled when driver pay is managed outside of Business Central, such as through a payroll system or a separate driver settlement solution. Please note that even when this setting is enabled, external carrier bills, subsidiary carrier bills, and company expenses such as fuel and tolls may still be exported if those options are configured.
### Single Bill for Driver Statement
This setting controls how bills for company drivers and owner operators are exported to Business Central. It is used to consolidate all charges and transactions related to a driver, including trips, fuel, tolls, and other expenses, into a single bill per driver statement.
When enabled, a single bill is exported to Business Central for the total net amount of the paystub. All components of driver pay are consolidated into this bill, including trip pay, accessorials, deductions, credits, reimbursements, and any other adjustments. Each component appears as a **separate line item** on the bill, providing detailed visibility while keeping the accounting export grouped into one transaction. This option is commonly used when driver pay is processed on a scheduled basis, such as weekly or biweekly payroll cycles.
When disabled, generating a customer invoice will also export the driver bill for the individual trip. Each trip or delivery is exported as a separate bill. When a paystub is generated, multiple bills are exported for each transaction type on the paystub, including separate bills for credits, deductions/reimbursements.
### Generate Carrier Invoice Separately
This setting applies to brokerage-type trips where an external carrier and its assets are assigned to a load. When enabled, the system verifies that a carrier invoice document has been uploaded before exporting the carrier bill to Business Central. Specifically, when a brokerage trip is delivered or released and the user uploads a document of the type of carrier invoice, the system will export the carrier bill to Business Central. This can also be triggered when a user generates the customer invoice for a load; the system will verify that a carrier invoice has been uploaded, and if no carrier invoice is found, the carrier bill will not be exported to Business Central. This setting should only be enabled when carrier invoices are required as part of the workflow prior to exporting external carrier bills for payment. If this setting is disabled, generating the customer invoice for a trip with an external carrier will automatically export the carrier bill to Business Central, even if the carrier invoice has not been uploaded.
💡 If this setting was previously enabled but no carrier invoice document was uploaded, the carrier bill was not created and therefore was not exported to Business Central. To resolve this, upload a document of type **Carrier Invoice** to the trip, then select Regenerate Invoice. This will create the carrier bill and initiate its export to Business Central.
### Process Statement by Tax Category
When enabled, only bills for 1099 drivers are exported to Business Central. Bills for W-2 drivers are excluded, allowing users to manage W-2 driver payments in a separate payroll system. When disabled, bills for both W-2 and 1099 drivers are exported.
This setting is typically enabled by tenants that handle W-2 driver compensation outside of Business Central and want to prevent those purchase invoices from being sent while still exporting 1099 driver expenses.
*Displays Step 2 (Account Settings) with active checkboxes enabling both Revenue and Expense mappings.*
⚠️ Your selection here takes precedence over all other configuration settings. These options determine the type of financial data that will be integrated. Enable only the options you intend to export to Business Central. Once selected, additional settings are available to further control how transactions are exported.
### Ignore Driver Bills
This setting prevents the export of all driver bills, including company drivers and owner-operators, to Business Central. When enabled, driver-associated bills will not be exported, giving users greater control over which transactions are sent to external accounting systems. This option is commonly enabled when driver pay is managed outside of Business Central, such as through a payroll system or a separate driver settlement solution. Please note that even when this setting is enabled, external carrier bills, subsidiary carrier bills, and company expenses such as fuel and tolls may still be exported if those options are configured.
### Single Bill for Driver Statement
This setting controls how bills for company drivers and owner operators are exported to Business Central. It is used to consolidate all charges and transactions related to a driver, including trips, fuel, tolls, and other expenses, into a single bill per driver statement.
When enabled, a single bill is exported to Business Central for the total net amount of the paystub. All components of driver pay are consolidated into this bill, including trip pay, accessorials, deductions, credits, reimbursements, and any other adjustments. Each component appears as a **separate line item** on the bill, providing detailed visibility while keeping the accounting export grouped into one transaction. This option is commonly used when driver pay is processed on a scheduled basis, such as weekly or biweekly payroll cycles.
When disabled, generating a customer invoice will also export the driver bill for the individual trip. Each trip or delivery is exported as a separate bill. When a paystub is generated, multiple bills are exported for each transaction type on the paystub, including separate bills for credits, deductions/reimbursements.
### Generate Carrier Invoice Separately
This setting applies to brokerage-type trips where an external carrier and its assets are assigned to a load. When enabled, the system verifies that a carrier invoice document has been uploaded before exporting the carrier bill to Business Central. Specifically, when a brokerage trip is delivered or released and the user uploads a document of the type of carrier invoice, the system will export the carrier bill to Business Central. This can also be triggered when a user generates the customer invoice for a load; the system will verify that a carrier invoice has been uploaded, and if no carrier invoice is found, the carrier bill will not be exported to Business Central. This setting should only be enabled when carrier invoices are required as part of the workflow prior to exporting external carrier bills for payment. If this setting is disabled, generating the customer invoice for a trip with an external carrier will automatically export the carrier bill to Business Central, even if the carrier invoice has not been uploaded.
💡 If this setting was previously enabled but no carrier invoice document was uploaded, the carrier bill was not created and therefore was not exported to Business Central. To resolve this, upload a document of type **Carrier Invoice** to the trip, then select Regenerate Invoice. This will create the carrier bill and initiate its export to Business Central.
### Process Statement by Tax Category
When enabled, only bills for 1099 drivers are exported to Business Central. Bills for W-2 drivers are excluded, allowing users to manage W-2 driver payments in a separate payroll system. When disabled, bills for both W-2 and 1099 drivers are exported.
This setting is typically enabled by tenants that handle W-2 driver compensation outside of Business Central and want to prevent those purchase invoices from being sent while still exporting 1099 driver expenses.
 **Image showing the Tax Category on driver profile.**
💡 Some settings must be used together, while others should not be enabled at the same time. Refer to the **Configuration Dependencies and Incompatible Settings** section for guidance.
### Pay Subsidiary Carrier
This setting applies to trips involving a subsidiary carrier (i.e., a carrier operating under a subsidiary of the main company) that is assigned alongside the tenant’s internal assets. By default, when a driver statement is generated and assuming the Single Bill for Driver Statement setting is enabled, a bill is exported for the tenant’s driver on the trip.
When Pay Subsidiary Carrier is enabled, this behavior changes; instead of exporting a bill/purchase invoice for the driver when a paystub is generated, the system exports a purchase invoice for the subsidiary carrier when the load invoice is generated.\*\* E.g. Alvys Inc \*\*
**Image showing the Tax Category on driver profile.**
💡 Some settings must be used together, while others should not be enabled at the same time. Refer to the **Configuration Dependencies and Incompatible Settings** section for guidance.
### Pay Subsidiary Carrier
This setting applies to trips involving a subsidiary carrier (i.e., a carrier operating under a subsidiary of the main company) that is assigned alongside the tenant’s internal assets. By default, when a driver statement is generated and assuming the Single Bill for Driver Statement setting is enabled, a bill is exported for the tenant’s driver on the trip.
When Pay Subsidiary Carrier is enabled, this behavior changes; instead of exporting a bill/purchase invoice for the driver when a paystub is generated, the system exports a purchase invoice for the subsidiary carrier when the load invoice is generated.\*\* E.g. Alvys Inc \*\*
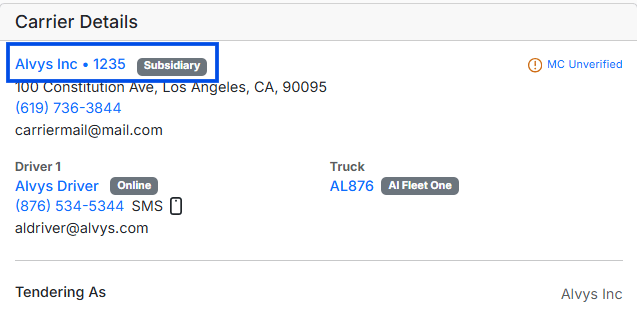 ⚠️ Certain settings are mutually exclusive and should not be enabled at the same time. The Pay Subsidiary Carrier setting should not be configured together with the Single Bill for Driver Statement setting. Refer to the \*\*Configuration Dependencies and Incompatible Settings \*\*section for guidance.
### Ignore Zero Valued Transactions
When enabled, this setting excludes invoices and bills with a **total financial value of zero**, meaning transactions that have no overall impact on the accounts will not be exported.
⚠️ Certain settings are mutually exclusive and should not be enabled at the same time. The Pay Subsidiary Carrier setting should not be configured together with the Single Bill for Driver Statement setting. Refer to the \*\*Configuration Dependencies and Incompatible Settings \*\*section for guidance.
### Ignore Zero Valued Transactions
When enabled, this setting excludes invoices and bills with a **total financial value of zero**, meaning transactions that have no overall impact on the accounts will not be exported.
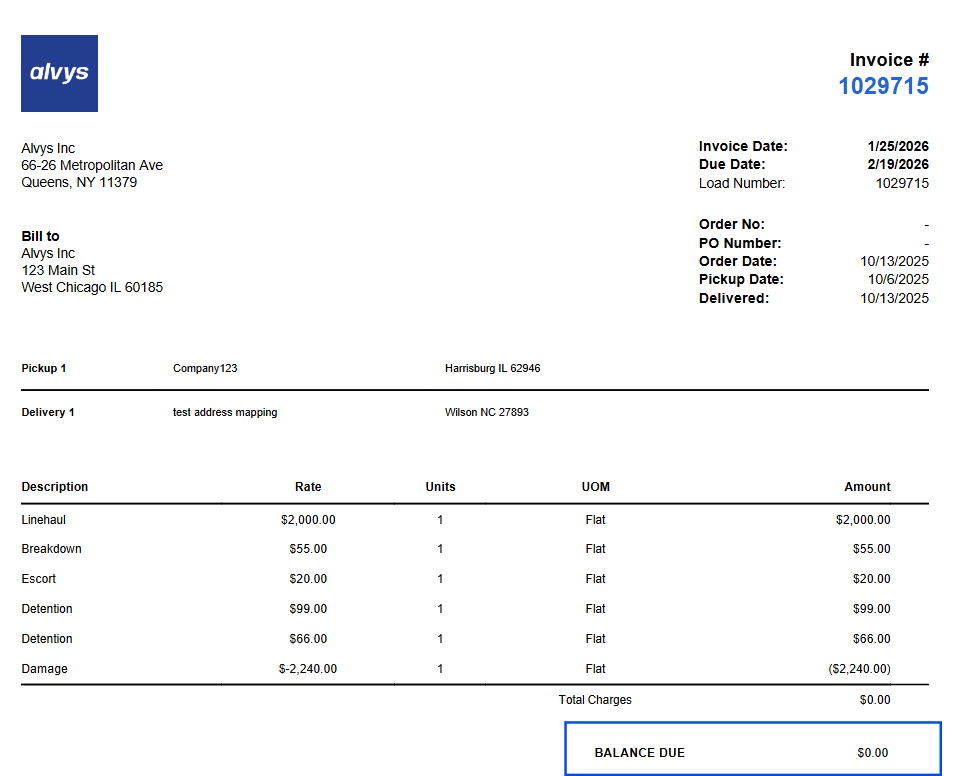 **Image showing sample Alvys Invoice with total billable of \$0**
⚠️ If the **Ignore Zero Valued Transactions** setting was previously enabled and a transaction with a total value of $0 was generated, such as a customer sales invoice/vendor purchase invoice, an issue may occur if that transaction is later updated to a value greater than $0. When attempting to export the updated transaction to Business Central, the system may encounter the following error: **"A digit was expected at position 3 in '(ID)'.”**
**If an error with this format occurs, please contact **[Alvys Support](mailto:support@alvys.com)** so the transaction can be re-exported.**
**Image showing sample Alvys Invoice with total billable of \$0**
⚠️ If the **Ignore Zero Valued Transactions** setting was previously enabled and a transaction with a total value of $0 was generated, such as a customer sales invoice/vendor purchase invoice, an issue may occur if that transaction is later updated to a value greater than $0. When attempting to export the updated transaction to Business Central, the system may encounter the following error: **"A digit was expected at position 3 in '(ID)'.”**
**If an error with this format occurs, please contact **[Alvys Support](mailto:support@alvys.com)** so the transaction can be re-exported.**
 ### Create Vendor Using 1099 Tax Company
The **“Create Vendor Using 1099 Tax Company”** setting allows users to determine whether vendors should be created in Business Central using the tax company details (Tax Company Name and Address) specified in the **Tax Information** section of the Alvys driver profile (for either company drivers or owner-operators with the tax category of 1099).
### Create Vendor Using 1099 Tax Company
The **“Create Vendor Using 1099 Tax Company”** setting allows users to determine whether vendors should be created in Business Central using the tax company details (Tax Company Name and Address) specified in the **Tax Information** section of the Alvys driver profile (for either company drivers or owner-operators with the tax category of 1099).
 **Image showing the Tax Company Name and Company Address**
When this setting is enabled: If the vendor does **not** exist in Business Central, a vendor will be automatically created when the driver statement is generated, using the Tax Company Name as the vendor's name and the Tax Company Address as the vendor address. If the vendor **already exists** in Business Central, the user must ensure that the vendor's name matches the Tax Company Name specified in the Alvys driver profile to avoid conflicts and create duplicates.
### Match Vendors by Name
The **“Match vendors by name”** setting controls how Alvys finds an existing Business Central vendor for a carrier.
Alvys always tries to match a carrier to a vendor by MC number first. This setting decides what happens when no MC-number match is found:
* **Enabled (the default).** Alvys falls back to matching by name. This is the long-standing behavior, so leaving it on changes nothing.
* **Disabled.** Alvys matches by MC number only. When there is no MC-number match it creates a **new vendor** rather than matching on a name, which keeps carriers that share a name but hold different MC numbers separate.
Turn it off if carrier bills have been posting under the wrong vendor because two of your carriers trade under the same name. Because the fallback is what causes that, removing the fallback is the fix.
**Carrier subsidiaries that export driver statements should leave this setting enabled.** Drivers do not have MC numbers, so they are matched by name. With the setting off, Alvys cannot find the matching driver in Business Central.
### Carrier Statements
This setting must be enabled to export carrier statements as bills when generating a Carrier Statement from the [Carrier Settlements module](https://app.alvys.com/#/accounting/settlements).
If you use the Carrier Settlements module to generate statements for external carriers and want these statements automatically exported to business central upon generation, this setting must be enabled. This is the **only** scenario in which this option should be turned on.
If you do not use the Carrier Settlements module and want carrier statements to be exported only when the carrier invoice is manually uploaded for a trip, this setting should be **disabled**, and the option to generate carrier invoices separately should be **enabled**.
Alternatively, if you prefer carrier statements to be exported only when the customer invoice is generated on a load, this setting should also be **disabled**, and the option to generate carrier invoices separately should remain **disabled**.
### Export Company Fuel Expense
The TMS allows users to record fuel transactions, either manually or imported directly from the fuel provider. These transactions can be viewed in the\*\* \*\*[Alvys Fuel Report](https://app.alvys.com/#/reports/fuel).
In the fuel report, if a transaction is marked “Deduct Transaction” true, the cost will be deducted from the linked driver during payroll (statement generation). If it is not deducted, Deduct Fuel false **(-)**, the transaction is treated as a company expense.
**Image showing the Tax Company Name and Company Address**
When this setting is enabled: If the vendor does **not** exist in Business Central, a vendor will be automatically created when the driver statement is generated, using the Tax Company Name as the vendor's name and the Tax Company Address as the vendor address. If the vendor **already exists** in Business Central, the user must ensure that the vendor's name matches the Tax Company Name specified in the Alvys driver profile to avoid conflicts and create duplicates.
### Match Vendors by Name
The **“Match vendors by name”** setting controls how Alvys finds an existing Business Central vendor for a carrier.
Alvys always tries to match a carrier to a vendor by MC number first. This setting decides what happens when no MC-number match is found:
* **Enabled (the default).** Alvys falls back to matching by name. This is the long-standing behavior, so leaving it on changes nothing.
* **Disabled.** Alvys matches by MC number only. When there is no MC-number match it creates a **new vendor** rather than matching on a name, which keeps carriers that share a name but hold different MC numbers separate.
Turn it off if carrier bills have been posting under the wrong vendor because two of your carriers trade under the same name. Because the fallback is what causes that, removing the fallback is the fix.
**Carrier subsidiaries that export driver statements should leave this setting enabled.** Drivers do not have MC numbers, so they are matched by name. With the setting off, Alvys cannot find the matching driver in Business Central.
### Carrier Statements
This setting must be enabled to export carrier statements as bills when generating a Carrier Statement from the [Carrier Settlements module](https://app.alvys.com/#/accounting/settlements).
If you use the Carrier Settlements module to generate statements for external carriers and want these statements automatically exported to business central upon generation, this setting must be enabled. This is the **only** scenario in which this option should be turned on.
If you do not use the Carrier Settlements module and want carrier statements to be exported only when the carrier invoice is manually uploaded for a trip, this setting should be **disabled**, and the option to generate carrier invoices separately should be **enabled**.
Alternatively, if you prefer carrier statements to be exported only when the customer invoice is generated on a load, this setting should also be **disabled**, and the option to generate carrier invoices separately should remain **disabled**.
### Export Company Fuel Expense
The TMS allows users to record fuel transactions, either manually or imported directly from the fuel provider. These transactions can be viewed in the\*\* \*\*[Alvys Fuel Report](https://app.alvys.com/#/reports/fuel).
In the fuel report, if a transaction is marked “Deduct Transaction” true, the cost will be deducted from the linked driver during payroll (statement generation). If it is not deducted, Deduct Fuel false **(-)**, the transaction is treated as a company expense.
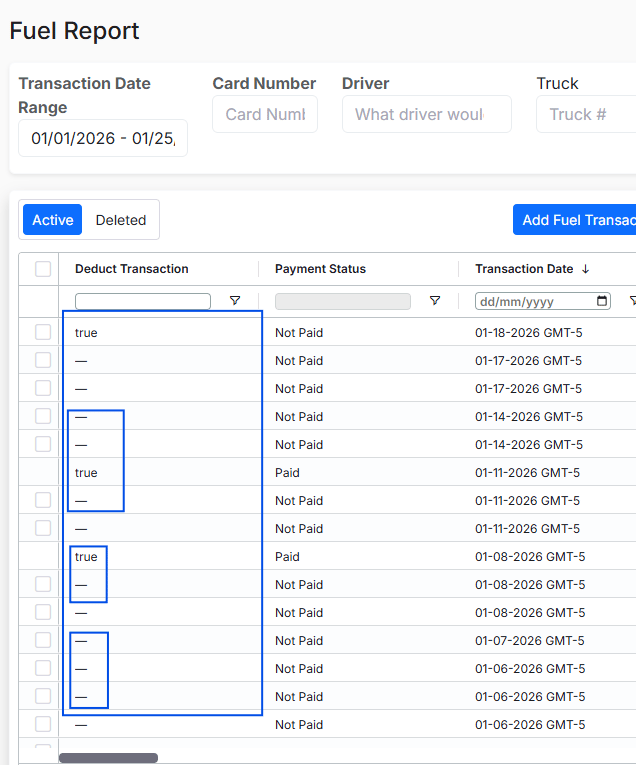 **Image showing the Alvys Fuel Report with the Deduct Transaction highlighted**
When the “Export Company Fuel Expense” setting is enabled, fuel transactions where Deduct Fuel is set to false (-) (i.e., fuel costs not deducted from drivers) are exported to Business Central as purchase invoices. This allows the company to track and manage fuel expenses not charged to drivers, such as those for company-owned vehicles. Exports are scheduled daily at 6:30 AM UTC
⚠️ Please note: if a user was not previously configured to export company fuel transactions and later enables this setting, past transactions will not be exported automatically. Additionally, if an export fails for any reason, contact\*\* \*\*[Alvys Support](mailto:support@alvys.com)[ ](mailto:support@alvys.com)to have those transactions exported.
### Export Company Toll Expense
The TMS allows users to record toll transactions, either manually or imported directly from the toll provider. These transactions can be viewed in the [Alvys Toll Report](https://app.alvys.com/#/reports/toll).
If a transaction is marked “Deduct Toll” true, the cost will be deducted from the linked driver during payroll. If it is not deducted, Deduct Toll false (-), the transaction is treated as a company expense.
**Image showing the Alvys Fuel Report with the Deduct Transaction highlighted**
When the “Export Company Fuel Expense” setting is enabled, fuel transactions where Deduct Fuel is set to false (-) (i.e., fuel costs not deducted from drivers) are exported to Business Central as purchase invoices. This allows the company to track and manage fuel expenses not charged to drivers, such as those for company-owned vehicles. Exports are scheduled daily at 6:30 AM UTC
⚠️ Please note: if a user was not previously configured to export company fuel transactions and later enables this setting, past transactions will not be exported automatically. Additionally, if an export fails for any reason, contact\*\* \*\*[Alvys Support](mailto:support@alvys.com)[ ](mailto:support@alvys.com)to have those transactions exported.
### Export Company Toll Expense
The TMS allows users to record toll transactions, either manually or imported directly from the toll provider. These transactions can be viewed in the [Alvys Toll Report](https://app.alvys.com/#/reports/toll).
If a transaction is marked “Deduct Toll” true, the cost will be deducted from the linked driver during payroll. If it is not deducted, Deduct Toll false (-), the transaction is treated as a company expense.
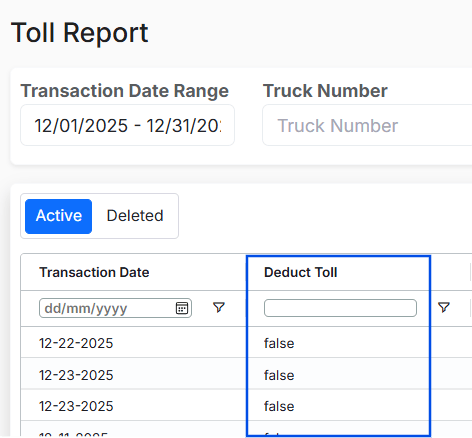 **Image showing the Alvys Toll Report with the Deduct Transaction highlighted**
When the “**Export Company Toll Expense**” setting is enabled, toll transactions where Deduct Toll is set to false (i.e., toll costs not deducted from drivers) are exported to the Business Central system as bills. This allows the company to track and manage toll expenses not charged to drivers, such as those incurred by company-owned vehicles. Exports are scheduled daily at 7:30 AM UTC.
### Reference number prefix
This setting allows Alvys’ predefined prefixes to be applied to transaction reference numbers, altering how transactions are identified when sent from Alvys to Business Central. Different transaction types, such as Load Invoices, Bills from Trips, and Bills from Paystubs, have specific prefixes. For example, an invoice might appear as **ALD-100000**. **Alvys Predefined Prefixes:**
* **ALD** – Load
* **ATP** – Trip
* **APS** – Paystub
* **AEK** – E-Check
* **AFL** – Fuel
* **ADT** – Deduction
* **ATL** – Toll
* **AAC** – Accessorial
Users should enable this setting **only** if reference numbers will help organize and identify transactions originating from Alvys.
In addition to the reference number prefix, users can configure a **fleet prefix**, which applies only to customer invoices exported to Business Central. Adding a fleet-specific prefix allows invoices to be easily differentiated across multiple fleets. See the following help center article to configure\*\* \*\*[fleet prefixes](/help/assets-fleet/how-to-add-and-manage-fleets-in-alvys)
**Priority of Prefixes (Reference Number Prefix vs Fleet Prefix):**
If both the external accounting setting for the reference number prefix and the fleet prefix are enabled, the fleet prefix takes precedence for invoices and will be prepended to the invoice number. Other transaction types, such as bills, will continue to use the standard reference number prefix.
### Subsidiaries
Alvys subsidiaries can be mapped to an Entity Dimension created in Business Central. Entity dimensions are typically established to distinguish and report on multiple legal entities within a single database environment. For tenants using Multi-Entity Management (MEM), Business Central generally operates as a single database, or single company, that contains multiple legal entities. To ensure proper financial separation and reporting, a Global Dimension commonly labeled Entity, or Subsidiary is used to tag all transactions accordingly. In this structure, each Alvys subsidiary must be mapped to the corresponding Business Central dimension value.
⚠️ Subsidiary mapping is mandatory for users who manage multiple legal entities within a single Business Central company (often referred to as Multi-Entity Management or MEM).
However, if the Business Central environment is configured with multiple separate companies, meaning individual databases, rather than a single company utilizing dimensions for MEM, the subsidiary mapping step within the integration is typically unnecessary. In this scenario, the integration logic differs because the Entity is inherently defined by the specific company connection itself.
### Prerequisites for Successful Subsidiary Mapping
Before completing this in Alvys, you must ensure your Dimensions are correctly established in Business Central: **Dimension Definition:** Ensure your "Entity" or "Subsidiary" dimension is set as a **Global Dimension** in your General Ledger Setup. **Value Creation:** Every subsidiary you intend to use must already exist as a **Dimension Value** within that dimension. For detailed instructions on establishing and configuring dimensions within Microsoft Business Central, please refer to the official documentation: [Working with Dimensions - Business Central | Microsoft Learn](https://learn.microsoft.com/en-us/dynamics365/business-central/finance-dimensions)\*\* \*\*[Set up dimensions in Dynamics 365 Business Central](https://learn.microsoft.com/en-us/training/modules/dimensions-dynamics-365-business-central/)
### How to Map Alvys Subsidiaries to Business Central
**Select the Subsidiaries Checkbox:** Within the Alvys integration setup, check the **Subsidiaries** box.
**Image showing the Alvys Toll Report with the Deduct Transaction highlighted**
When the “**Export Company Toll Expense**” setting is enabled, toll transactions where Deduct Toll is set to false (i.e., toll costs not deducted from drivers) are exported to the Business Central system as bills. This allows the company to track and manage toll expenses not charged to drivers, such as those incurred by company-owned vehicles. Exports are scheduled daily at 7:30 AM UTC.
### Reference number prefix
This setting allows Alvys’ predefined prefixes to be applied to transaction reference numbers, altering how transactions are identified when sent from Alvys to Business Central. Different transaction types, such as Load Invoices, Bills from Trips, and Bills from Paystubs, have specific prefixes. For example, an invoice might appear as **ALD-100000**. **Alvys Predefined Prefixes:**
* **ALD** – Load
* **ATP** – Trip
* **APS** – Paystub
* **AEK** – E-Check
* **AFL** – Fuel
* **ADT** – Deduction
* **ATL** – Toll
* **AAC** – Accessorial
Users should enable this setting **only** if reference numbers will help organize and identify transactions originating from Alvys.
In addition to the reference number prefix, users can configure a **fleet prefix**, which applies only to customer invoices exported to Business Central. Adding a fleet-specific prefix allows invoices to be easily differentiated across multiple fleets. See the following help center article to configure\*\* \*\*[fleet prefixes](/help/assets-fleet/how-to-add-and-manage-fleets-in-alvys)
**Priority of Prefixes (Reference Number Prefix vs Fleet Prefix):**
If both the external accounting setting for the reference number prefix and the fleet prefix are enabled, the fleet prefix takes precedence for invoices and will be prepended to the invoice number. Other transaction types, such as bills, will continue to use the standard reference number prefix.
### Subsidiaries
Alvys subsidiaries can be mapped to an Entity Dimension created in Business Central. Entity dimensions are typically established to distinguish and report on multiple legal entities within a single database environment. For tenants using Multi-Entity Management (MEM), Business Central generally operates as a single database, or single company, that contains multiple legal entities. To ensure proper financial separation and reporting, a Global Dimension commonly labeled Entity, or Subsidiary is used to tag all transactions accordingly. In this structure, each Alvys subsidiary must be mapped to the corresponding Business Central dimension value.
⚠️ Subsidiary mapping is mandatory for users who manage multiple legal entities within a single Business Central company (often referred to as Multi-Entity Management or MEM).
However, if the Business Central environment is configured with multiple separate companies, meaning individual databases, rather than a single company utilizing dimensions for MEM, the subsidiary mapping step within the integration is typically unnecessary. In this scenario, the integration logic differs because the Entity is inherently defined by the specific company connection itself.
### Prerequisites for Successful Subsidiary Mapping
Before completing this in Alvys, you must ensure your Dimensions are correctly established in Business Central: **Dimension Definition:** Ensure your "Entity" or "Subsidiary" dimension is set as a **Global Dimension** in your General Ledger Setup. **Value Creation:** Every subsidiary you intend to use must already exist as a **Dimension Value** within that dimension. For detailed instructions on establishing and configuring dimensions within Microsoft Business Central, please refer to the official documentation: [Working with Dimensions - Business Central | Microsoft Learn](https://learn.microsoft.com/en-us/dynamics365/business-central/finance-dimensions)\*\* \*\*[Set up dimensions in Dynamics 365 Business Central](https://learn.microsoft.com/en-us/training/modules/dimensions-dynamics-365-business-central/)
### How to Map Alvys Subsidiaries to Business Central
**Select the Subsidiaries Checkbox:** Within the Alvys integration setup, check the **Subsidiaries** box.
 *Shows an unselected configuration checkbox for the **Subsidiaries** field parameter.*
**Access the subsidiary mapping Step**
*Shows an unselected configuration checkbox for the **Subsidiaries** field parameter.*
**Access the subsidiary mapping Step**
 *Displays a progress indicator icon highlighting **Step 3 (Subsidiaries)** within a multi-step setup flow.*
Choose the class option from the dropdown menu located under the Subsidiary heading.
*Displays a progress indicator icon highlighting **Step 3 (Subsidiaries)** within a multi-step setup flow.*
Choose the class option from the dropdown menu located under the Subsidiary heading.
 *Shows Step 3 (Subsidiaries) containing an unconfigured Class dropdown menu.*
Link each relevant subsidiary to its corresponding option presented in the right-hand dropdown menu.
*Shows Step 3 (Subsidiaries) containing an unconfigured Class dropdown menu.*
Link each relevant subsidiary to its corresponding option presented in the right-hand dropdown menu.
 *hows Step 3 (Subsidiaries) tracking the configuration line for Alvys Inc alongside a searchable dropdown menu.*
### Fleets
Mapping Alvys Fleets to Business Central Dimensions allows you to track profitability by specific fleet or truck groups within your financial statements. In Business Central, this is usually handled via Dimensions. In Alvys, this mapping ensures that every time a load is synced, the correct "Tag" is attached to the General Ledger entry.
⚠️ The Alvys integration logic allows for **either** Fleet mapping or Subsidiary (Entity) mapping, but **not both** simultaneously.
### How to Map Alvys Fleets to Dimensions:
Select the **Fleets** checkbox, which will create an additional step called **Fleets**.
*hows Step 3 (Subsidiaries) tracking the configuration line for Alvys Inc alongside a searchable dropdown menu.*
### Fleets
Mapping Alvys Fleets to Business Central Dimensions allows you to track profitability by specific fleet or truck groups within your financial statements. In Business Central, this is usually handled via Dimensions. In Alvys, this mapping ensures that every time a load is synced, the correct "Tag" is attached to the General Ledger entry.
⚠️ The Alvys integration logic allows for **either** Fleet mapping or Subsidiary (Entity) mapping, but **not both** simultaneously.
### How to Map Alvys Fleets to Dimensions:
Select the **Fleets** checkbox, which will create an additional step called **Fleets**.
 \*Displays an unselected configuration checkbox for the Fleets field \*
Click on the **Fleets** step.
\*Displays an unselected configuration checkbox for the Fleets field \*
Click on the **Fleets** step.
 *Displays a progress indicator icon highlighting Step 4 (Fleets) within a multi-step setup flow.*
Choose the class option from the dropdown menu located under the Fleets heading.
*Displays a progress indicator icon highlighting Step 4 (Fleets) within a multi-step setup flow.*
Choose the class option from the dropdown menu located under the Fleets heading.
 *Shows Step 4 (Fleets) featuring an unconfigured Class sorting dropdown menu.*
Proceed by mapping each specific Alvy's fleet to the corresponding option presented in the right-hand dropdown menu.
### Shared Billing/Intercompany Billing
🚫 It is not recommended to use Shared Billing with the Alvys Business Integration Central, as it is currently not stable.
Shared Billing is used when a load is **invoiced by one subsidiary** (Invoice As) and **tendered by another subsidiary** (Tender As), and both subsidiaries have separate accounting integrations. This setting ensures that all financial transactions are correctly recorded across the two subsidiaries.
**Invoice As Subsidiary (e.g., Alvys Inc)**
*Shows Step 4 (Fleets) featuring an unconfigured Class sorting dropdown menu.*
Proceed by mapping each specific Alvy's fleet to the corresponding option presented in the right-hand dropdown menu.
### Shared Billing/Intercompany Billing
🚫 It is not recommended to use Shared Billing with the Alvys Business Integration Central, as it is currently not stable.
Shared Billing is used when a load is **invoiced by one subsidiary** (Invoice As) and **tendered by another subsidiary** (Tender As), and both subsidiaries have separate accounting integrations. This setting ensures that all financial transactions are correctly recorded across the two subsidiaries.
**Invoice As Subsidiary (e.g., Alvys Inc)**
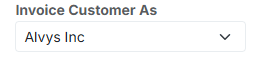 *view of the billing configuration dropdown menu with Invoice Customer As set to Alvys Inc.*
* Creates a **customer invoice** for the load
* Creates an **intercompany bill to the Tender As subsidiary** (Alvys Brokerage) for the carrier/driver cost
**Tender As Subsidiary (e.g., Alvys Brokerage)**
*view of the billing configuration dropdown menu with Invoice Customer As set to Alvys Inc.*
* Creates a **customer invoice** for the load
* Creates an **intercompany bill to the Tender As subsidiary** (Alvys Brokerage) for the carrier/driver cost
**Tender As Subsidiary (e.g., Alvys Brokerage)**
 *Displays a minimal status line reflecting that the current load is being handled under Tendering As: Alvys Brokerage.*
* Creates an **intercompany invoice back to the Invoice As subsidiary**
* Creates a **vendor bill to the carrier or driver** for the load
⚠️ Shared Billing must be enabled on **both subsidiaries**. Without it, the intercompany transactions or carrier/vendor bills will not export correctly.
## Send E-Check on Generation
This setting controls whether e-Check transactions created in Alvys are automatically exported to Business Central at the moment the e-Check is generated.
When this setting is enabled, Alvys immediately creates and transmits a journal entry to the selected General Journal Batch in Business Central. The journal entry will post according to the journal batch configuration and the user permissions established in Business Central. It is important to ensure that the designated General Journal Batch exists, is not blocked, and that the integration user has sufficient permissions to create and post journal entries.
If this setting is disabled, e-Check journal entries will not export automatically. Instead, the export occurs when the e-Check is included on a generated driver statement or when a carrier bill is exported.
## Add Asset Dimensions
The **Add Asset Dimensions** setting allows users to map Alvys Assets (trucks and drivers) to Dimensions in Microsoft Dynamics 365 Business Central. In BC Dimensions are used to categorize financial data for reporting and analysis, enabling organizations to track profitability and performance by specific operational assets.
Before enabling this feature in Alvys, the required Dimension Codes and Dimension Values must be created in Business Central.
**Create Dimension Codes (in Business Central):**
* Navigate to the **Dimensions** page (🔍 Search → *Dimensions*).
* Click **New**.
* Create a dimension code such as **DRIVERS** (Name: Drivers).
* Create a dimension code such as **TRUCKS** (Name: Trucks).
**Create Dimension Values (in Business Central):**
* Open the **DRIVERS** dimension and select **Dimension Values**.
* Click **New** and create a value for each driver (for example, Code: JOHN).
* Open the **TRUCKS** dimension and select **Dimension Values**.
* Click **New** and create a value for each truck (for example, Code: T01).
\*\*Microsoft documentation reference: \*\*[Work with dimensions](https://learn.microsoft.com/en-us/dynamics365/business-central/finance-dimensions)
After the Dimension Codes and Values are created in Business Central, the user must map the **Dimension Codes** in the Alvys integration settings. In Alvys, you will map:
* **Alvys Driver** → Business Central Dimension Code: **DRIVERS**
* **Alvys Truck** → Business Central Dimension Code: **TRUCKS**
💡 The user should not map individual Dimension Values in Alvys. During transaction export, Alvys automatically sends the driver and truck identifiers associated with the transaction.
## Configuration Dependencies and Incompatible Settings
Some Configuration settings in the Alvys Business Central integration are mutually exclusive (meaning they cannot be enabled at the same time) or render others inactive when enabled. In addition, certain settings may not require configuration at all, depending on the initial selection of Revenue and or Expense transactions
### The Revenue Checkbox
If only the Revenue transaction checkbox is selected (customer invoices, etc.), \*\*do \*\***not** configure any settings related to Expenses, including:
* Single Bill for Driver Statement
* Generate Carrier Invoice Separately
* Process Statement by Tax Category
* Pay Subsidiary Carrier
* Create Vendor Using 1099 Tax Company
* Ignore Driver Bills
* Carrier Statements
* Export Company Fuel Expense (not deducted from a driver)
* Export Company Toll Expense (not deducted from a driver)
*Displays a minimal status line reflecting that the current load is being handled under Tendering As: Alvys Brokerage.*
* Creates an **intercompany invoice back to the Invoice As subsidiary**
* Creates a **vendor bill to the carrier or driver** for the load
⚠️ Shared Billing must be enabled on **both subsidiaries**. Without it, the intercompany transactions or carrier/vendor bills will not export correctly.
## Send E-Check on Generation
This setting controls whether e-Check transactions created in Alvys are automatically exported to Business Central at the moment the e-Check is generated.
When this setting is enabled, Alvys immediately creates and transmits a journal entry to the selected General Journal Batch in Business Central. The journal entry will post according to the journal batch configuration and the user permissions established in Business Central. It is important to ensure that the designated General Journal Batch exists, is not blocked, and that the integration user has sufficient permissions to create and post journal entries.
If this setting is disabled, e-Check journal entries will not export automatically. Instead, the export occurs when the e-Check is included on a generated driver statement or when a carrier bill is exported.
## Add Asset Dimensions
The **Add Asset Dimensions** setting allows users to map Alvys Assets (trucks and drivers) to Dimensions in Microsoft Dynamics 365 Business Central. In BC Dimensions are used to categorize financial data for reporting and analysis, enabling organizations to track profitability and performance by specific operational assets.
Before enabling this feature in Alvys, the required Dimension Codes and Dimension Values must be created in Business Central.
**Create Dimension Codes (in Business Central):**
* Navigate to the **Dimensions** page (🔍 Search → *Dimensions*).
* Click **New**.
* Create a dimension code such as **DRIVERS** (Name: Drivers).
* Create a dimension code such as **TRUCKS** (Name: Trucks).
**Create Dimension Values (in Business Central):**
* Open the **DRIVERS** dimension and select **Dimension Values**.
* Click **New** and create a value for each driver (for example, Code: JOHN).
* Open the **TRUCKS** dimension and select **Dimension Values**.
* Click **New** and create a value for each truck (for example, Code: T01).
\*\*Microsoft documentation reference: \*\*[Work with dimensions](https://learn.microsoft.com/en-us/dynamics365/business-central/finance-dimensions)
After the Dimension Codes and Values are created in Business Central, the user must map the **Dimension Codes** in the Alvys integration settings. In Alvys, you will map:
* **Alvys Driver** → Business Central Dimension Code: **DRIVERS**
* **Alvys Truck** → Business Central Dimension Code: **TRUCKS**
💡 The user should not map individual Dimension Values in Alvys. During transaction export, Alvys automatically sends the driver and truck identifiers associated with the transaction.
## Configuration Dependencies and Incompatible Settings
Some Configuration settings in the Alvys Business Central integration are mutually exclusive (meaning they cannot be enabled at the same time) or render others inactive when enabled. In addition, certain settings may not require configuration at all, depending on the initial selection of Revenue and or Expense transactions
### The Revenue Checkbox
If only the Revenue transaction checkbox is selected (customer invoices, etc.), \*\*do \*\***not** configure any settings related to Expenses, including:
* Single Bill for Driver Statement
* Generate Carrier Invoice Separately
* Process Statement by Tax Category
* Pay Subsidiary Carrier
* Create Vendor Using 1099 Tax Company
* Ignore Driver Bills
* Carrier Statements
* Export Company Fuel Expense (not deducted from a driver)
* Export Company Toll Expense (not deducted from a driver)
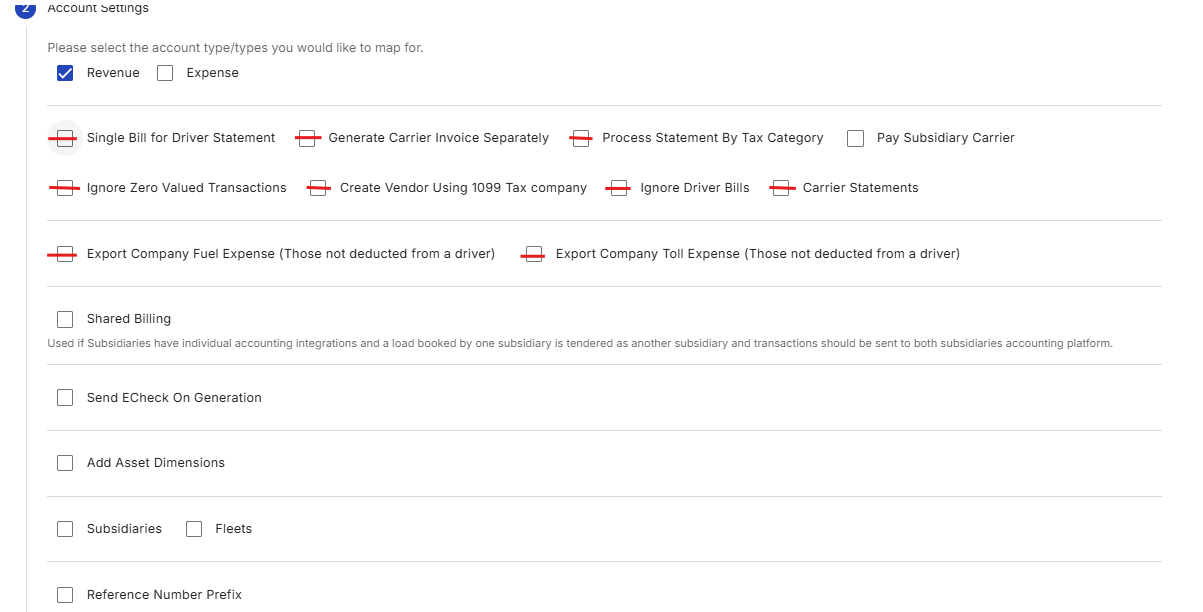 *Displays Step 2 (Account Settings) with only Revenue selected, automatically crossing out all subsequent expense-specific configuration properties.*
### Single Bill for Driver Statement
*Displays Step 2 (Account Settings) with only Revenue selected, automatically crossing out all subsequent expense-specific configuration properties.*
### Single Bill for Driver Statement
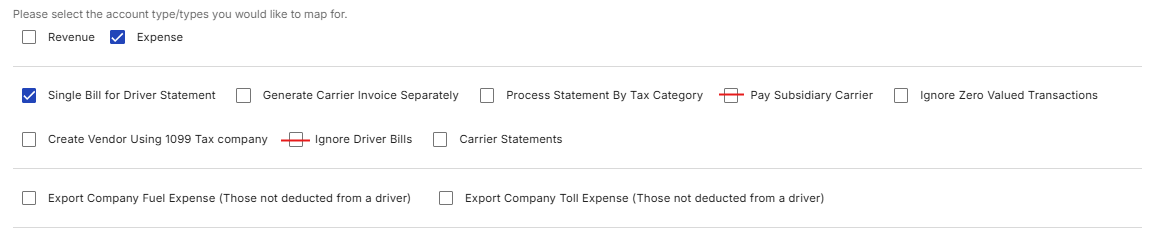 *Shows the Account Settings interface with Expense mapping enabled and the Single Bill for Driver Statement parameter actively checked.*
**Do not configure this setting with:**
* **Ignore Driver Bills**
* **Pay Subsidiary Carrier**
**Why:**
Single Bill for Driver Statement assumes that **driver bills are being created and exported**. If driver bills are ignored *(not sent to Business Central)* this consolidation logic no longer applies and will conflict with the export process. Also, if configured with pay subsidiary carrier bills, the single bill for driver statement will take precedence.
### Process Statement by Tax Category
*Shows the Account Settings interface with Expense mapping enabled and the Single Bill for Driver Statement parameter actively checked.*
**Do not configure this setting with:**
* **Ignore Driver Bills**
* **Pay Subsidiary Carrier**
**Why:**
Single Bill for Driver Statement assumes that **driver bills are being created and exported**. If driver bills are ignored *(not sent to Business Central)* this consolidation logic no longer applies and will conflict with the export process. Also, if configured with pay subsidiary carrier bills, the single bill for driver statement will take precedence.
### Process Statement by Tax Category
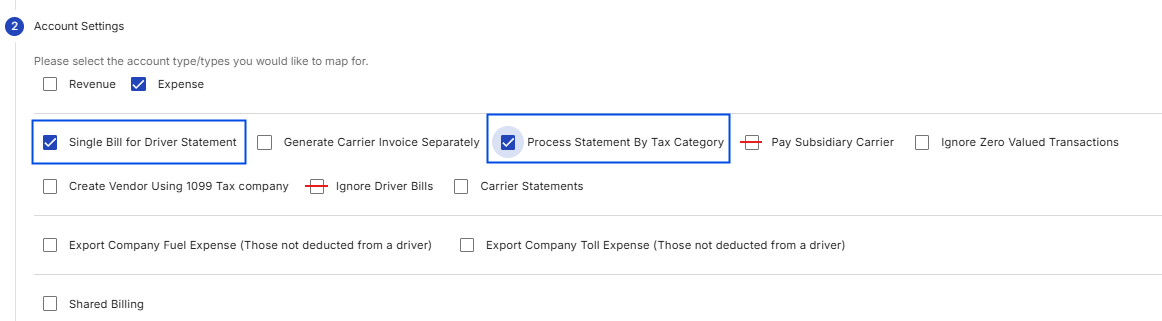 *Features blue boxes highlighting both Single Bill for Driver Statement and Process Statement By Tax Category enabled concurrently under Expense settings.*
**Configuration Dependency:**
* **Single Bill for Driver Statement must be enabled** along with this setting
**Do not configure this setting with:**
* **Ignore Driver Bills**
* **Pay Subsidiary Carrier Why: This setting depends on driver bill data to separate payments by tax type. If driver bills are ignored or billing is redirected to a subsidiary carrier, tax-based filtering cannot function correctly.**
### Pay Subsidiary Carrier
*Features blue boxes highlighting both Single Bill for Driver Statement and Process Statement By Tax Category enabled concurrently under Expense settings.*
**Configuration Dependency:**
* **Single Bill for Driver Statement must be enabled** along with this setting
**Do not configure this setting with:**
* **Ignore Driver Bills**
* **Pay Subsidiary Carrier Why: This setting depends on driver bill data to separate payments by tax type. If driver bills are ignored or billing is redirected to a subsidiary carrier, tax-based filtering cannot function correctly.**
### Pay Subsidiary Carrier
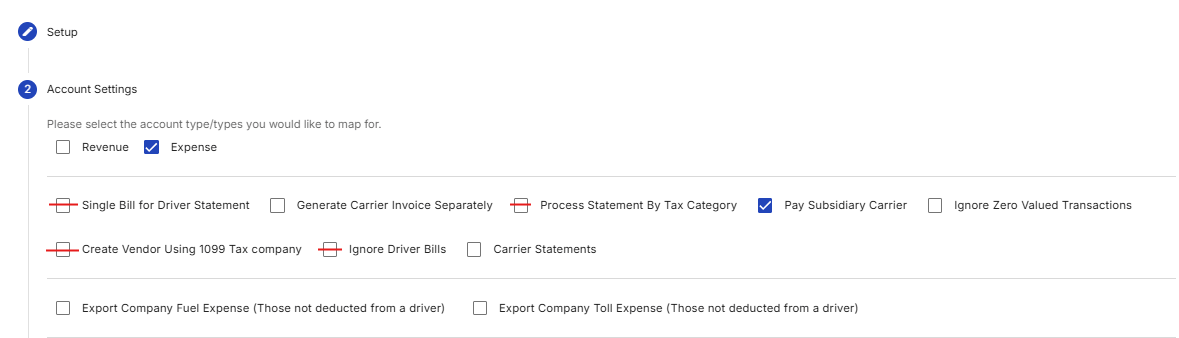 *Displays the active configuration of Pay Subsidiary Carrier, which renders conflicting single bill options struck through in red.*
**Do not configure this setting with:**
* **Single Bill for Driver Statement**
* **Process Statement By Tax Category**
* **Create Vendor Using 1099 Tax Company**
* **Ignore Driver Bills**
**Why:**
When this setting is enabled, billing responsibility shifts **away from the driver entirely**. Any configuration that assumes driver-based billing, or driver vendor creation becomes invalid.
### Ignore Driver Bills
*Displays the active configuration of Pay Subsidiary Carrier, which renders conflicting single bill options struck through in red.*
**Do not configure this setting with:**
* **Single Bill for Driver Statement**
* **Process Statement By Tax Category**
* **Create Vendor Using 1099 Tax Company**
* **Ignore Driver Bills**
**Why:**
When this setting is enabled, billing responsibility shifts **away from the driver entirely**. Any configuration that assumes driver-based billing, or driver vendor creation becomes invalid.
### Ignore Driver Bills
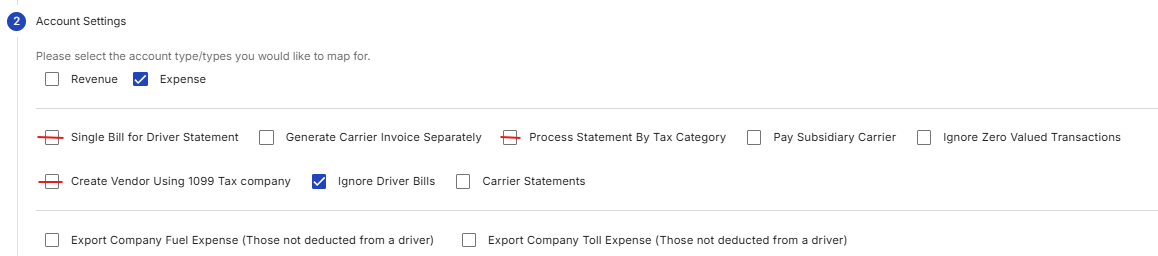 *Shows Step 2 (Account Settings) with the Ignore Driver Bills toggle checked under the Expense configuration options.*
**Do not configure this setting with:**
* **Single Bill for Driver Statement**
* **Process Statement By Tax Category**
* **Create Vendor Using 1099 Tax Company**
**Why:**
Each of these settings relies on **driver bills being generated and exported**. Ignoring driver bills removes the underlying data required for these settings to work.
### Create Vendor Using 1099 Tax Company
*Shows Step 2 (Account Settings) with the Ignore Driver Bills toggle checked under the Expense configuration options.*
**Do not configure this setting with:**
* **Single Bill for Driver Statement**
* **Process Statement By Tax Category**
* **Create Vendor Using 1099 Tax Company**
**Why:**
Each of these settings relies on **driver bills being generated and exported**. Ignoring driver bills removes the underlying data required for these settings to work.
### Create Vendor Using 1099 Tax Company
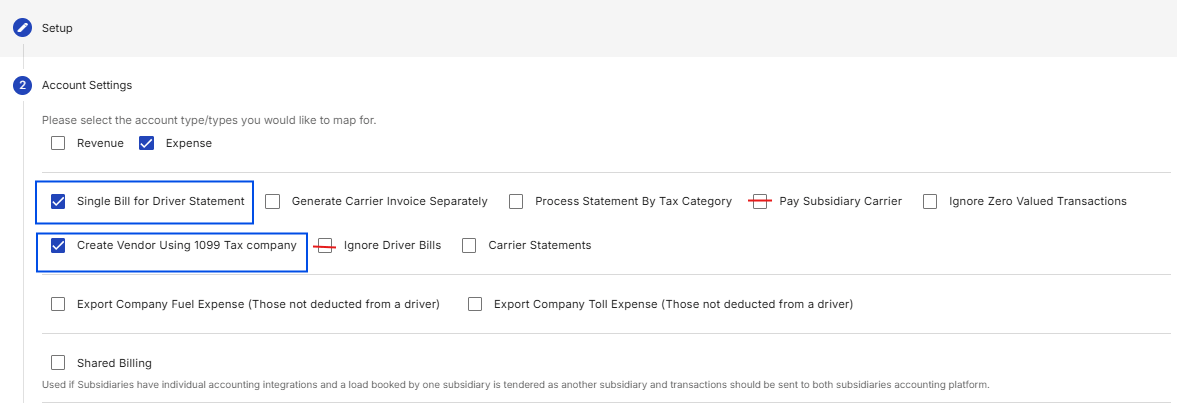 *eatures blue boundaries highlighting a joint setup enabling both Single Bill for Driver Statement and Create Vendor Using 1099 Tax company.*
**Configuration Dependency:**
* **Single Bill for Driver Statement must be enabled** along with this setting
**Do not configure this setting with:**
* **Pay Subsidiary Carrier**
* **Ignore Driver Bills**
**Why:**
This option assumes driver-based billing based on tax category. If billing is redirected to a subsidiary carrier or driver bills are excluded, vendor creation using tax data is no longer applicable.
### Match Vendors by Name
**Configuration Dependency:**
* **Leave enabled** if this subsidiary is a carrier subsidiary that **exports driver statements**
**Why:**
Vendor matching by MC number only works for parties that have an MC number. Drivers do not, so they are resolved by name. Disabling the name fallback to keep same-named *carriers* distinct also removes the only way Alvys can match a *driver*, and driver statement export stops finding its vendor.
## FAQs
**Q: Can I configure the integration for multiple subsidiaries simultaneously?**
**A:** No. The integration must be configured one subsidiary at a time. Return to Management > Integrations and repeat the connection steps for each additional subsidiary.
**Q: What happens if I enable only the Revenue transaction type?**
**A:** Only customer invoices are exported to Business Central. Carrier bills, driver settlements, and expense-related settings have no effect. Do not enable expense-specific settings when only Revenue is selected.
**Q: What happens if I enable only the Expense transaction type?**
**A:** Only carrier bills and driver settlements are exported to Business Central. Customer invoices are not exported.
**Q: What does "Ignore Driver Bills" do?**
**A:** It excludes driver-level bills from export entirely. Use this when you do not need individual driver payroll entries in Business Central, such as when drivers are paid through a separate payroll system.
**Q: Can I enable "Single Bill for Driver Statement" with "Pay Subsidiary Carrier"?**
**A:** No. These settings are incompatible. Single Bill consolidates driver-level billing, while Pay Subsidiary Carrier redirects billing away from drivers entirely. Enable only one or the other.
**Q: How do I exclude W-2 driver payments from exporting to Business Central?**
**A:** Enable Ignore Driver Bills. This excludes all driver bills from export. If you need to export only certain types of driver payments, review the Process Statement by Tax Category and Single Bill for Driver Statement settings for more targeted control.
**Q: Why am I receiving a digit expectation error when exporting a previously \$0 transaction?**
**A:** This error can occur when a transaction that previously had a $0 value is updated and re-exported. Enabling Ignore Zero Valued Transactions prevents $0 transactions from being sent in the first place, which avoids this error on subsequent updates. If the error persists after enabling this setting, contact Alvys support.
**Q: Can I enable both Ignore Driver Bills and Single Bill for Driver Statement?**
**A:** No. These settings are incompatible. Single Bill depends on driver bills being exported; Ignore Driver Bills removes them before export.
**Q: When do fuel and toll expenses sync to Business Central?**
**A:** Fuel and toll expenses sync when the associated load transaction is exported. If Export Company Fuel Expense or Export Company Toll Expense was not enabled when past transactions were processed, those past transactions will not be retroactively exported after the setting is turned on.
**Q: Do I need to manually map every individual driver and truck as a Dimension Value?**
**A:** No. Subsidiaries and Fleets are mapped as groups, not as individual drivers or trucks. After enabling the Subsidiaries or Fleets setting, you map each Alvys subsidiary or fleet to its corresponding Business Central Dimension value.
**Q: Can I map both Fleets and Subsidiaries to Business Central Dimensions?**
**A:** No. These settings are mutually exclusive. You must choose to map by either Subsidiaries or Fleets, not both simultaneously.
**Q: Why has a carrier bill not exported even though the load invoice was generated?**
**A:** If Generate Carrier Invoice Separately is enabled, the carrier bill will not export until the physical carrier invoice has been received and verified in Alvys. Confirm that the carrier invoice has been marked as received on the load. If the invoice is marked received and the bill still has not exported, contact Alvys support.
**Q: What happens if a vendor match is not found in Business Central during export?**
**A:** If no matching vendor is found by name or External Accounting ID, Alvys automatically creates a new vendor in Business Central using the carrier or driver's profile information, along with the Default Payment Method you selected during setup.
## Go Deeper
* [Business Central: Account Mappings](/help/integrations/how-to-set-up-business-central-account-mappings)
*eatures blue boundaries highlighting a joint setup enabling both Single Bill for Driver Statement and Create Vendor Using 1099 Tax company.*
**Configuration Dependency:**
* **Single Bill for Driver Statement must be enabled** along with this setting
**Do not configure this setting with:**
* **Pay Subsidiary Carrier**
* **Ignore Driver Bills**
**Why:**
This option assumes driver-based billing based on tax category. If billing is redirected to a subsidiary carrier or driver bills are excluded, vendor creation using tax data is no longer applicable.
### Match Vendors by Name
**Configuration Dependency:**
* **Leave enabled** if this subsidiary is a carrier subsidiary that **exports driver statements**
**Why:**
Vendor matching by MC number only works for parties that have an MC number. Drivers do not, so they are resolved by name. Disabling the name fallback to keep same-named *carriers* distinct also removes the only way Alvys can match a *driver*, and driver statement export stops finding its vendor.
## FAQs
**Q: Can I configure the integration for multiple subsidiaries simultaneously?**
**A:** No. The integration must be configured one subsidiary at a time. Return to Management > Integrations and repeat the connection steps for each additional subsidiary.
**Q: What happens if I enable only the Revenue transaction type?**
**A:** Only customer invoices are exported to Business Central. Carrier bills, driver settlements, and expense-related settings have no effect. Do not enable expense-specific settings when only Revenue is selected.
**Q: What happens if I enable only the Expense transaction type?**
**A:** Only carrier bills and driver settlements are exported to Business Central. Customer invoices are not exported.
**Q: What does "Ignore Driver Bills" do?**
**A:** It excludes driver-level bills from export entirely. Use this when you do not need individual driver payroll entries in Business Central, such as when drivers are paid through a separate payroll system.
**Q: Can I enable "Single Bill for Driver Statement" with "Pay Subsidiary Carrier"?**
**A:** No. These settings are incompatible. Single Bill consolidates driver-level billing, while Pay Subsidiary Carrier redirects billing away from drivers entirely. Enable only one or the other.
**Q: How do I exclude W-2 driver payments from exporting to Business Central?**
**A:** Enable Ignore Driver Bills. This excludes all driver bills from export. If you need to export only certain types of driver payments, review the Process Statement by Tax Category and Single Bill for Driver Statement settings for more targeted control.
**Q: Why am I receiving a digit expectation error when exporting a previously \$0 transaction?**
**A:** This error can occur when a transaction that previously had a $0 value is updated and re-exported. Enabling Ignore Zero Valued Transactions prevents $0 transactions from being sent in the first place, which avoids this error on subsequent updates. If the error persists after enabling this setting, contact Alvys support.
**Q: Can I enable both Ignore Driver Bills and Single Bill for Driver Statement?**
**A:** No. These settings are incompatible. Single Bill depends on driver bills being exported; Ignore Driver Bills removes them before export.
**Q: When do fuel and toll expenses sync to Business Central?**
**A:** Fuel and toll expenses sync when the associated load transaction is exported. If Export Company Fuel Expense or Export Company Toll Expense was not enabled when past transactions were processed, those past transactions will not be retroactively exported after the setting is turned on.
**Q: Do I need to manually map every individual driver and truck as a Dimension Value?**
**A:** No. Subsidiaries and Fleets are mapped as groups, not as individual drivers or trucks. After enabling the Subsidiaries or Fleets setting, you map each Alvys subsidiary or fleet to its corresponding Business Central Dimension value.
**Q: Can I map both Fleets and Subsidiaries to Business Central Dimensions?**
**A:** No. These settings are mutually exclusive. You must choose to map by either Subsidiaries or Fleets, not both simultaneously.
**Q: Why has a carrier bill not exported even though the load invoice was generated?**
**A:** If Generate Carrier Invoice Separately is enabled, the carrier bill will not export until the physical carrier invoice has been received and verified in Alvys. Confirm that the carrier invoice has been marked as received on the load. If the invoice is marked received and the bill still has not exported, contact Alvys support.
**Q: What happens if a vendor match is not found in Business Central during export?**
**A:** If no matching vendor is found by name or External Accounting ID, Alvys automatically creates a new vendor in Business Central using the carrier or driver's profile information, along with the Default Payment Method you selected during setup.
## Go Deeper
* [Business Central: Account Mappings](/help/integrations/how-to-set-up-business-central-account-mappings)