> ## Documentation Index
> Fetch the complete documentation index at: https://docs.alvys.com/llms.txt
> Use this file to discover all available pages before exploring further.
# NetSuite: Prerequisites
> Prepare NetSuite for the Alvys integration: enable SuiteTalk REST, create the integration role and user, and generate Token-Based Authentication keys.
Before connecting Alvys to NetSuite, your NetSuite environment must be properly prepared: the correct features, roles, users, and credentials must be configured, or the integration will fail to authenticate or export transactions.
### Overview
Before configuring (setting up) the Alvys and NetSuite integration, your NetSuite environment must be properly prepared. Most integration failures result from misconfigured features, roles, users, or improper subsidiary access.
Alvys connects to NetSuite using **Token-Based Authentication (TBA)** through **SuiteTalk REST Web Services**. This secure authentication method allows encrypted API communication without storing user credentials. OAuth 2.0 is not used.
### Before You Start
**Required role:** Configuring the accounting integration in Alvys requires the **"CompanyProfileManager"** permission, available to the Admin, Partner Admin, or Support role. On the NetSuite side, a NetSuite Administrator (or a role with equivalent permissions) is needed only during setup to enable features, create roles, and generate tokens.
**Prerequisites:**
* An active NetSuite account with Administrator-level access
* Access to Setup, Users/Roles, and Integrations in NetSuite
* If your organization uses NetSuite OneWorld, all subsidiaries must be created and configured before starting
💡 **Important:** Do not use your personal Administrator login for the live integration. During setup you will create a dedicated integration role and user specifically for Alvys. Your Administrator account is used only to prepare the system, not to run the integration long-term.
### Steps
#### Enable required NetSuite features
The required features are: REST Web Services, SOAP Web Services, Token-Based Authentication (TBA), and SuiteScript.
**Required Features**
* **REST Web Services** – Allows NetSuite to share data with Alvys
* **SOAP Web Services** – Recommended to ensure compatibility with all supported record types
* **Token-Based Authentication (TBA)** – Allows secure system access without using a password
* **SuiteScript** – While Alvys does not deploy custom scripts in your account, SuiteScript is required for NetSuite’s REST and SOAP Web Services to function properly, including internal searches and record queries executed by the integration.
💡 **Important:** OAuth 2.0 is not required for this integration. Alvys authenticates exclusively using Token-Based Authentication (TBA).
1. Log in to NetSuite using your administrator account.
2. Navigate to **Setup > Company > Enable Features**.
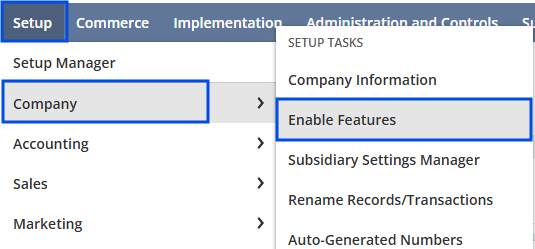 *NetSuite menu: Setup > Company > Enable Features*
3. Open the **SuiteCloud** tab.
*NetSuite menu: Setup > Company > Enable Features*
*NetSuite menu: Setup > Company > Enable Features*
3. Open the **SuiteCloud** tab.
 *Selecting the SuiteCloud tab*
4. In the **SuiteTalk (Web Services)** section, enable **SOAP Web Services** and **REST Web Services**.
*Selecting the SuiteCloud tab*
*Selecting the SuiteCloud tab*
4. In the **SuiteTalk (Web Services)** section, enable **SOAP Web Services** and **REST Web Services**.
 *SuiteTalk (Web Services) section*
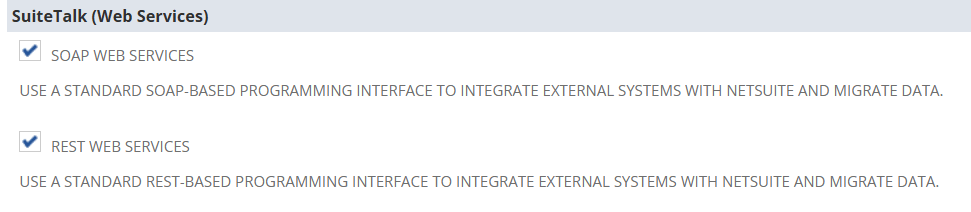 *SOAP and REST Web Services enabled*
1. In the **Manage Authentication** section, enable **Token-Based Authentication (TBA)**.
*SOAP and REST Web Services enabled*
1. In the **Manage Authentication** section, enable **Token-Based Authentication (TBA)**.
 *Enabling Token-Based Authentication*
2. In the **SuiteCloud** tab, locate **SuiteScript** and enable it.
*Enabling Token-Based Authentication*
*Enabling Token-Based Authentication*
2. In the **SuiteCloud** tab, locate **SuiteScript** and enable it.
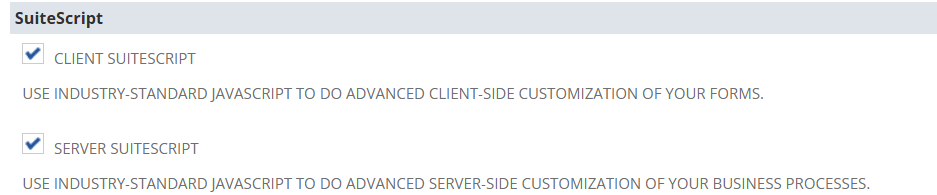 *Enabling Client and Server SuiteScript*
3. Click **Save**.
**Important:** Missing any of these features may cause authentication failures or prevent transaction data from being exported correctly.
#### Create a dedicated integration role
A dedicated role separates automated API access from human administrator accounts and restricts permissions to only what is necessary.
1. Navigate to **Setup > Users/Roles > Manage Roles**, then click **New**.
*Enabling Client and Server SuiteScript*
*Enabling Client and Server SuiteScript*
3. Click **Save**.
**Important:** Missing any of these features may cause authentication failures or prevent transaction data from being exported correctly.
#### Create a dedicated integration role
A dedicated role separates automated API access from human administrator accounts and restricts permissions to only what is necessary.
1. Navigate to **Setup > Users/Roles > Manage Roles**, then click **New**.
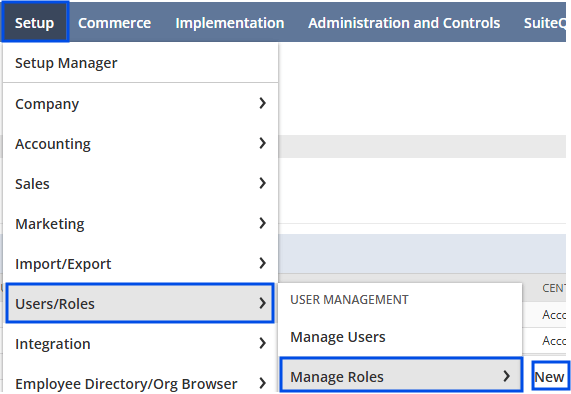 *Creating a new role under Manage Roles*
2. Enter a descriptive name such as **"Alvys Integration Role"**.
3. Assign **Subsidiary Access**: if using OneWorld, assign access to all subsidiaries used in Alvys and enable **Cross-Subsidiary Record Viewing**.
*Creating a new role under Manage Roles*
*Creating a new role under Manage Roles*
2. Enter a descriptive name such as **"Alvys Integration Role"**.
3. Assign **Subsidiary Access**: if using OneWorld, assign access to all subsidiaries used in Alvys and enable **Cross-Subsidiary Record Viewing**.
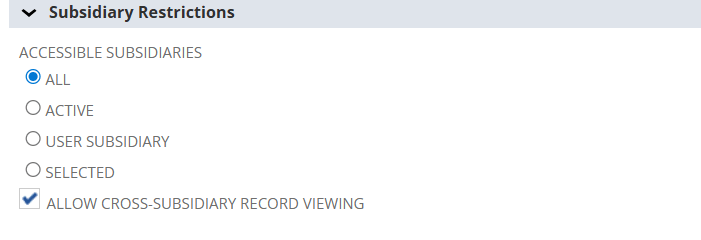 *Setting subsidiary access and cross-subsidiary viewing*
4. Optionally, restrict the role to **Web Services Only** to prevent login through the NetSuite interface.
*Setting subsidiary access and cross-subsidiary viewing*
*Setting subsidiary access and cross-subsidiary viewing*
4. Optionally, restrict the role to **Web Services Only** to prevent login through the NetSuite interface.
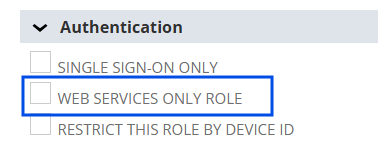 *Restricting the role to Web Services Only*
5. Click **Save**.
#### Assign permissions to the integration role
**Setup permissions** (all Full Access unless noted):
REST Web Services, SOAP Web Services, Login Using Access Tokens, SuiteScript, Accounting Lists, Custom Fields, Custom Item Fields, Custom Body Fields, Custom Column Fields, Custom Transaction Fields, Custom Entity Fields, Custom Record Types, Custom Segments, Custom Lists, Other Lists, Deleted Records, Manage Accounting Periods (View), Financial Institution Records
*Restricting the role to Web Services Only*
*Restricting the role to Web Services Only*
5. Click **Save**.
#### Assign permissions to the integration role
**Setup permissions** (all Full Access unless noted):
REST Web Services, SOAP Web Services, Login Using Access Tokens, SuiteScript, Accounting Lists, Custom Fields, Custom Item Fields, Custom Body Fields, Custom Column Fields, Custom Transaction Fields, Custom Entity Fields, Custom Record Types, Custom Segments, Custom Lists, Other Lists, Deleted Records, Manage Accounting Periods (View), Financial Institution Records
 *Setup permissions tab on the role*
**Transaction permissions** (all Full Access):
Invoice, Bills, Customer Payments, Pay Bills, Vendor Credits, Credit Memos, Customer Deposit, Make Journal Entry
*Setup permissions tab on the role*
**Transaction permissions** (all Full Access):
Invoice, Bills, Customer Payments, Pay Bills, Vendor Credits, Credit Memos, Customer Deposit, Make Journal Entry
 *Transactions permissions tab on the role*
**Important:** If any transaction permissions are missing, exports may fail even if authentication is successful.
**List permissions:**
Accounts (Full), Address List in Search (Full), Contacts (Full), Customers (Full), Vendors (Full), Employees (View), Employee Record (View), Expense Categories (Full), Payment Methods (Full), Currency (Full), Items (Full), Perform Search (Full), Custom Record Entries (Full), Classes (Full), Departments (Full), Locations (Full), Subsidiaries (View), Contact-Subsidiary relationship (View), Companies (Full), Tax Records (View), Documents and Files (Full)
*Transactions permissions tab on the role*
**Important:** If any transaction permissions are missing, exports may fail even if authentication is successful.
**List permissions:**
Accounts (Full), Address List in Search (Full), Contacts (Full), Customers (Full), Vendors (Full), Employees (View), Employee Record (View), Expense Categories (Full), Payment Methods (Full), Currency (Full), Items (Full), Perform Search (Full), Custom Record Entries (Full), Classes (Full), Departments (Full), Locations (Full), Subsidiaries (View), Contact-Subsidiary relationship (View), Companies (Full), Tax Records (View), Documents and Files (Full)
 *Lists permissions tab on the role*
#### Create a dedicated integration user
1. Navigate to **Lists > Employees**, then select **New** (or choose an existing service account).
*Lists permissions tab on the role*
#### Create a dedicated integration user
1. Navigate to **Lists > Employees**, then select **New** (or choose an existing service account).
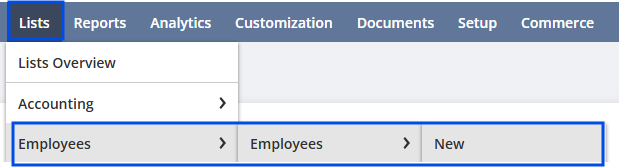 *Creating the integration user (Lists > Employees > New)*
2. Assign the **Alvys Integration Role** under the Roles section.
*Creating the integration user (Lists > Employees > New)*
2. Assign the **Alvys Integration Role** under the Roles section.
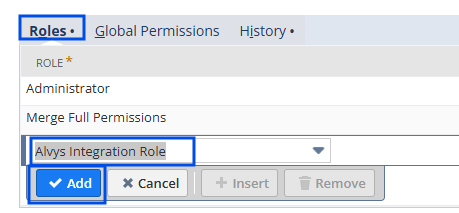 *Assigning the Alvys Integration Role to the user*
3. Click **Save**.
💡 Admin account: used only to enable features, create roles, create integration records, and generate tokens. The dedicated integration user (employee record or service account) is used by Alvys to authenticate via REST/TBA.
#### Generate integration credentials
Alvys requires five credentials: Account ID, Consumer Key, Consumer Secret, Token ID, Token Secret.
**Locate your Account ID:** In the NetSuite URL before "[app.netsuite.com](http://app.netsuite.com/)." Example: in `https://123456.app.netsuite.com`, the Account ID is **123456**. Sandbox accounts include a suffix such as "\_SB1."
**Create the integration record:**
1. Navigate to **Setup > Integrations > Manage Integrations**, then click **New**.
*Assigning the Alvys Integration Role to the user*
3. Click **Save**.
💡 Admin account: used only to enable features, create roles, create integration records, and generate tokens. The dedicated integration user (employee record or service account) is used by Alvys to authenticate via REST/TBA.
#### Generate integration credentials
Alvys requires five credentials: Account ID, Consumer Key, Consumer Secret, Token ID, Token Secret.
**Locate your Account ID:** In the NetSuite URL before "[app.netsuite.com](http://app.netsuite.com/)." Example: in `https://123456.app.netsuite.com`, the Account ID is **123456**. Sandbox accounts include a suffix such as "\_SB1."
**Create the integration record:**
1. Navigate to **Setup > Integrations > Manage Integrations**, then click **New**.
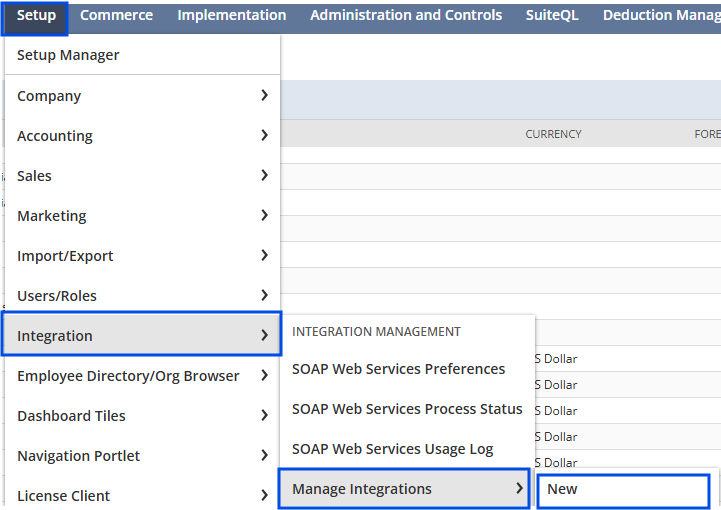 *Creating a new integration record (Manage Integrations > New)*
2. Enter a descriptive name such as **"Alvys TMS Integration"**.
3. Enable **Token-Based Authentication**.
*Creating a new integration record (Manage Integrations > New)*
*Creating a new integration record (Manage Integrations > New)*
2. Enter a descriptive name such as **"Alvys TMS Integration"**.
3. Enable **Token-Based Authentication**.
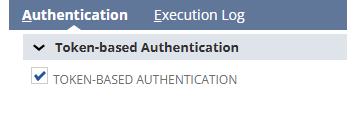 *Enabling Token-Based Authentication on the integration*
4. Click **Save**.
5. Copy the **Consumer Key** and **Consumer Secret**.
⚠️ **Important:** The Consumer Key and Consumer Secret are displayed only once. Store them securely.
**Generate access tokens:**
6. Go to **Setup > Users/Roles > Access Tokens**, then click **New**.
*Enabling Token-Based Authentication on the integration*
*Enabling Token-Based Authentication on the integration*
4. Click **Save**.
5. Copy the **Consumer Key** and **Consumer Secret**.
⚠️ **Important:** The Consumer Key and Consumer Secret are displayed only once. Store them securely.
**Generate access tokens:**
6. Go to **Setup > Users/Roles > Access Tokens**, then click **New**.
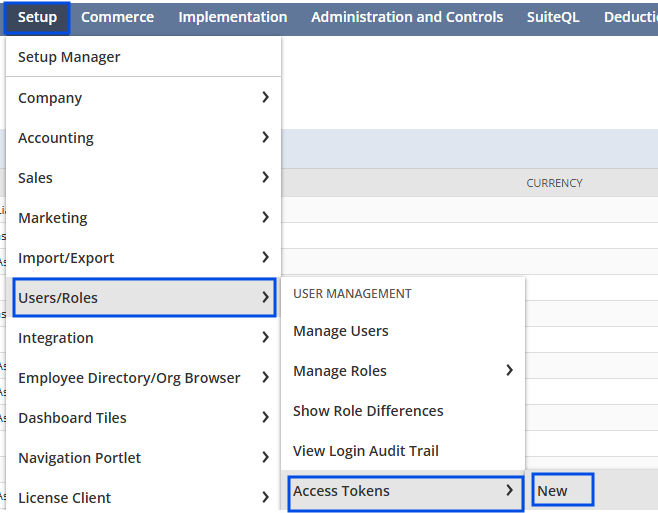 *Creating a new access token (Access Tokens > New)*
7. Select:
* **Application Name:** "Alvys TMS Integration"
* **User:** the dedicated integration user
* **Role:** the dedicated integration role
8. Click **Save**.
9. Copy the **Token ID** and **Token Secret**.
⚠️ **Important:** The Token ID and Token Secret are displayed only once.
#### Confirm a complete Chart of Accounts
All required income, expense, asset, liability, and clearing accounts must exist before exporting transactions. See Oracle documentation: [Creating Accounts](https://docs.oracle.com/en/cloud/saas/netsuite/ns-online-help/section_N1440518.html).
1. Log in with a role that has accounting permissions.
2. Go to **Lists > Accounting > Accounts**, then click **New**.
3. Select the account **Type**.
4. Enter the **Account Name**.
5. If using account numbers, enter a number (account numbering must be enabled under **Setup > Accounting > Accounting Preferences**).
6. Optionally assign a parent account or subsidiary (for OneWorld users).
7. Click **Save**.
⚠️ **Important:** All required accounts must be created before pushing transactions from Alvys.
#### Configure subsidiaries (OneWorld accounts only)
See Oracle documentation: [Creating Subsidiary Records](https://docs.oracle.com/en/cloud/saas/netsuite/ns-online-help/section_N272471.html).
**To create a subsidiary:**
1. Navigate to **Setup > Company > Subsidiaries**.
2. Click **New**.
3. Enter the **Name** of the subsidiary.
4. Assign a **Base Currency**.
5. Select the **Parent Subsidiary** if applicable.
6. Assign a **Chart of Accounts**.
7. Complete tax settings.
8. Click **Save**.
**To assign the Alvys Integration Role access to the subsidiary:**
9. Go to **Setup > Users/Roles > Manage Roles** and select the Alvys Integration Role.
10. Click **Edit**.
11. Find the **Subsidiary Access** section.
12. Set access to **All** (recommended) or select only the subsidiaries used in Alvys.
13. Enable **Cross-Subsidiary Record Viewing**.
14. Click **Save**.
### Result
Your NetSuite environment is ready to connect to Alvys. You have enabled required features, created a dedicated role with the required permissions, created a dedicated integration user, generated all five credentials, confirmed your Chart of Accounts, and (if using OneWorld) configured subsidiary access.
Proceed to enter these credentials in **Management > Integrations**.
### Troubleshooting
#### Integration fails to authenticate
**Step 1:** Confirm that REST Web Services, SOAP Web Services, Token-Based Authentication, and SuiteScript are all enabled under **Setup > Company > Enable Features > SuiteCloud**.
**Step 2:** Confirm the integration record has Token-Based Authentication enabled under **Setup > Integrations > Manage Integrations**.
**Step 3:** Confirm the Consumer Key, Consumer Secret, Token ID, and Token Secret were copied correctly. If any value was lost, regenerate the credentials.
**Step 4:** Confirm the token was created with the correct Application Name, User, and Role.
#### Transaction exports fail after successful authentication
**Step 1:** Confirm the integration role includes all required Transaction permissions with Full access.
**Step 2:** Confirm all required Setup and List permissions are present.
**Step 3:** Confirm role permissions have not been modified since the token was generated.
**Step 4:** Confirm all required accounts exist in the Chart of Accounts.
#### Transactions fail for a specific subsidiary
**Step 1:** Confirm the Alvys Integration Role has access to that subsidiary under **Setup > Users/Roles > Manage Roles > \[Alvys Integration Role] > Subsidiary Restrictions**.
**Step 2:** Confirm **Cross-Subsidiary Record Viewing** is enabled.
**Step 3:** Confirm the subsidiary has a Base Currency and Chart of Accounts assigned.
#### Token was lost after creation
Delete the existing integration record or access token and repeat the credential generation step. Update Alvys with the new credentials.
⚠️ Common causes of integration failures: required features not enabled, token created under the wrong role, missing transaction or list permissions, subsidiary not assigned to the role, role permissions modified after token generation, or required accounts not created in NetSuite. Any of these will cause authentication or export failures.
## FAQs
**Q: What level of NetSuite access is required to set up the Alvys integration?**
**A:** An Administrator-level account is required only during setup. The integration itself uses a dedicated integration user.
**Q: Can I use my personal Administrator login for the live integration?**
**A:** No. A dedicated integration user and role must be created to separate API access from human accounts.
**Q: Which NetSuite features must be enabled for Alvys to connect?**
**A:** REST Web Services, SOAP Web Services, Token-Based Authentication (TBA), and SuiteScript must all be enabled. OAuth 2.0 is not required.
**Q: What happens if required NetSuite features are not enabled?**
**A:** Missing features can cause authentication failures or prevent transaction data from being exported correctly.
**Q: What permissions are required for the integration role?**
**A:** The role requires permissions across Setup, Transaction, and List categories, including full access to Web Services, SuiteScript, accounting lists, customers, vendors, items, and all relevant transaction types.
**Q: Should the integration role be restricted to Web Services only?**
**A:** Yes. This enhances security by preventing login through the NetSuite interface.
**Q: How do I create the integration user?**
**A:** Create a new employee record (or use a service account) and assign the dedicated integration role.
**Q: What credentials does Alvys require to connect to NetSuite?**
**A:** Account ID (Realm ID), Consumer Key, Consumer Secret, Token ID, and Token Secret.
**Q: Where can I find my NetSuite Account ID / Realm ID?**
**A:** The Account ID is in the NetSuite URL before "[app.netsuite.com](http://app.netsuite.com/)." Sandbox accounts include a suffix such as "\_SB1."
**Q: Can tokens be regenerated if lost?**
**A:** Yes, but you must regenerate them in NetSuite. Each value is shown only once at time of creation.
**Q: Are all Chart of Accounts and subsidiaries required before exporting transactions?**
**A:** Yes. All required accounts must exist and subsidiaries must be fully configured before exporting.
**Q: What are common causes of integration failures?**
**A:** Required features not enabled, tokens created under the wrong role, missing transaction or list permissions, subsidiaries not assigned to the role, role permissions modified after token generation, or required accounts not created in NetSuite.
**Q: Is SuiteScript required for the integration?**
**A:** Yes. SuiteScript must be enabled to allow NetSuite's REST and SOAP Web Services to function properly.
**Q: Can I limit the integration role to selected subsidiaries?**
**A:** Yes, but all subsidiaries used in Alvys must be included; otherwise, transaction exports to those subsidiaries will fail.
**Q: Does the integration support OAuth 2.0 authentication?**
**A:** No. Alvys uses only Token-Based Authentication (TBA) via SuiteTalk REST Web Services.
### Go Deeper
* [NetSuite: Authentication and Settings Configuration in Alvys](/help/integrations/netsuite-authentication-and-settings-configuration-in-alvys)
* [NetSuite Integration Collection](/help/integrations/netsuite-integration-collection)
*Creating a new access token (Access Tokens > New)*
7. Select:
* **Application Name:** "Alvys TMS Integration"
* **User:** the dedicated integration user
* **Role:** the dedicated integration role
8. Click **Save**.
9. Copy the **Token ID** and **Token Secret**.
⚠️ **Important:** The Token ID and Token Secret are displayed only once.
#### Confirm a complete Chart of Accounts
All required income, expense, asset, liability, and clearing accounts must exist before exporting transactions. See Oracle documentation: [Creating Accounts](https://docs.oracle.com/en/cloud/saas/netsuite/ns-online-help/section_N1440518.html).
1. Log in with a role that has accounting permissions.
2. Go to **Lists > Accounting > Accounts**, then click **New**.
3. Select the account **Type**.
4. Enter the **Account Name**.
5. If using account numbers, enter a number (account numbering must be enabled under **Setup > Accounting > Accounting Preferences**).
6. Optionally assign a parent account or subsidiary (for OneWorld users).
7. Click **Save**.
⚠️ **Important:** All required accounts must be created before pushing transactions from Alvys.
#### Configure subsidiaries (OneWorld accounts only)
See Oracle documentation: [Creating Subsidiary Records](https://docs.oracle.com/en/cloud/saas/netsuite/ns-online-help/section_N272471.html).
**To create a subsidiary:**
1. Navigate to **Setup > Company > Subsidiaries**.
2. Click **New**.
3. Enter the **Name** of the subsidiary.
4. Assign a **Base Currency**.
5. Select the **Parent Subsidiary** if applicable.
6. Assign a **Chart of Accounts**.
7. Complete tax settings.
8. Click **Save**.
**To assign the Alvys Integration Role access to the subsidiary:**
9. Go to **Setup > Users/Roles > Manage Roles** and select the Alvys Integration Role.
10. Click **Edit**.
11. Find the **Subsidiary Access** section.
12. Set access to **All** (recommended) or select only the subsidiaries used in Alvys.
13. Enable **Cross-Subsidiary Record Viewing**.
14. Click **Save**.
### Result
Your NetSuite environment is ready to connect to Alvys. You have enabled required features, created a dedicated role with the required permissions, created a dedicated integration user, generated all five credentials, confirmed your Chart of Accounts, and (if using OneWorld) configured subsidiary access.
Proceed to enter these credentials in **Management > Integrations**.
### Troubleshooting
#### Integration fails to authenticate
**Step 1:** Confirm that REST Web Services, SOAP Web Services, Token-Based Authentication, and SuiteScript are all enabled under **Setup > Company > Enable Features > SuiteCloud**.
**Step 2:** Confirm the integration record has Token-Based Authentication enabled under **Setup > Integrations > Manage Integrations**.
**Step 3:** Confirm the Consumer Key, Consumer Secret, Token ID, and Token Secret were copied correctly. If any value was lost, regenerate the credentials.
**Step 4:** Confirm the token was created with the correct Application Name, User, and Role.
#### Transaction exports fail after successful authentication
**Step 1:** Confirm the integration role includes all required Transaction permissions with Full access.
**Step 2:** Confirm all required Setup and List permissions are present.
**Step 3:** Confirm role permissions have not been modified since the token was generated.
**Step 4:** Confirm all required accounts exist in the Chart of Accounts.
#### Transactions fail for a specific subsidiary
**Step 1:** Confirm the Alvys Integration Role has access to that subsidiary under **Setup > Users/Roles > Manage Roles > \[Alvys Integration Role] > Subsidiary Restrictions**.
**Step 2:** Confirm **Cross-Subsidiary Record Viewing** is enabled.
**Step 3:** Confirm the subsidiary has a Base Currency and Chart of Accounts assigned.
#### Token was lost after creation
Delete the existing integration record or access token and repeat the credential generation step. Update Alvys with the new credentials.
⚠️ Common causes of integration failures: required features not enabled, token created under the wrong role, missing transaction or list permissions, subsidiary not assigned to the role, role permissions modified after token generation, or required accounts not created in NetSuite. Any of these will cause authentication or export failures.
## FAQs
**Q: What level of NetSuite access is required to set up the Alvys integration?**
**A:** An Administrator-level account is required only during setup. The integration itself uses a dedicated integration user.
**Q: Can I use my personal Administrator login for the live integration?**
**A:** No. A dedicated integration user and role must be created to separate API access from human accounts.
**Q: Which NetSuite features must be enabled for Alvys to connect?**
**A:** REST Web Services, SOAP Web Services, Token-Based Authentication (TBA), and SuiteScript must all be enabled. OAuth 2.0 is not required.
**Q: What happens if required NetSuite features are not enabled?**
**A:** Missing features can cause authentication failures or prevent transaction data from being exported correctly.
**Q: What permissions are required for the integration role?**
**A:** The role requires permissions across Setup, Transaction, and List categories, including full access to Web Services, SuiteScript, accounting lists, customers, vendors, items, and all relevant transaction types.
**Q: Should the integration role be restricted to Web Services only?**
**A:** Yes. This enhances security by preventing login through the NetSuite interface.
**Q: How do I create the integration user?**
**A:** Create a new employee record (or use a service account) and assign the dedicated integration role.
**Q: What credentials does Alvys require to connect to NetSuite?**
**A:** Account ID (Realm ID), Consumer Key, Consumer Secret, Token ID, and Token Secret.
**Q: Where can I find my NetSuite Account ID / Realm ID?**
**A:** The Account ID is in the NetSuite URL before "[app.netsuite.com](http://app.netsuite.com/)." Sandbox accounts include a suffix such as "\_SB1."
**Q: Can tokens be regenerated if lost?**
**A:** Yes, but you must regenerate them in NetSuite. Each value is shown only once at time of creation.
**Q: Are all Chart of Accounts and subsidiaries required before exporting transactions?**
**A:** Yes. All required accounts must exist and subsidiaries must be fully configured before exporting.
**Q: What are common causes of integration failures?**
**A:** Required features not enabled, tokens created under the wrong role, missing transaction or list permissions, subsidiaries not assigned to the role, role permissions modified after token generation, or required accounts not created in NetSuite.
**Q: Is SuiteScript required for the integration?**
**A:** Yes. SuiteScript must be enabled to allow NetSuite's REST and SOAP Web Services to function properly.
**Q: Can I limit the integration role to selected subsidiaries?**
**A:** Yes, but all subsidiaries used in Alvys must be included; otherwise, transaction exports to those subsidiaries will fail.
**Q: Does the integration support OAuth 2.0 authentication?**
**A:** No. Alvys uses only Token-Based Authentication (TBA) via SuiteTalk REST Web Services.
### Go Deeper
* [NetSuite: Authentication and Settings Configuration in Alvys](/help/integrations/netsuite-authentication-and-settings-configuration-in-alvys)
* [NetSuite Integration Collection](/help/integrations/netsuite-integration-collection)