> ## Documentation Index
> Fetch the complete documentation index at: https://docs.alvys.com/llms.txt
> Use this file to discover all available pages before exploring further.
# QuickBooks Online: Prerequisites
> Prepare your QuickBooks Online account for the Alvys sync: plan type, admin access, chart of accounts, class tracking, and QBO invoice settings.
Before connecting Alvys to QuickBooks Online, complete these account configurations in QuickBooks Online. Skipping these steps can cause sync errors, mismatched data, or a failed connection after the integration is active.
## Overview
This article covers the account-level configurations required in QuickBooks Online before connecting to Alvys. Complete all five areas below. Each section describes a setting or condition that must be in place for the integration to work correctly.
## QuickBooks Online Plan Types
Not all QuickBooks Online plans support the features required for the Alvys integration.
* **Simple Start** does not include the Accounts Payable module and is not recommended for use with Alvys.
* **Essentials** is the minimum supported plan. It includes the "Manage Bills" feature required for the Alvys integration.
* **Plus** and **Advanced** are recommended. These plans support Location and Class Tracking, which enables more detailed financial reporting in QuickBooks Online.
## Administrative Access
You must have Admin credentials for your QuickBooks Online account to complete the integration setup. Non-admin access does not have the permissions required to configure account settings or connect third-party integrations.
## Chart of Accounts Preparation
Before connecting to Alvys, confirm that your QuickBooks Online Chart of Accounts includes the following accounts at minimum:
* **Accounts Receivable:** For customer invoicing.
* **Accounts Payable:** For carrier and vendor obligations.
* **Income Account:** Categorized for Linehaul, Fuel Surcharges, and Accessorials.
* **Expense Account:** Categorized for Purchased Transportation (Brokerage costs) and Driver Settlements.
If any of these accounts are missing, create them in QuickBooks Online before connecting.
### How to create an account in QuickBooks Online?
* Navigate to the Chart of Accounts section in QuickBooks Online.
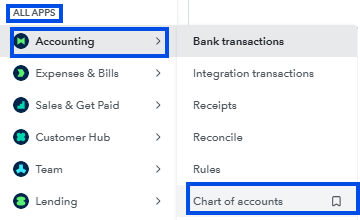 *Screenshot showing the Chart of Accounts navigation in QuickBooks Online (via All Apps or Accounting menu)*
* Click **New**.
*Screenshot showing the Chart of Accounts navigation in QuickBooks Online (via All Apps or Accounting menu)*
* Click **New**.
 * Screenshot showing the green New button in the QuickBooks Online Chart of Accounts view\*
* Enter the account details: select the account Category and enter a Name.
* Click **Save and Close** to confirm the account.
## Validate Open Accounting Periods
Confirm that your accounting periods are open for the dates you plan to sync. In QuickBooks Online, navigate to Settings > Advanced > Accounting and review the Closing Date field. If a closing date is set that covers recent periods, transactions from those periods may not sync correctly.
## Custom Transaction Numbers
Alvys sends its own transaction numbers when syncing invoices to QuickBooks Online. For these numbers to be preserved, Custom Transaction Numbers must be turned on in QuickBooks Online.
* Screenshot showing the green New button in the QuickBooks Online Chart of Accounts view\*
* Enter the account details: select the account Category and enter a Name.
* Click **Save and Close** to confirm the account.
## Validate Open Accounting Periods
Confirm that your accounting periods are open for the dates you plan to sync. In QuickBooks Online, navigate to Settings > Advanced > Accounting and review the Closing Date field. If a closing date is set that covers recent periods, transactions from those periods may not sync correctly.
## Custom Transaction Numbers
Alvys sends its own transaction numbers when syncing invoices to QuickBooks Online. For these numbers to be preserved, Custom Transaction Numbers must be turned on in QuickBooks Online.
 *Screenshot showing the Custom Transaction Numbers toggle in QuickBooks Online under Settings > Account and Settings > Sales > Sales form content.*
To enable Custom Transaction Numbers:
1. In QuickBooks Online, navigate to Settings > Account and Settings > Sales.
2. Under Sales form content, locate the **Custom transaction numbers** toggle.
3. Turn Custom transaction numbers **On**.
4. Click **Save**.
⚠️ If Custom transaction numbers is turned off, QuickBooks Online ignores the transaction numbers sent by Alvys and assigns its own sequential numbers instead. Turn this setting on before connecting Alvys to avoid numbering mismatches.
## FAQs
**Q: Which QuickBooks Online plan is the minimum requirement for the Alvys integration?**
**A:** Essentials is the minimum supported plan. It includes the "Manage Bills" feature required for the integration. Simple Start does not include Accounts Payable and is not recommended.
**Q: Why is QuickBooks Online Plus or Advanced recommended?**
**A:** Plus and Advanced plans support Location and Class Tracking, which enables more detailed financial reporting in QuickBooks Online when syncing from Alvys.
**Q: What accounts must I have in my Chart of Accounts before connecting?**
**A:** At minimum, you need Accounts Receivable, Accounts Payable, Income accounts (Linehaul, Fuel Surcharge, Accessorials), and Expense or Cost of Goods Sold accounts (Purchased Transportation, Driver Settlements).
**Q: Does the Custom Transaction Numbers setting apply to Bills as well as Sales forms?**
**A:** No. The Custom Transaction Numbers setting only applies to Sales forms such as invoices. Bills use the Reference Number field automatically.
**Q: Are custom fields in QuickBooks Online supported across all plans?**
**A:** Custom fields are available across QuickBooks Online plans, but the number of custom fields available may vary by subscription.
## Go Deeper
* [How to Connect and Configure QuickBooks Online in Alvys](/help/integrations/how-to-connect-and-configure-quickbooks-online-in-alvys)
* [QuickBooks Online Integration Overview](/help/integrations/quickbooks-online-integration-overview)
*Screenshot showing the Custom Transaction Numbers toggle in QuickBooks Online under Settings > Account and Settings > Sales > Sales form content.*
To enable Custom Transaction Numbers:
1. In QuickBooks Online, navigate to Settings > Account and Settings > Sales.
2. Under Sales form content, locate the **Custom transaction numbers** toggle.
3. Turn Custom transaction numbers **On**.
4. Click **Save**.
⚠️ If Custom transaction numbers is turned off, QuickBooks Online ignores the transaction numbers sent by Alvys and assigns its own sequential numbers instead. Turn this setting on before connecting Alvys to avoid numbering mismatches.
## FAQs
**Q: Which QuickBooks Online plan is the minimum requirement for the Alvys integration?**
**A:** Essentials is the minimum supported plan. It includes the "Manage Bills" feature required for the integration. Simple Start does not include Accounts Payable and is not recommended.
**Q: Why is QuickBooks Online Plus or Advanced recommended?**
**A:** Plus and Advanced plans support Location and Class Tracking, which enables more detailed financial reporting in QuickBooks Online when syncing from Alvys.
**Q: What accounts must I have in my Chart of Accounts before connecting?**
**A:** At minimum, you need Accounts Receivable, Accounts Payable, Income accounts (Linehaul, Fuel Surcharge, Accessorials), and Expense or Cost of Goods Sold accounts (Purchased Transportation, Driver Settlements).
**Q: Does the Custom Transaction Numbers setting apply to Bills as well as Sales forms?**
**A:** No. The Custom Transaction Numbers setting only applies to Sales forms such as invoices. Bills use the Reference Number field automatically.
**Q: Are custom fields in QuickBooks Online supported across all plans?**
**A:** Custom fields are available across QuickBooks Online plans, but the number of custom fields available may vary by subscription.
## Go Deeper
* [How to Connect and Configure QuickBooks Online in Alvys](/help/integrations/how-to-connect-and-configure-quickbooks-online-in-alvys)
* [QuickBooks Online Integration Overview](/help/integrations/quickbooks-online-integration-overview)