
This article covers how to export customer invoices, carrier bills, and driver settlements from Alvys to QuickBooks Desktop (QBD), and how to modify previously exported transactions. Also covers the QBD export queue, customer and vendor matching, shared billing, and using the QuickBooks Web Connector.
Overview
The Alvys and QuickBooks Desktop integration exports (pushes) customer invoices, carrier bills, and driver settlements from Alvys to your QuickBooks Desktop company file. Exports are triggered by actions you take in Alvys (generating an invoice, creating a settlement), and the data transfer occurs when the QuickBooks Web Connector runs its sync cycle. All transaction types follow the same export flow: after a transaction is triggered in Alvys, it appears on the Accounting > Error Transactions page in a queued state (shown as a dash). The transaction waits on this page until the QuickBooks Web Connector connects and pulls it into your company file. Appearing on the Error Transactions page in a queued state does not indicate a failure.Before You Start
Before exporting transactions, confirm the following:- You have Admin, Partner Admin, or Support access in Alvys. The accounting integration requires the “CompanyProfileManager” permission, which is available to those three roles.
- The QuickBooks Desktop integration is active for the relevant subsidiary. See How to connect QuickBooks Desktop to Alvys and configure settings to complete the connection first.
- The QuickBooks Web Connector is installed and running on the same computer as QuickBooks Desktop.
- For customer invoice exports: the load must be in an invoiceable status: TONU, Released, Queued, Invoiced, Financed, or Completed.
Key Concepts
The export queue and Error Transactions page
When a transaction is triggered in Alvys, it is placed in a pending export queue and appears on the Error Transactions page with a dash status. This queued state is not an error. The transaction waits here until the QuickBooks Web Connector runs and pulls it into your company file. Once the sync completes, the transaction clears from this page. Screenshot showing the Error Transactions page with a queued (dash status) transaction.
Which subsidiary receives each transaction
Each Alvys subsidiary is connected to its own QuickBooks Desktop company file. The subsidiary that receives a transaction is determined as follows:- Customer invoices export to the QuickBooks company linked to the subsidiary in the Invoice As field on the load.
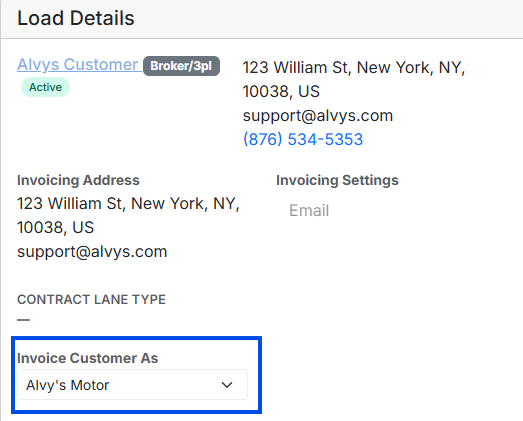 Image showing the “Invoice As” dropdown button in the load details page
- Carrier bills export to the QuickBooks company linked to the subsidiary in the Tender As field on the load.
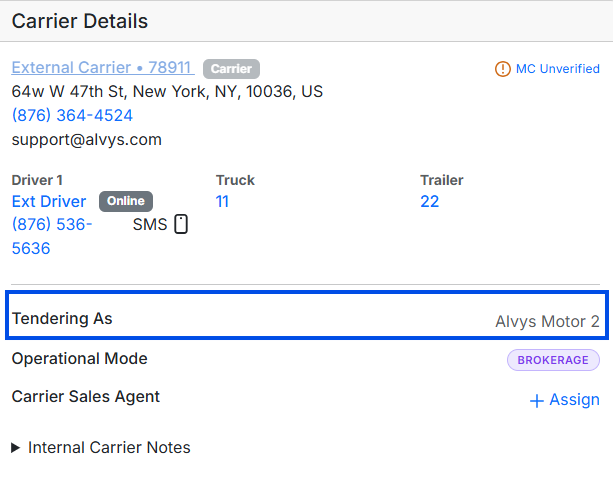 Image showing the Tendering As field in the carrier details on the load details page.
- Driver bills export to the QuickBooks company linked to the subsidiary assigned on the driver’s profile.
 Image showing the Subsidiary field on a driver profile
How Alvys matches customers in QuickBooks
The customer’s External Accounting Name is used to identify a customer or broker in QuickBooks Desktop (QBD). When exporting an invoice, Alvys first searches for an exact match in QBD using this field. If a matching customer exists, the invoice is linked to that customer. If no match is found and the External Accounting Name is set on the customer profile, Alvys will automatically create a new customer in QBD using that name. For tenants where the External Accounting Name is not set, Alvys attempts to match using the Customer Name. If no match is found, a new customer is created in QBD using the Customer Name. It is important to note that the External Accounting Name takes priority. If the External Accounting Name differs from an existing QBD customer name, even if the Customer Name in Alvys matches, Alvys will create a new customer using the External Accounting Name.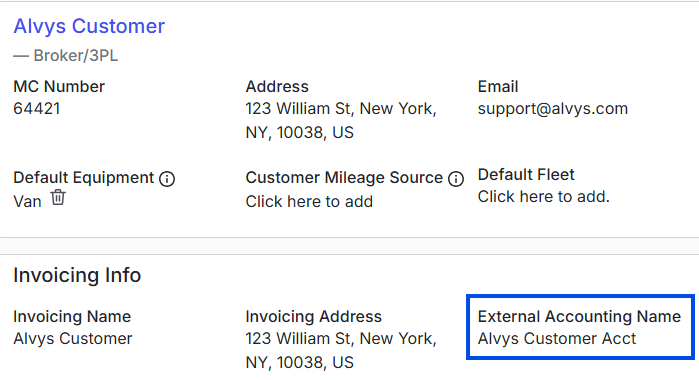 Image showing the External Accounting Name field on the Customer profile.
How Alvys matches Vendors in QuickBooks
This section explains how Alvys links carriers and drivers to QuickBooks Desktop (QBD), how vendor records are created when no match is found, and which accounting fields control bill synchronization. [Heading 4 not supported] The carrier’s External Accounting Name is used to identify a vendor in QuickBooks Desktop (QBD). When exporting a bill, Alvys first searches for an exact match in QBD using this field.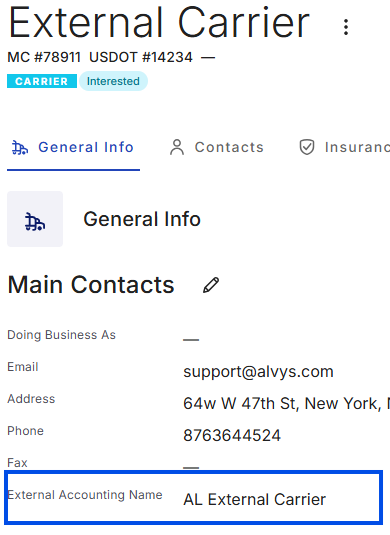 Image showing the External Accounting Name field on the Carrier profile.
- Tax Company Name
- Tax Company Address
 Image showing the Tax Information on a sample driver profile
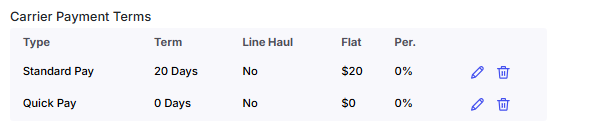 *Image showing carrier payment terms on the company/tenant profile *
Steps
1. Export a customer invoice
Individual load invoice
- Verify the load is in an invoiceable status: TONU, Released, Queued, Invoiced, Financed, or Completed.
- Confirm the customer is correct on the load, and the Invoice As subsidiary matches the subsidiary connected to the QuickBooks Desktop company that should receive the invoice.
- Confirm the customer’s External Accounting Name is set and matches the corresponding customer in QuickBooks Desktop.
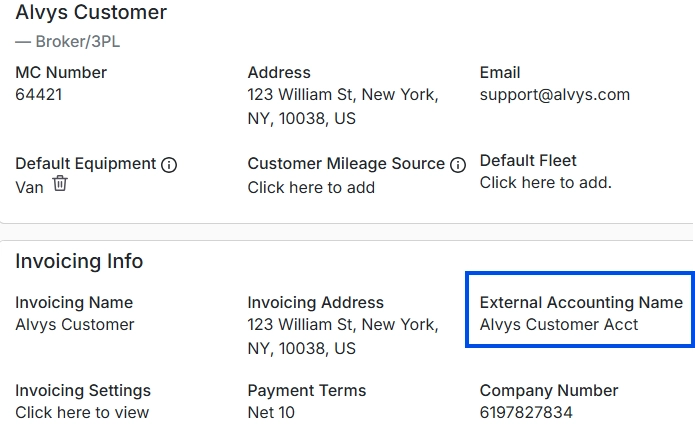 *Screenshot showing the Invoice As and External Accounting Name fields on a load. *
- Generate the invoice from the load’s Invoice section.
- Open the QuickBooks Web Connector and click Update Selected to trigger the export.
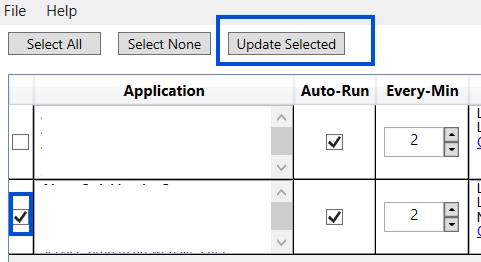 *Image showing the update selected button in the QBD web connector *
- After the connector completes this sync, the invoice can be located by navigating to the Customer Center and selecting the specific customer to view their Transactions tab. Users can filter the list for Invoices and apply date filters to browse the results and confirm the export.
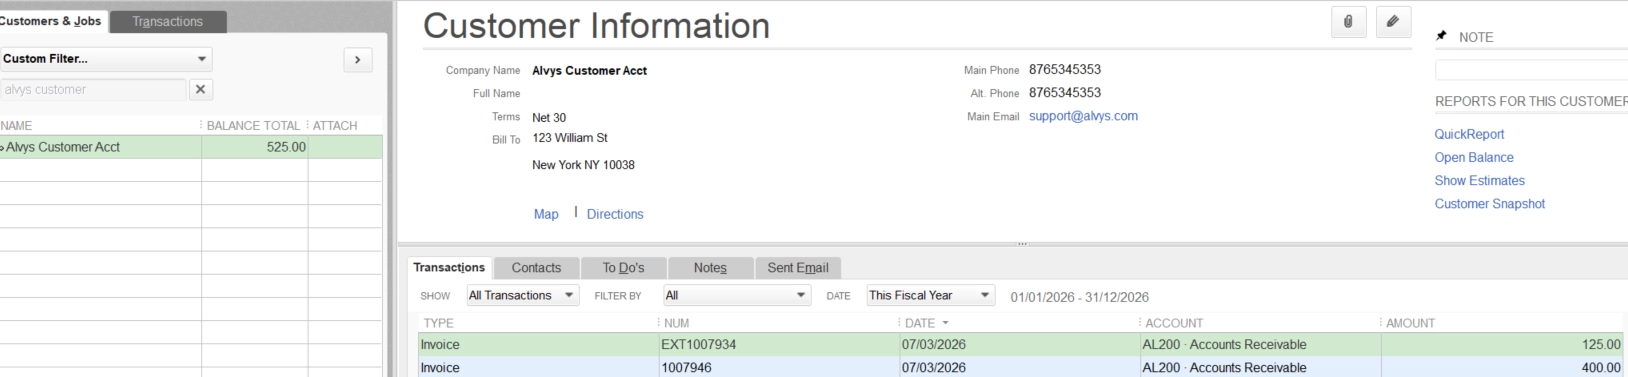 Image showing customer information with invoices in QuickBooks Desktop.
Batch invoice export
- Navigate to Accounting > Invoice to open the Batch Invoicing page.
- On the Released tab, select the loads for which you want to generate invoices.
- Confirm the customer and Invoice As subsidiary are correct for each selected load.
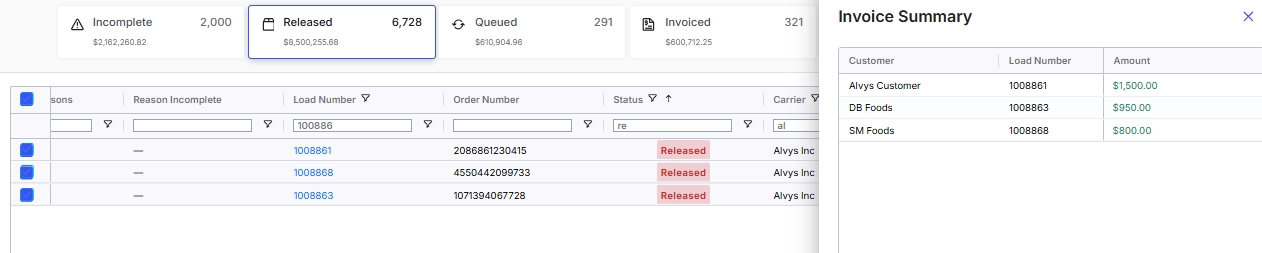 Screenshot showing the Batch Invoicing page with loads selected.
- Click Generate Invoice to generate invoices and queue them for export, or click Create and Send to generate, queue, and email invoices to customers.
- Open the QuickBooks Web Connector and click Update Selected.
Summary invoice export
- On the Loads Not Invoiced tab, select the loads to include. Confirm the subsidiary is correct before proceeding.
- Generate the summary invoice. The transaction is queued on the Error Transactions page.
- Open the QuickBooks Web Connector and click Update Selected.
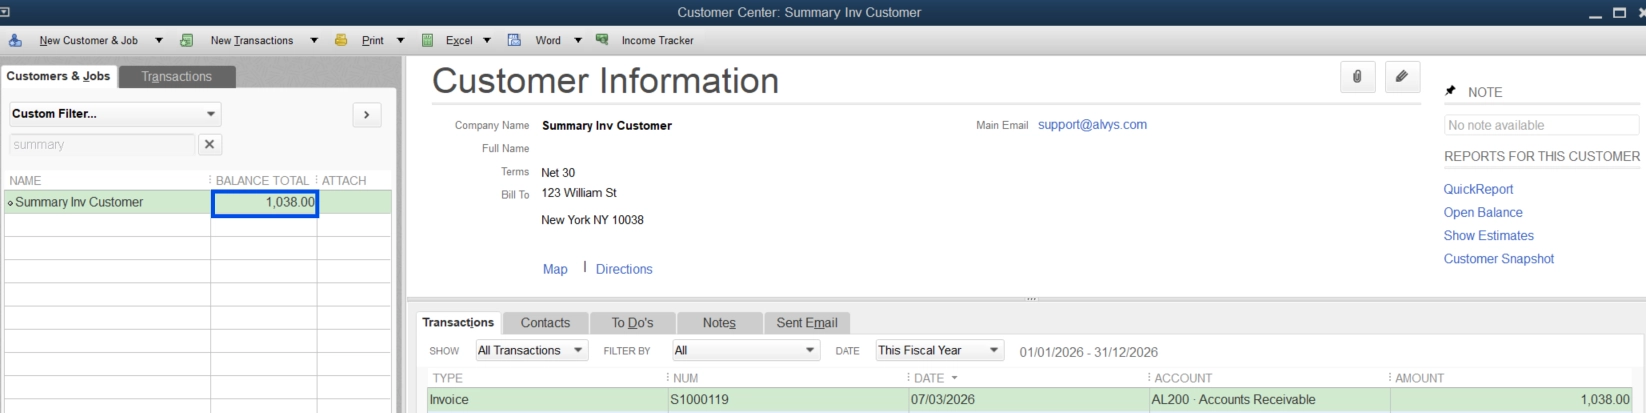 Screenshot showing a summary invoice in the QuickBooks Customer Center.
2. Export a carrier bill
Individual trip external carrier bill
- Confirm the correct external carrier is assigned to the trip.
- Verify the Tender As subsidiary on the load. For dual authority tenants: confirm the trip’s operational mode is set to Brokerage. If the mode is Carrier, no external carrier bill will export.
- If Generate Carrier Invoice Separately is enabled, upload a document categorized as Carrier Invoice to the trip before generating the customer invoice.
- If this setting is not enabled, the carrier bill is exported automatically when the customer invoice is generated.
- Open the QuickBooks Web Connector and click Update Selected.
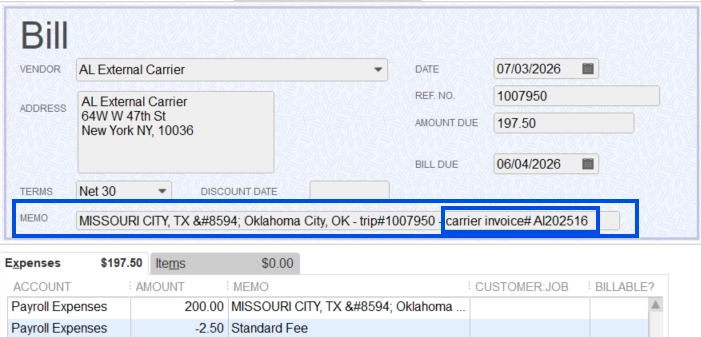 *Screenshot showing a carrier bill in the QuickBooks Vendor Center. *
Carrier settlements bill export
The Carrier Settlements module provides brokers with tools to generate transparent and accurate carrier statements and settlement bills. This page can be accessed from the accounting section of Alvys under Carrier Settlements. Additional details about this module can be found in the Carrier Settlements Help Center Article. When carrier settlements are used, the carrier bill is exported when a carrier statement is generated. To allow this export, the Carrier Statements External Accounting setting must be enabled for the subsidiary. If this setting is not enabled, no carrier bill will be exported when the statement is generated. Image showing carrier statements external accounting setting in QBD setup
3. Export driver bills
Driver bills export from the legacy Pay Drivers page (Accounting > Pay Drivers) or from the Driver Settlements module (Accounting > Driver Settlements). The subsidiary on the driver’s profile determines which QuickBooks company receives the bill.4. Export with shared billing
In the QBD accounting integration setup shared billing must be enabled on both the Invoice As subsidiary and the Tender As subsidiary. Each subsidiary must also have its own QuickBooks Desktop company connected. If shared billing is not enabled on both sides, intercompany transactions and carrier or vendor bills will not export correctly.-
In the QBD integration settings for each subsidiary participating in shared billing, enable the Shared Billing option.
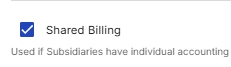 *Screenshot showing the Shared Billing toggle in the QBD integration settings. *
*Screenshot showing the Shared Billing toggle in the QBD integration settings. *
*Screenshot showing the Shared Billing toggle in the QBD integration settings. *
- On the load, assign different subsidiaries to Invoice As and Tender As.
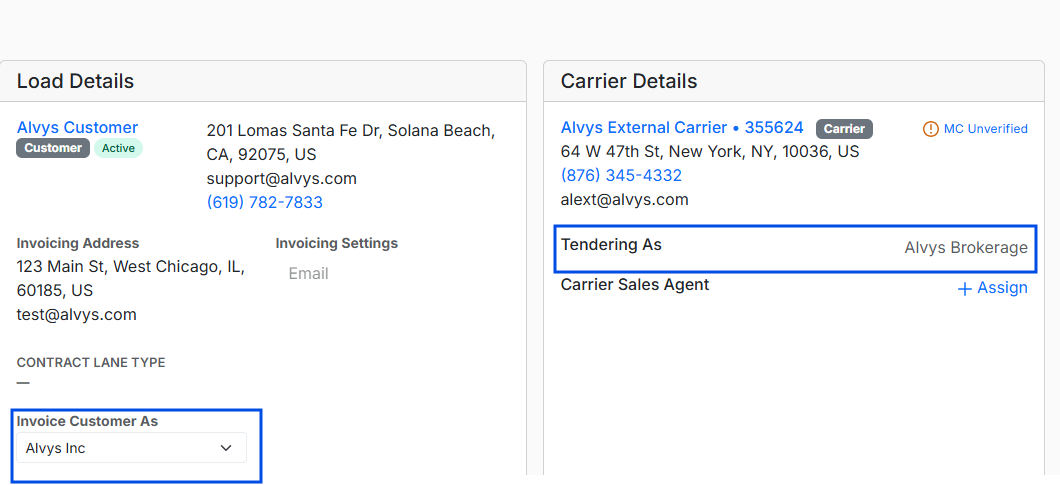 *Image showing Invoice as and Tendering As fields on load details page *
- Generate the customer invoice. This triggers the shared billing export.
- After export, both subsidiary companies receive appropriate intercompany entries.
-
Open the QuickBooks Web Connector and click Update Selected.
**Transactions created during export: **
Invoice As subsidiary (Alvys Motor Company):
- An intercompany bill is created to the Tender As subsidiary (Alvys Motor 2)
- A customer invoice is created, and export is initiated to QBD. Tender As subsidiary (Alvys Motor 2 Company):
- An intercompany invoice is created back to the Invoice As subsidiary (Alvys Motor).
- A vendor bill is created for the external carrier or driver (when paystub is generated) on the trip
 Screenshot showing the intercompany entries in Error Transactions Page
5. Modify a previously exported transaction
Alvys is the system of record for all exported accounting transactions. All corrections must be made in Alvys and re-synced to QuickBooks Desktop.Customer invoices — auto-syncing fields
The following fields update QuickBooks Desktop automatically without invoice regeneration: customer linehaul amount, customer fuel surcharge, accessorial charges (added, edited, or removed), and Invoice Date. Make the changes in Alvys, then run the Web Connector.To change the customer on an exported invoice:
- In the Load Details section, click the Change Customer button.
- Select the correct customer and save.
- Regenerate the invoice in Alvys.
- Open the Web Connector and click Update Selected.
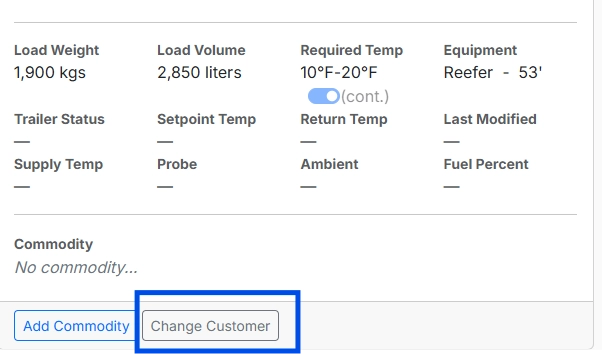 Screenshot showing the Change Customer button on a load.
To change the Invoice As subsidiary after export:
- In Load Details, click the Invoice Customer As dropdown and select the correct subsidiary.
- Regenerate the invoice.
- Open the Web Connector and click Update Selected.
- Manually delete the original invoice in the previous subsidiary’s QuickBooks company.
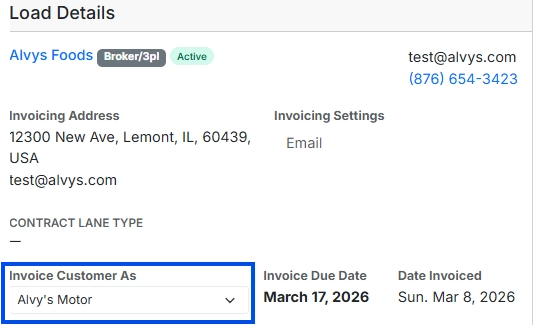 Screenshot showing the Invoice Customer As dropdown on a load.
To modify a summary invoice:
In Alvys, the only supported mechanism for adding or removing loads from a summary invoice is to revert the summary invoice. A summary invoice can be reverted only when its status is “Processed”. If the invoice has already been Sent or Paid, further modification requires intervention from Alvys Support.- Revert the summary invoice by navigating to the All-Invoices tab in Alvys.
-
Locate the invoice and Click the Delete icon for the specific summary invoice.
 Image showing delete icon for summary invoice
Image showing delete icon for summary invoice
Image showing delete icon for summary invoice
- Navigate to the Loads Not Invoiced tab.
- Select the loads to be included in the new summary invoice.
- Regenerate the summary invoice.
- Open the QuickBooks Desktop Connector and pull in the updates to export the new summary invoice to your company file.
- Confirm that the new summary invoice and the updated total amount are accurately reflected under the customer’s account in QuickBooks Desktop.
- Locate the old summary invoice in QuickBooks Desktop and manually delete it to avoid duplicate records and inaccurate aging reports.