
Dispatch Planner
Dispatch Planner v2 is a real-time planning workspace that shows unassigned trips alongside available drivers and assets, so dispatchers can match and assign loads without switching between screens.
Overview
Dispatch Planner v2 gives your team a live, side-by-side view of trips waiting for assignment and the drivers and assets available to cover them. The planner surfaces availability windows, priority tinting, and smart assignment suggestions so you can dispatch faster and with more confidence. The workspace has two main tables: a Trips table on the left showing Open and Planned loads, and a Drivers/Assets table on the right showing available assets. Selecting a trip or a driver filters the opposite table to show only compatible matches, turning a multi-step dispatch into a single workflow. The planner also supports inline editing of key fields, driver notes, driver events, DAT posting, and in-app driver chat: all without leaving the planning screen.Where to Find It
Navigate to Loads and Trips > Dispatch Planner v2 in the main navigation menu. All authenticated users can access Dispatch Planner v2. Certain configuration options within the planner are restricted to specific roles; those restrictions are described in Settings & Permissions below.Key Concepts
Trip Eligibility
Only trips that meet both of the following conditions appear in the Trips table:- The trip’s load must be tendered as a carrier subsidiary. Loads tendered as a brokerage subsidiary are excluded from Dispatch Planner v2.
- The trip must be in Open or Planned status.
Asset Eligibility
An asset (driver or truck) appears in the Drivers/Assets table only when it has an assignment preference configured. Assets without an assignment preference are not shown in the planner, regardless of their active status or availability. The more complete the configured preferences, the more accurate the dispatch suggestions the planner can surface. Assignment preferences are set up in Assets > Assignment Preferences. See Settings & Permissions below for the setup steps.Availability Calculation
The planner calculates driver availability using the following logic:- Available at: the exact date and time the driver becomes available, calculated as last trip delivery time plus average dwell time
- Available for: the duration the driver will be free before their next planned trip
- Next planned at: the start time of the driver’s next scheduled trip
- Available in: a countdown until the driver becomes available
Priority and Row Tinting
Each trip can be assigned one of four priority levels: None, Low, Medium, or High. The Trips table uses row tinting to reflect priority: no color for None, a light tint for Low, a medium tint for Medium, and a dark tint for High. Priority can be set inline directly from the grid.Assignment Actions
Two assignment actions are available when pairing a trip with a driver:- Assign: assigns the selected assets to the trip without dispatching. The trip stays in its current status. Use this when you want to lock in assets but are not yet ready to dispatch.
- Assign and dispatch: assigns the selected assets and dispatches the trip in one step. The trip moves to Covered status. Use this to complete the dispatch in a single action.
Three-Level Availability Settings Hierarchy
Availability settings follow a three-level hierarchy: Alvys platform defaults apply first, company-level settings override those defaults, and fleet-level settings override the company setting for individual fleets. This means a fleet can be configured differently from the rest of the company.How to Use It
Dispatch Planner v2 supports several interconnected workflows. Refer to the dedicated how-to articles for step-by-step instructions:- Assigning and dispatching a trip (trip-first and driver-first flows)
- Configuring trip columns, sorts, and filters
- Configuring asset columns, sorts, and filters
- Adding and editing driver notes
- Adding and editing driver events
- Posting and unposting a truck to DAT
- Sending a driver chat message from the planner
Settings & Permissions
Set Tender As and Carrier on Trips
Before a trip appears in Dispatch Planner v2, its load must be tendered as a carrier subsidiary. To set this:- Open the load details page for the load you want to appear in the planner.
- Locate the Carrier Details section in the top-right panel of the load details page.
- Click the Change Tender button.
-
Set the Tender As field to the carrier subsidiary (not a brokerage subsidiary).
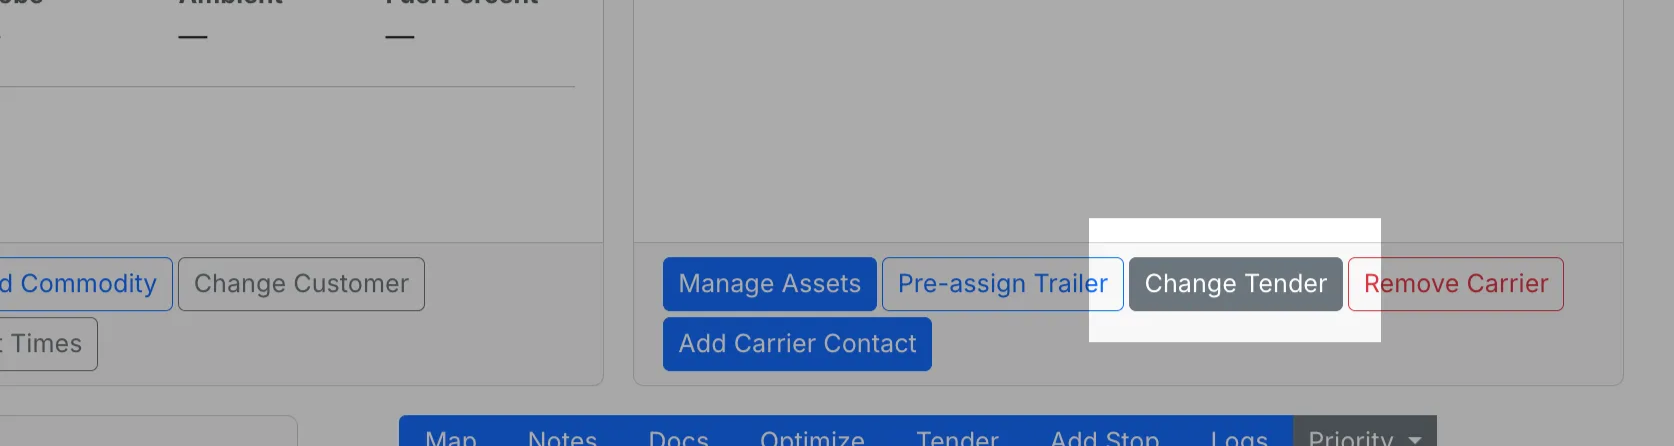
- Screenshot showing the Carrier Details section on the load details page with the Change Tender button and Tender As field visible*
Configure Availability Settings (Optional)
Availability settings control the thresholds the planner uses to calculate when a driver is eligible for a new trip. This is optional; the planner uses Alvys platform defaults if no company or fleet overrides are set. Availability settings are reached at Settings > Planning configuration. Any authenticated user with access to the Settings area can view and edit them; no dedicated permission gates these fields.- Navigate to Settings > Planning configuration.
- Locate the Driver Availability section on the page.
- Set the “Available for” minimum field. This is the minimum free time a driver must have to be considered available. The Alvys default is 4 hours.
- Set the Average dwell time field. This is the estimated time a driver spends at a delivery location before becoming available again. The Alvys default is 2 hours.
- Click Save.
Set Up Assignment Preferences
Assets must have an assignment preference configured before they appear in Dispatch Planner v2. This is required for every driver and truck you want the planner to surface. Viewing and managing assignment preferences requires the “ViewDrivers” and “ViewTrucks” permissions.- Navigate to Assets > Assignment Preferences.
- Click the blue + New Assignment button for the asset you want to configure.
-
Complete the preference fields for that asset and save.
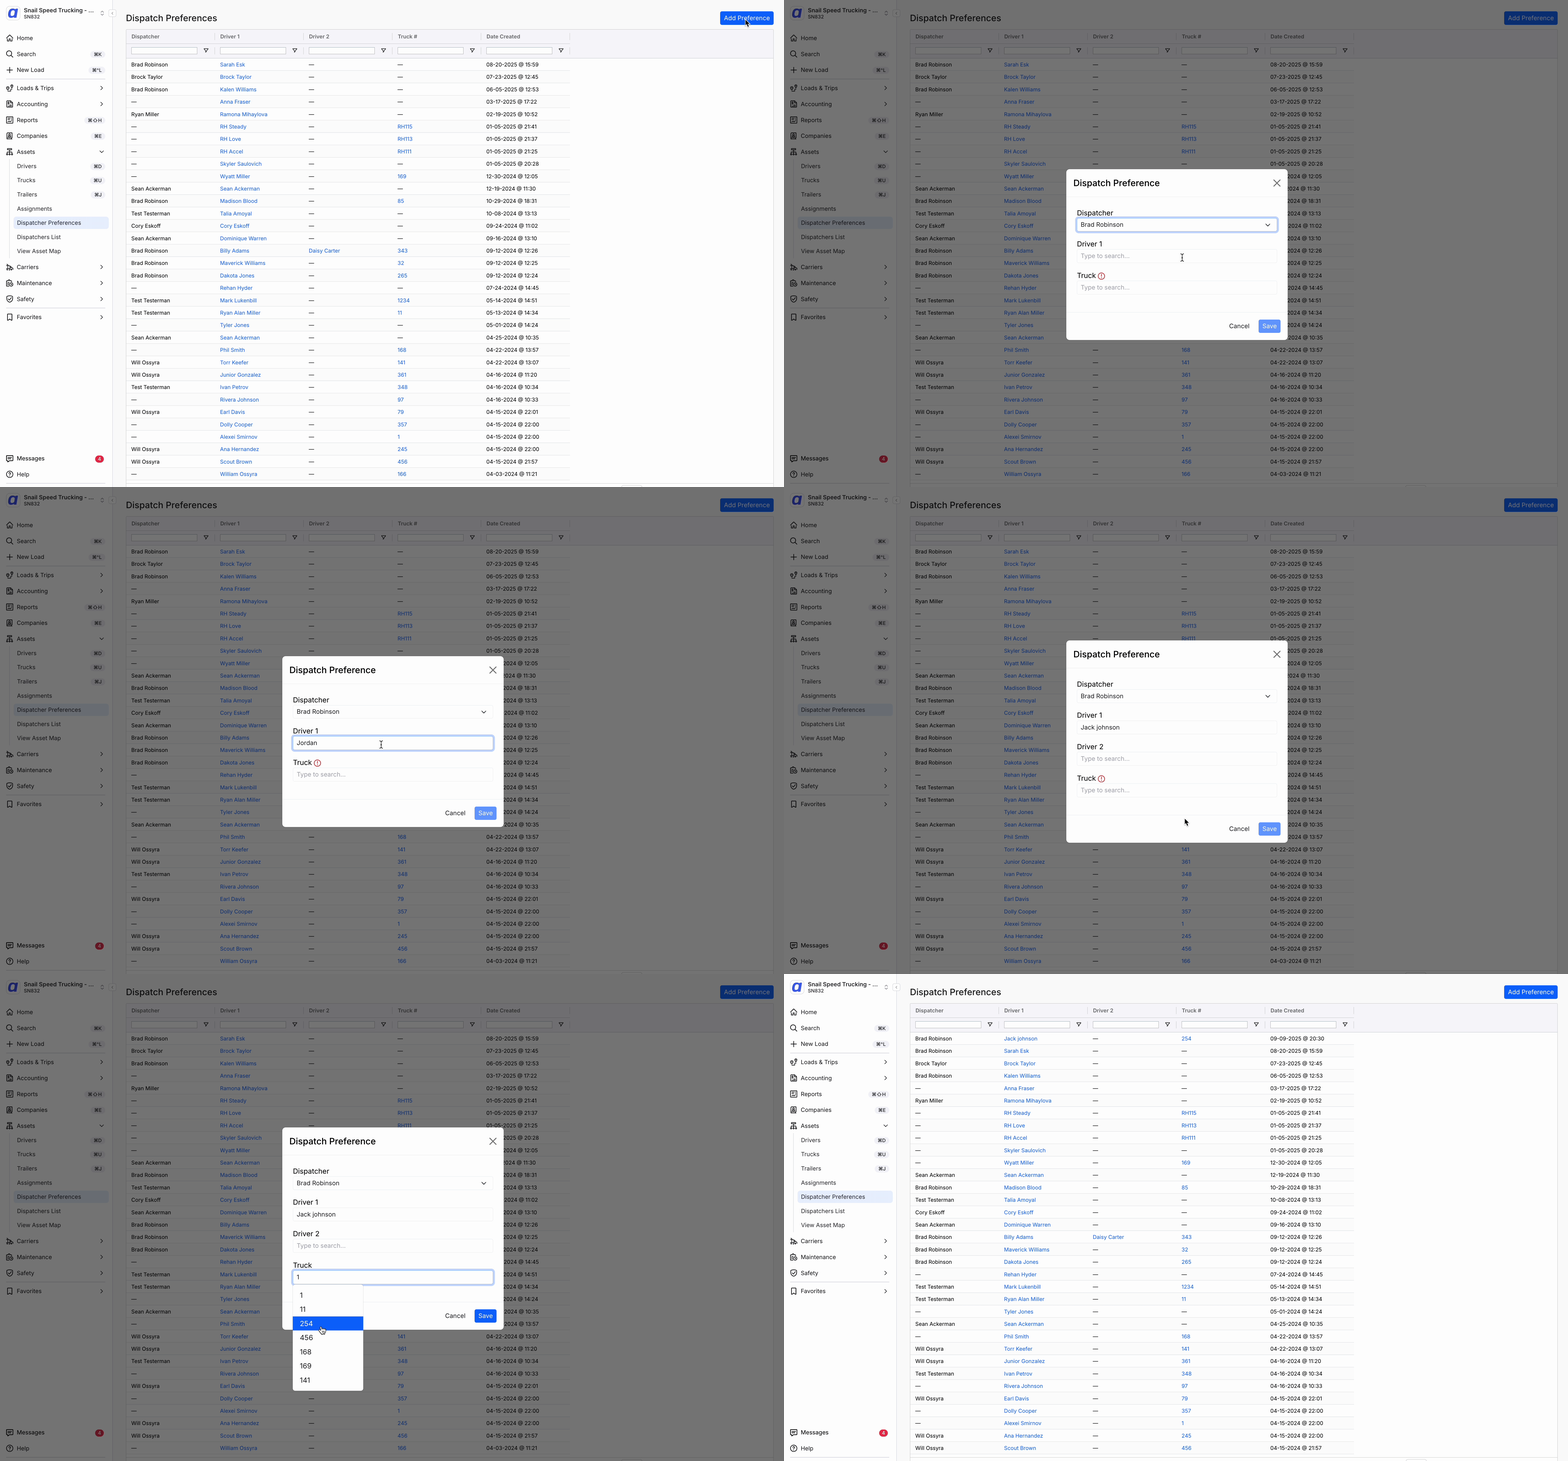 *GIF showing the Assignment Preferences setup flow: navigating to Assets > Assignment Preferences, clicking + New Assignment, and completing the preference fields. *
Limits & Behavior
Trips Table
The Trips table supports configurable columns, sorts, and filters. Use the column configuration menu to show, hide, or reorder columns.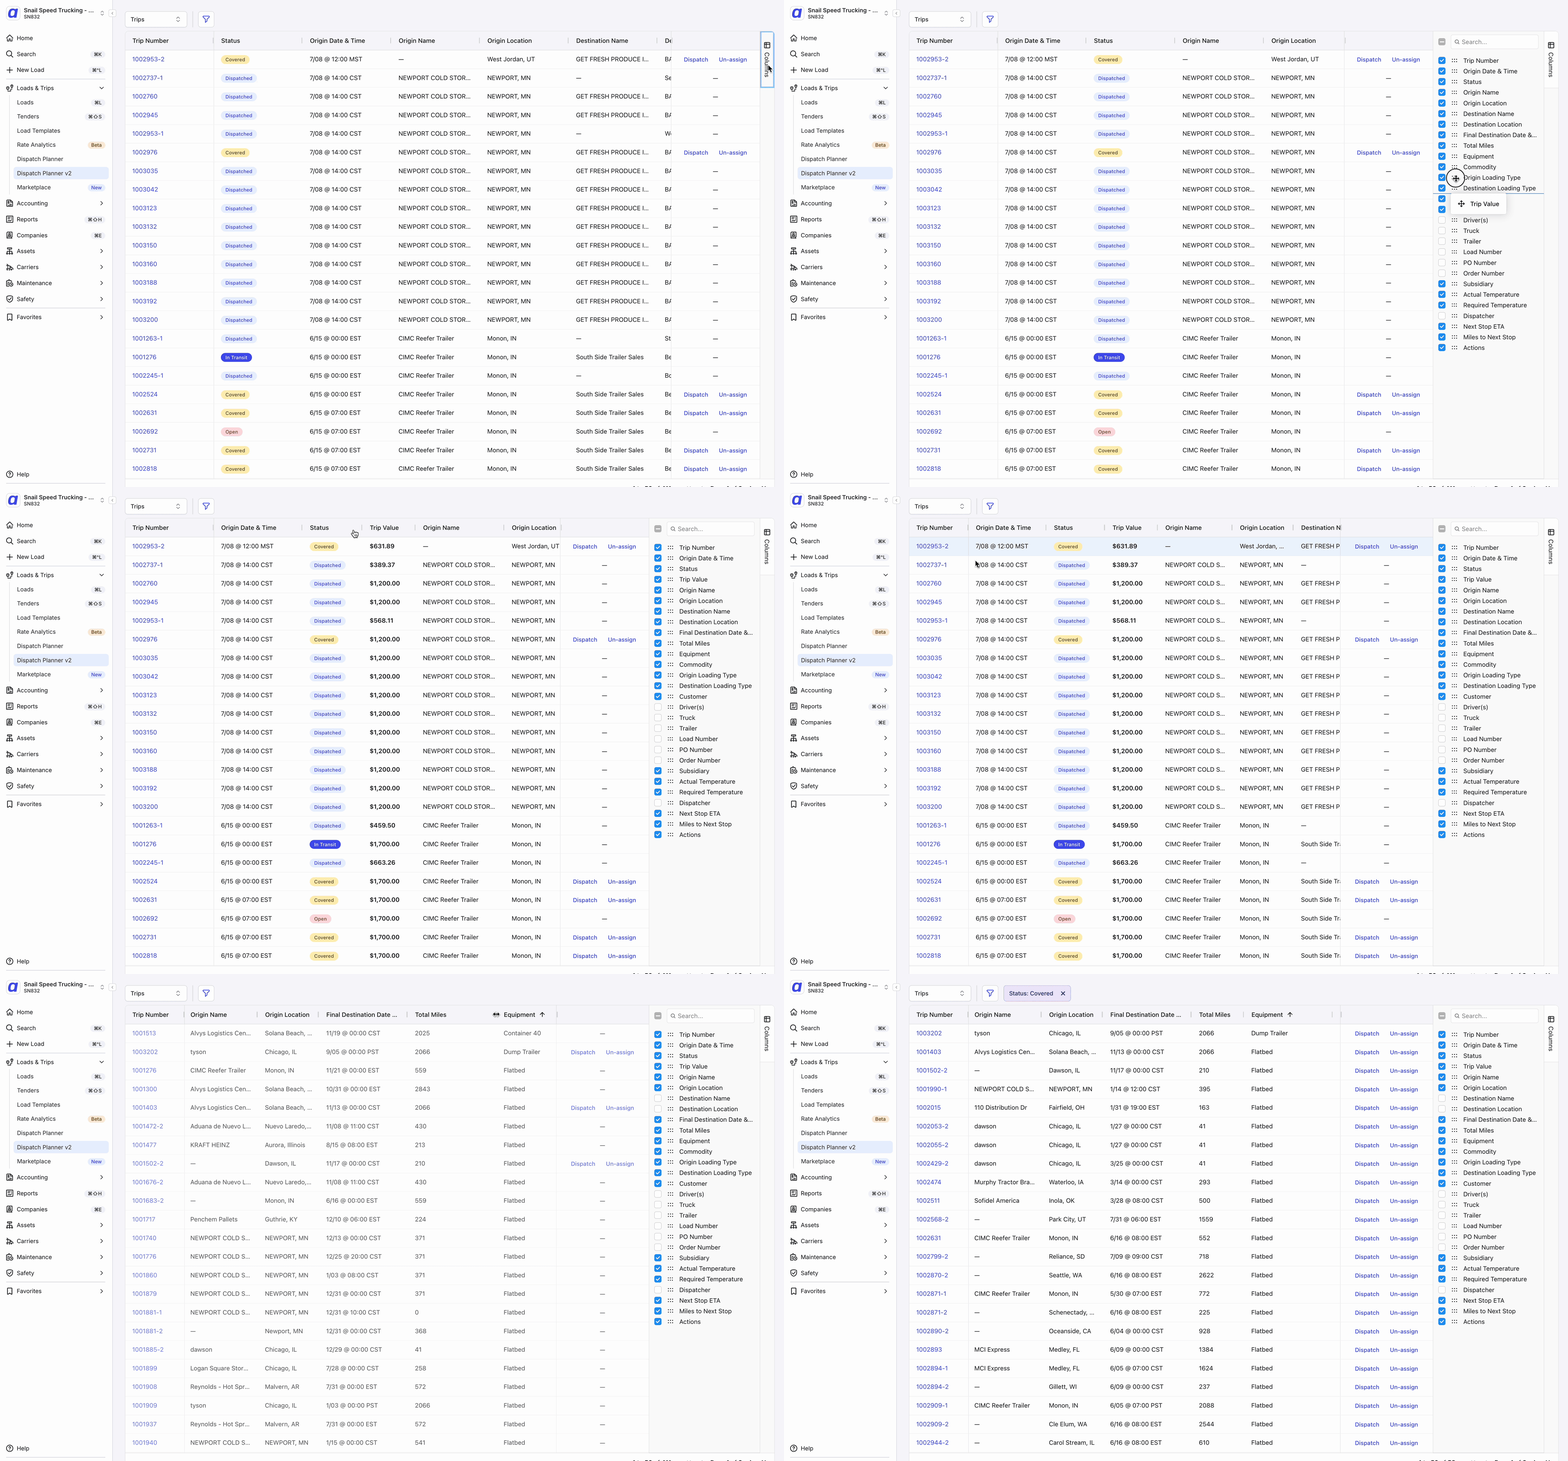 GIF showing the Trips table column configuration: opening the column menu, toggling columns on and off, and reordering them
Inline Editing
Certain columns in the Trips table support inline editing. An editable cell displays a visual indicator when you hover over it. To edit inline:- Click the editable cell.
- Make the change.
- Press Enter or click away to save.
-
The change is reflected in the table immediately.
The following fields support inline editing from the Trips table:
- Dispatcher
- Priority (options: None, Low, Medium, High)
- Trip-Level Custom References (four reference types)
Trip Sidebar
Clicking any row in the Trips table opens the Trip Sidebar on the right side of the screen. The sidebar displays:- Fixed Header: trip ID, status, and key metadata
- Static Map: origin and destination
- Stops Timeline
- Scorecard: rate metrics for the trip
- Details Section
- Customer and Carrier Sections
- Smart Footer: status-aware action buttons The Smart Footer buttons change depending on the trip’s current status:
- Open or Planned trips: a Show Drivers button and a Dispatch button are shown.
- Covered or Dispatched trips: an Un-assign button is shown.
- In Transit or completed trips: no action buttons are shown.
Assets Table
The Drivers/Assets table supports configurable columns, sorts, and filters. Use the column configuration menu to show, hide, or reorder columns. GIF showing the Assets table column configuration: opening the column menu, toggling columns on and off, and reordering them
Driver Notes
Driver notes are visible to dispatchers and are stored on the driver record. The planner shows the 10 most recent notes for each driver.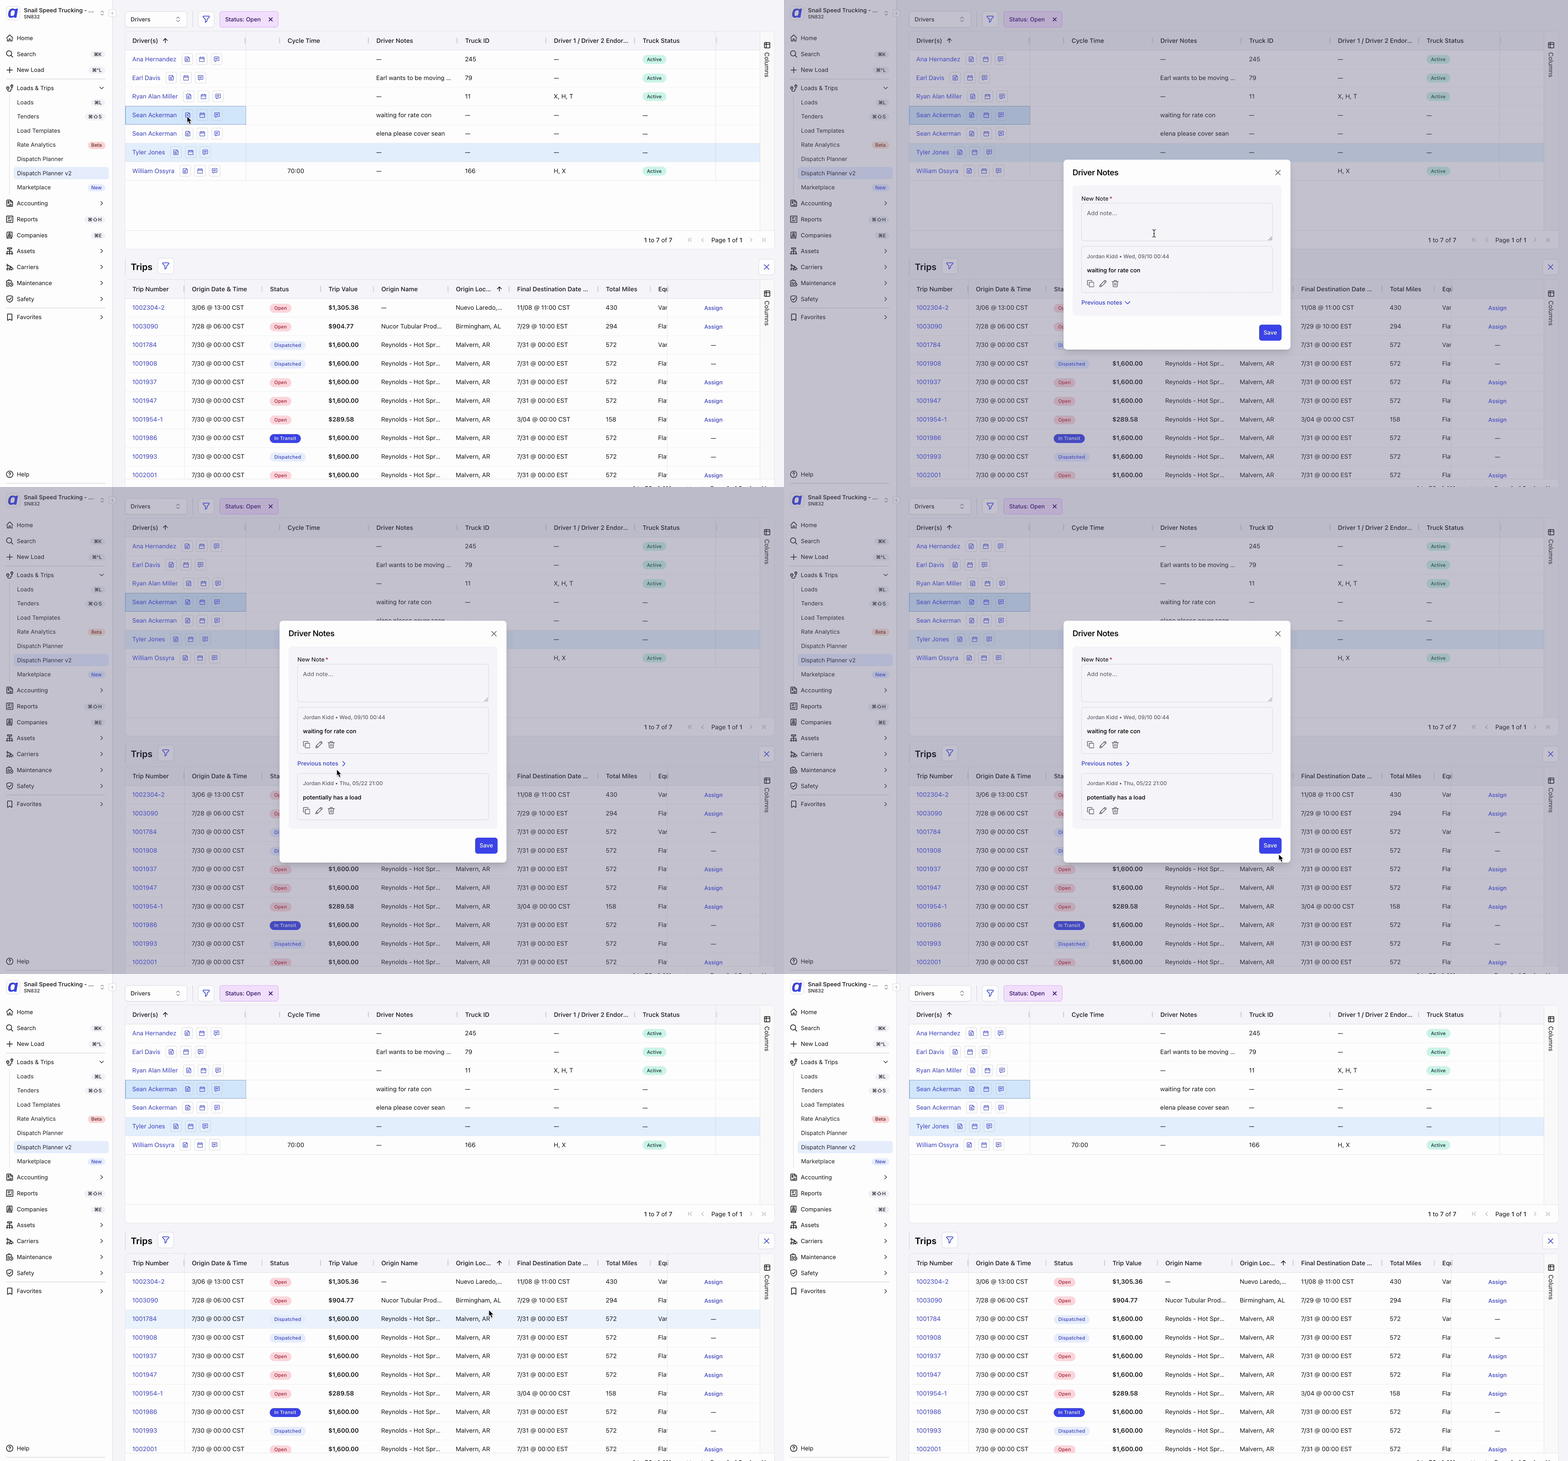 GIF showing the Driver Notes modal: selecting a driver, opening the notes section, adding a note, and saving
Driver Events
Driver events record activity that affects a driver’s availability and appear in the driver’s activity timeline in chronological order. To add a driver event:- Open the Driver Activity sidebar for the driver.
- Click Add Event.
- Enter the event details: type, date and time, and any notes.
-
Save. The event appears in the driver’s chronological activity timeline.
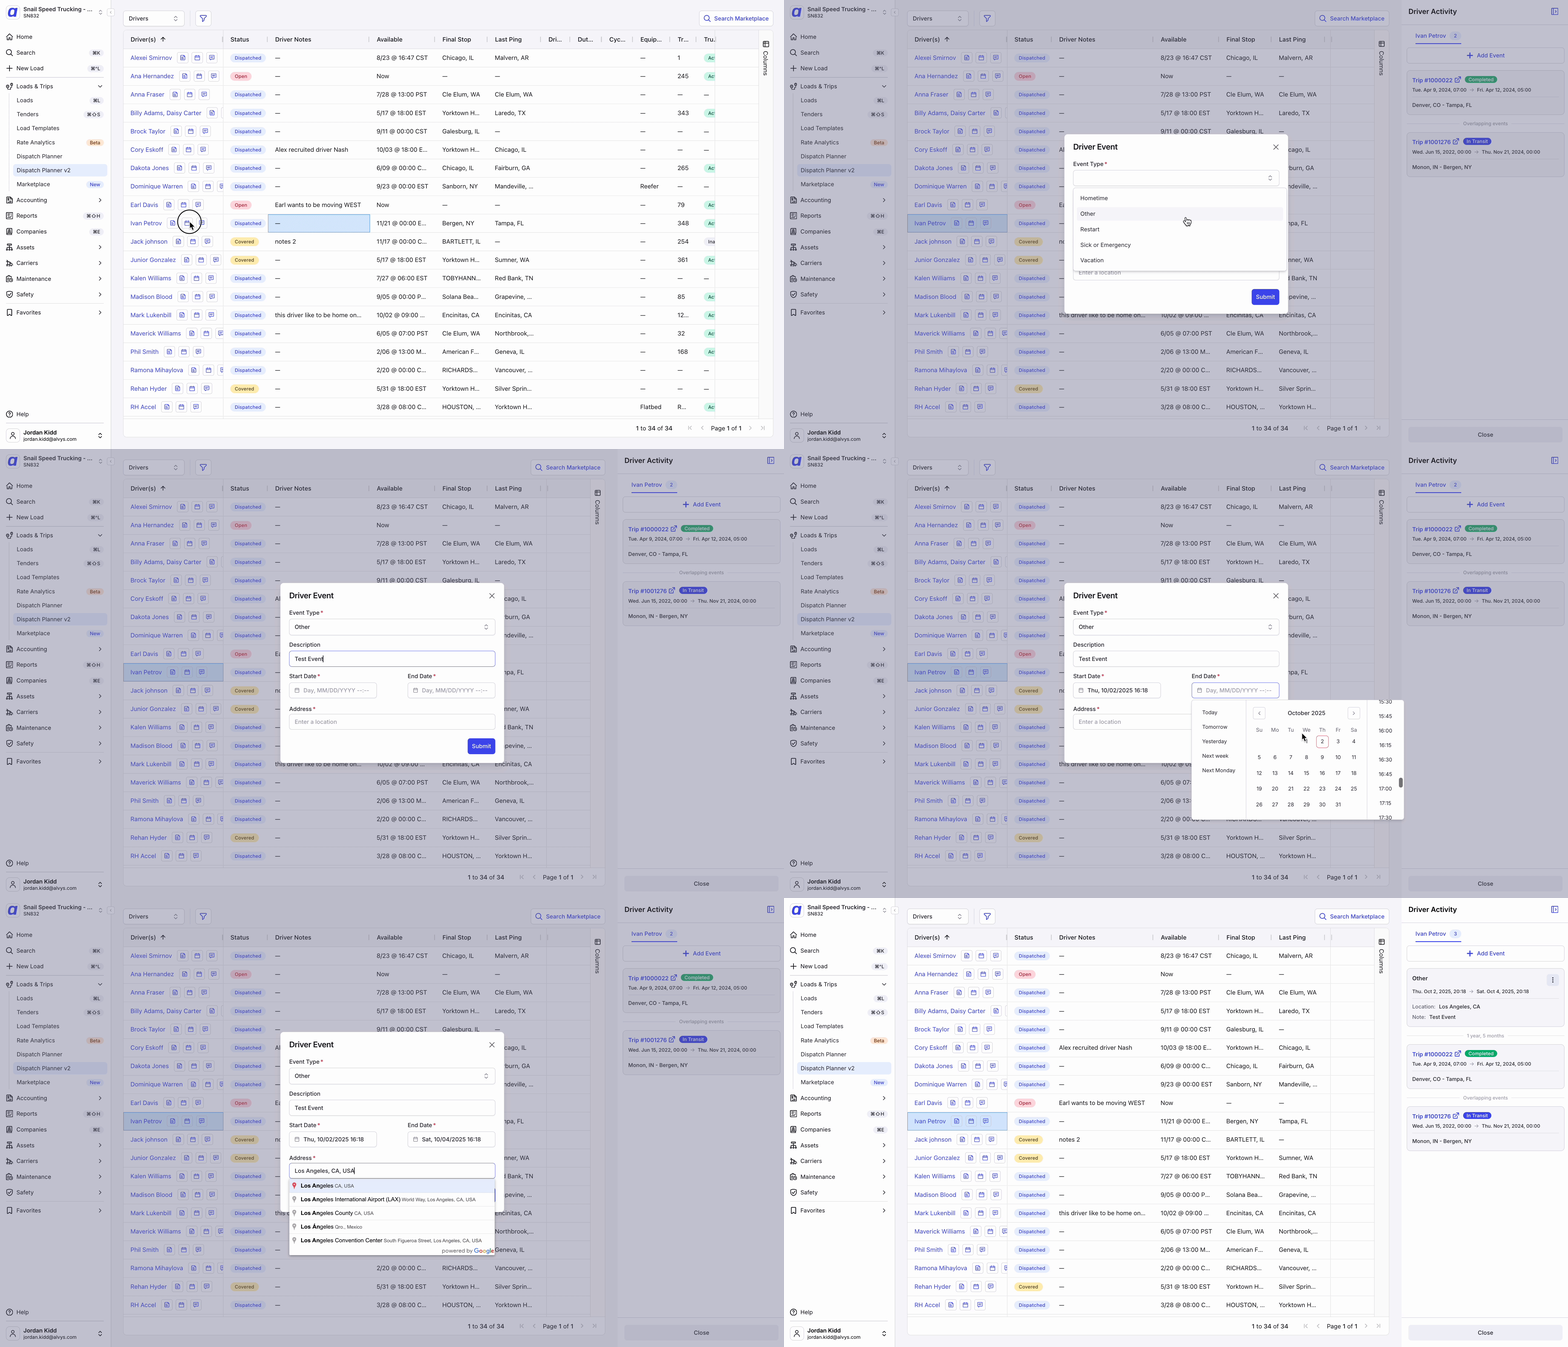 GIF showing the Add Driver Event flow: opening the Driver Activity sidebar, clicking Add Event, completing the event details, and saving.
Driver Chat
You can send a message to a driver directly from Dispatch Planner v2 without leaving the screen.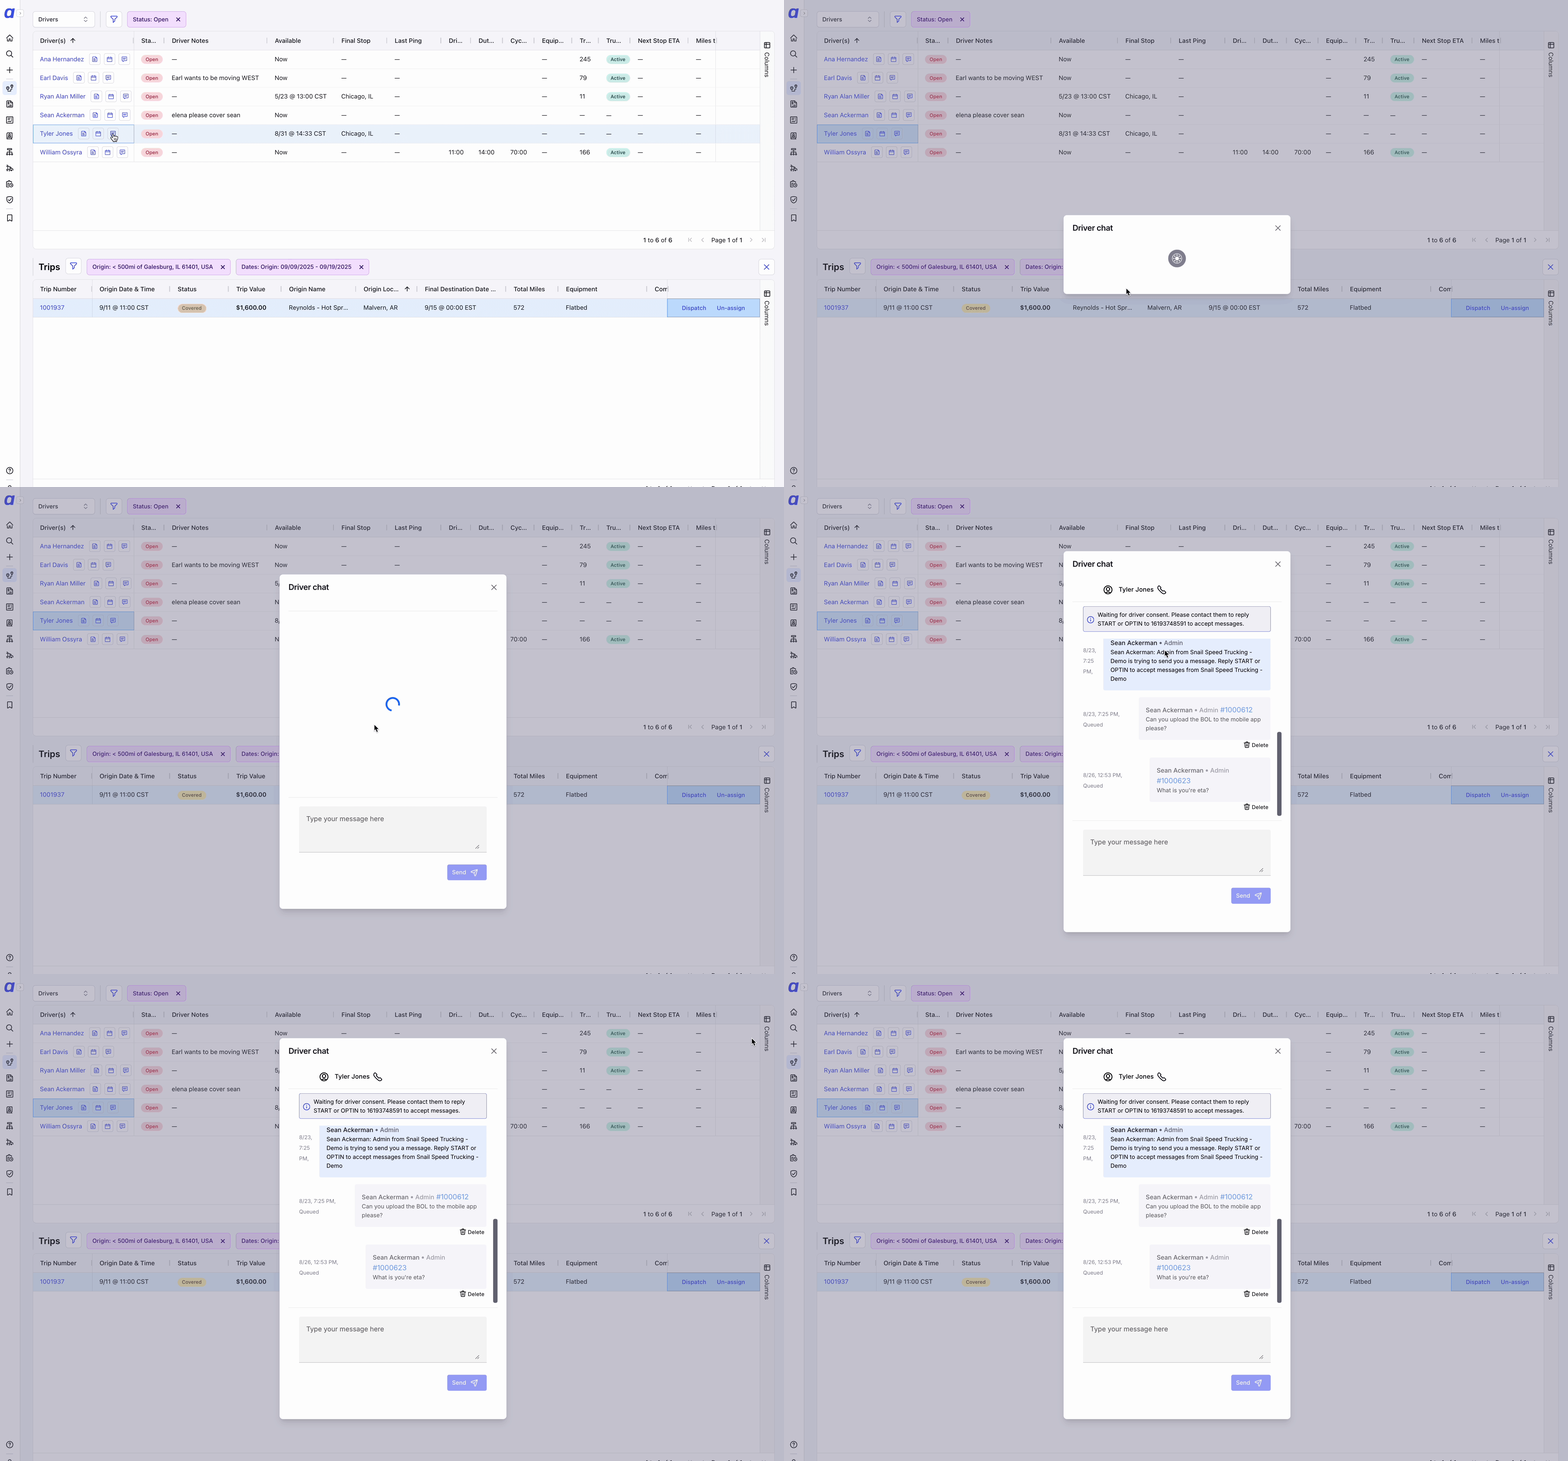 GIF showing the Driver Chat flow: selecting a driver in the assets table, clicking the Chat button in the asset sidebar, typing a message, and sending
Trip Assignment
Trip assignment can be initiated from either the trip side (trip-first) or the driver side (driver-first). Trip-first: Select a trip row in the Trips table. The Assets table displays a pinned suggestion row at the top showing the recommended asset match. Click Assign or Assign and dispatch to complete the assignment. Driver-first: Select a driver row in the Assets table. The Trips table updates to show only compatible Open trips for that driver. Select the trip you want to assign, then click Assign or Assign and dispatch.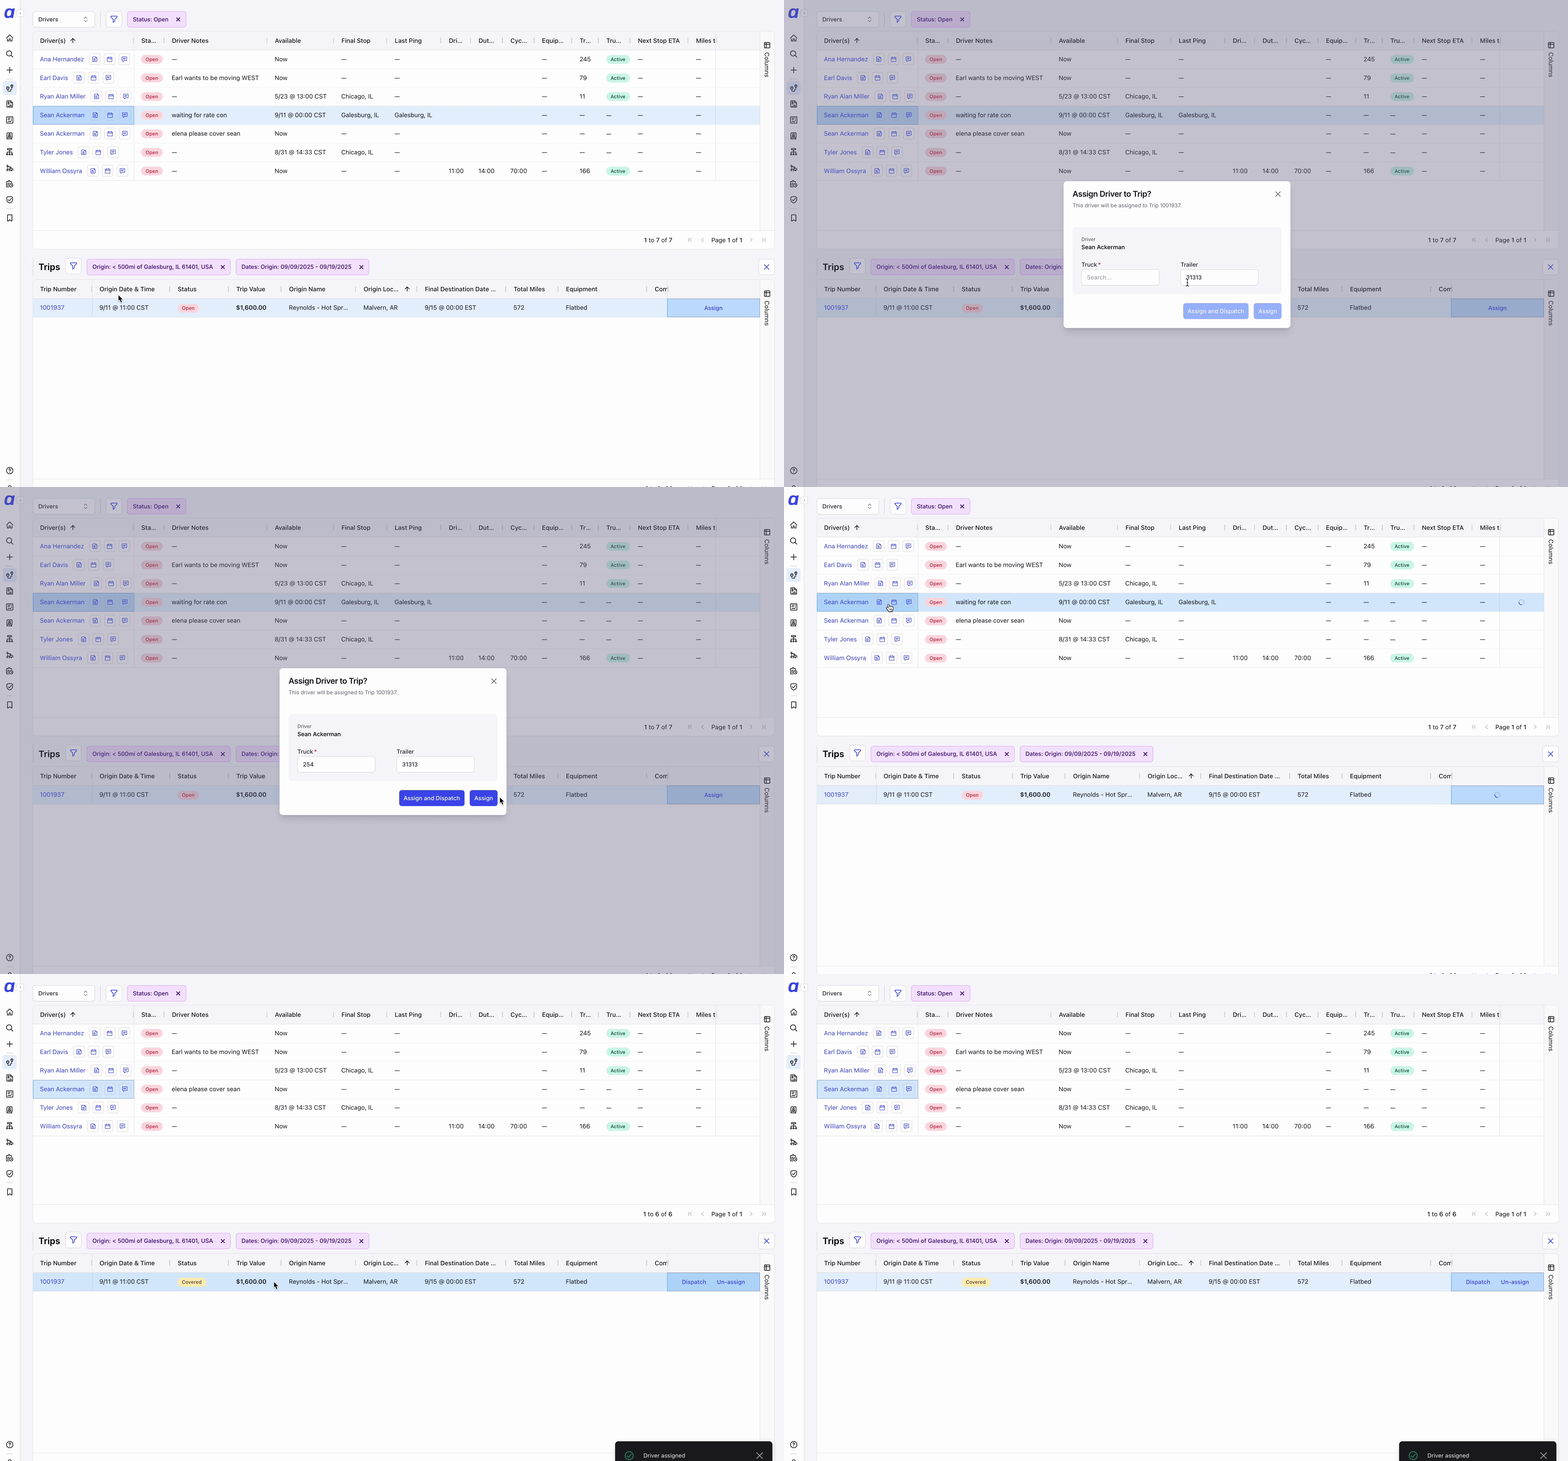 GIF showing the Trip Assignment flow: selecting a trip, reviewing the pinned suggestion in the assets table, and clicking Assign and dispatch
DAT Posting
You can post a truck to the DAT load board directly from the Assets table. When a trip is assigned to a posted truck, the DAT post is automatically removed. You can also manually unpost a truck at any time by clicking the Un-post button in the asset sidebar. The Assets table can be filtered to show only currently posted trucks.Availability Columns
The Assets table includes four availability columns that show at a glance when each driver is free:- Available at: the exact date and time the driver becomes available
- Available for: how long the driver will be free before their next planned trip
- Next planned at: the start time of the driver’s next scheduled trip
- Available in: a countdown until the driver becomes available
Asset Sidebar
Clicking any row in the Assets table opens the Asset Sidebar. The sidebar includes two tabs:- Overview Tab: driver and asset details, notes, and availability summary
- Activity Tab: chronological timeline of driver events