
This article covers the full lifecycle of a user account in Alvys: creating a new account, assigning a role and permissions, editing an existing profile, deactivating an account when someone leaves, and resetting a password.
Overview
Every person on your team who needs access to Alvys must have their own unique user account. This article walks you through the entire lifecycle of a user account: creating it for the first time, assigning the appropriate role and permissions, updating access as responsibilities change, deactivating the account when someone leaves, and resetting passwords. Synonyms: add user, create user, invite user, manage users, user setup, user account management, enable user, disable user, deactivate user.Before You Start
Before you can create or edit users, both of the following conditions must be met:- Your user account must have one of the following roles: Admin, Partner Admin, or Office Admin. Users assigned any other role — such as Dispatcher, Biller, Sales Agent, Data Entry, Safety, Operations Manager, or Driver — will not see the Company Profile menu option and cannot create, view, or modify user accounts.
- To create a new user, your account must have the “Add User” permission enabled. To adjust permissions on a new or existing user, your account must also have the “Set Permission” permission enabled. Without “Set Permission”, you can create an account but cannot modify its permissions, which results in an incomplete setup.
ℹ️ The Operations Manager role can update existing users but cannot create new users.
Open the Users tab in Company Profile
- Select your username in the bottom left corner of Alvys.
- Click Company Profile from the menu.
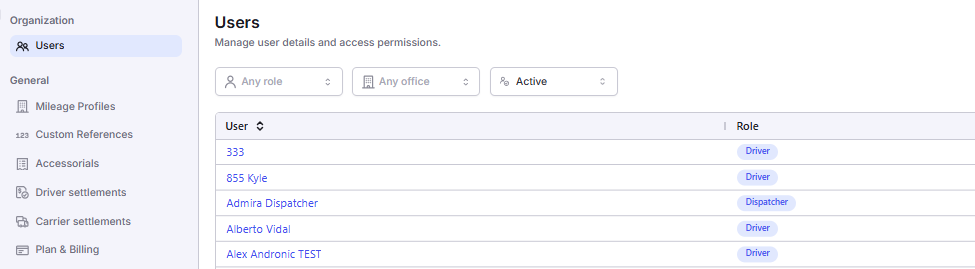
- On the Company Profile page, select the Users tab from the top navigation bar. This displays a list of all active and inactive users in your organization.
Open the new user creation form
Click the Add User button in the upper right corner of the Users screen. This opens the new user creation form.📷 Image: screen with Add User button highlighted.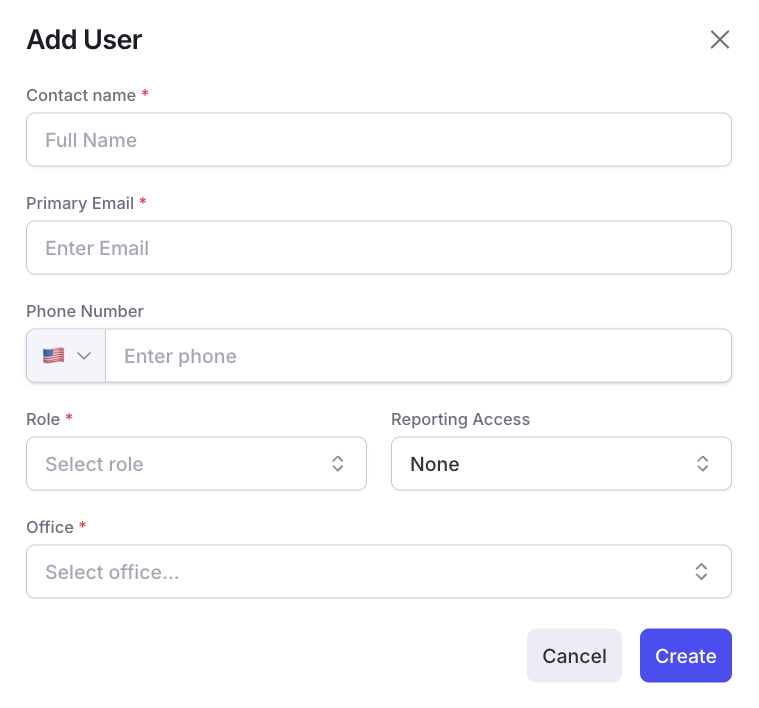
ℹ️ If the Add User button is not visible, your account does not have the “Add User” permission. Contact your Admin to request access.
Enter the user’s basic information
Fill in the following fields:- First and Last Name: Enter the user’s legal or preferred name. This name appears in notifications, activity logs, and throughout Alvys.
- Email Address: Provide a valid work email address. This becomes the user’s unique login username and must not already exist in the system.
- Password: Assign a temporary password. Instruct the user to update it immediately on their first login.
- Office Location: Select the branch or office to which the user is assigned.
- Role: Skip this field for now — role selection is covered in the next step.
Assign a base role
The role you select determines the starting set of permissions the user receives. In the Role dropdown, select the role that best matches the user’s job function. Refer to the User Roles in Alvys article for a detailed comparison of all roles.📷 Image: Role dropdown on the user creation form.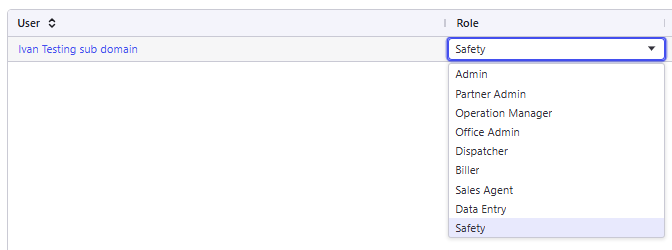
- IT or System Administrator: assign the Admin role.
- Company Owner, President, CEO, or General Manager: assign the Partner Admin role.
- Operations Manager, Fleet Manager, or Terminal Manager: assign the Operation Manager role.
- Office Manager, Administrative Manager, or Back-Office Coordinator: assign the Office Admin role.
- Freight Dispatcher, Load Planner, Load Coordinator, or Driver Manager: assign the Dispatcher role.
- Billing Clerk, Accounts Receivable/Payable Specialist, Payroll Clerk, or Transportation Accountant: assign the Biller role.
- Freight Broker, Logistics Sales Representative, Account Executive, or Business Development Representative: assign the Sales Agent role.
- Data Entry Clerk, Administrative Assistant, Load Builder, or EDI Coordinator: assign the Data Entry role.
- Safety Manager, DOT Compliance Officer, Fleet Safety Coordinator, or Risk/Compliance Specialist: assign the Safety role.
Review and adjust permissions
Once a base role is selected, Alvys automatically populates the default permissions for that role. Before saving the account, review and refine the user’s access:-
Scroll down to the Permissions area of the user form to view the available toggles organized by operational category.
📷 Image: Permissions area showing toggle groups by category.
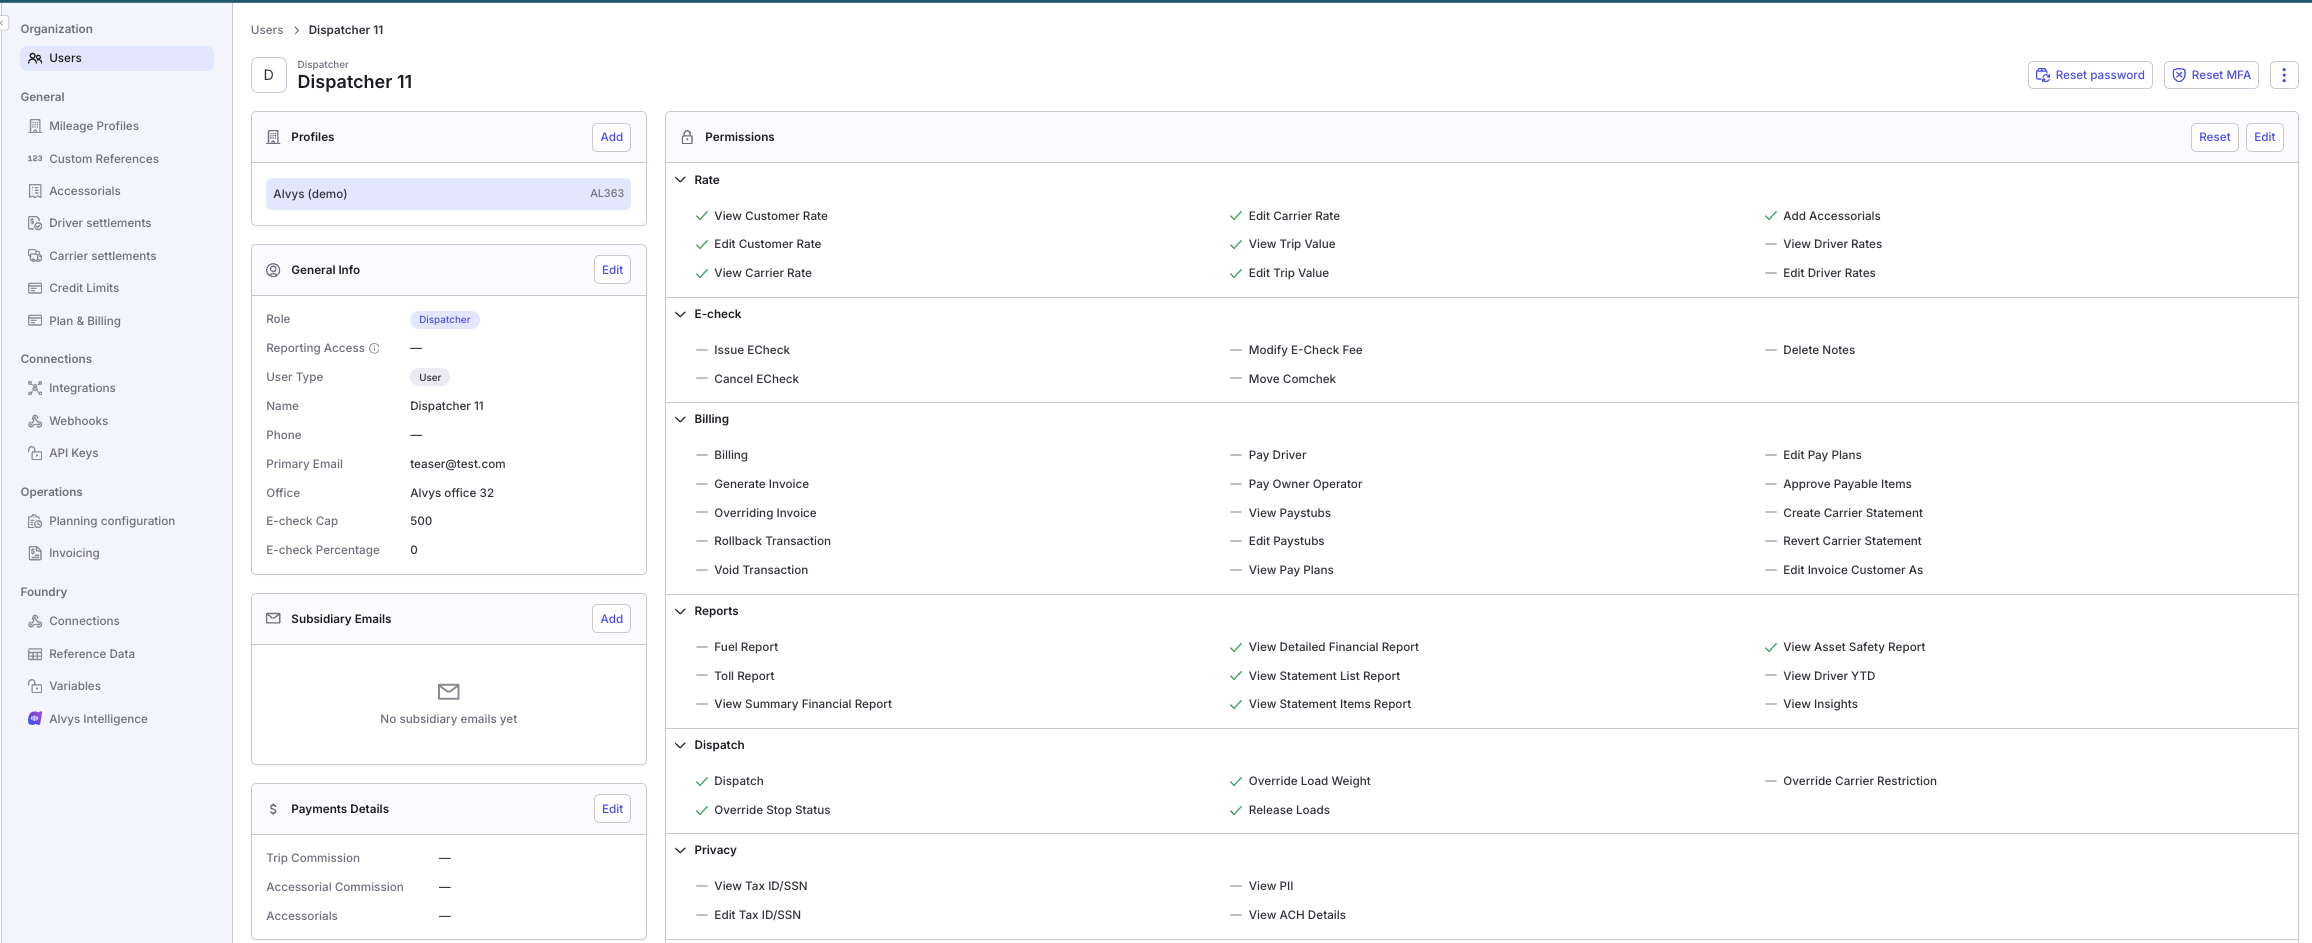
- Any toggle currently on (checked) represents an active permission. Evaluate these defaults against the user’s specific job responsibilities.
- Turn individual toggles off for any capability this user should not have.
- Turn individual toggles on for any additional capability the user specifically needs that is not in the default set.
- For a full explanation of what each permission does, see the User Roles and Permissions Collection.
✅ Best Practice: Do not rush this step. Taking a few minutes to review permissions when creating an account is far less disruptive than troubleshooting access issues afterward or discovering that a user had access to sensitive financial data they should not have.
Save the account
- Once you are satisfied with the role and permission configuration, click the Add User button in the bottom left corner of the form.
- The user will receive a login invitation at their email address. Alternatively, you can share the temporary password directly, depending on your company’s onboarding process.
- The new user now appears in your Users list and is active immediately upon saving.
ℹ️ If you are setting up an account for someone who has not yet started, you can create it in advance and ask them to change their password on their first day.
Confirm access
After saving the new account, follow these steps to verify the user has the correct access:- Ask the new user to log in and confirm they can reach all operational sections required for their role.
- Have them report any areas where they receive an “Access Denied” message or do not see expected buttons. These instances indicate a missing permission toggle.
- Return to the user’s profile in Company Profile > Users to enable any missing permissions.
Variations
Editing an existing user’s profile
To change a user’s name, email, role, or individual permissions:- Select your username in the bottom left corner, navigate to Company Profile, and select the Users tab.
- Find the user by name or email. Use the search bar if your team is large.
- Click the user’s name or row to open their profile.
- You will see the user’s basic information, assigned role, and current permission toggles.
- Modify the fields you need to change. To reassign the user to a different role, change the Role dropdown.
📷 Image: Role dropdown on the edit user form.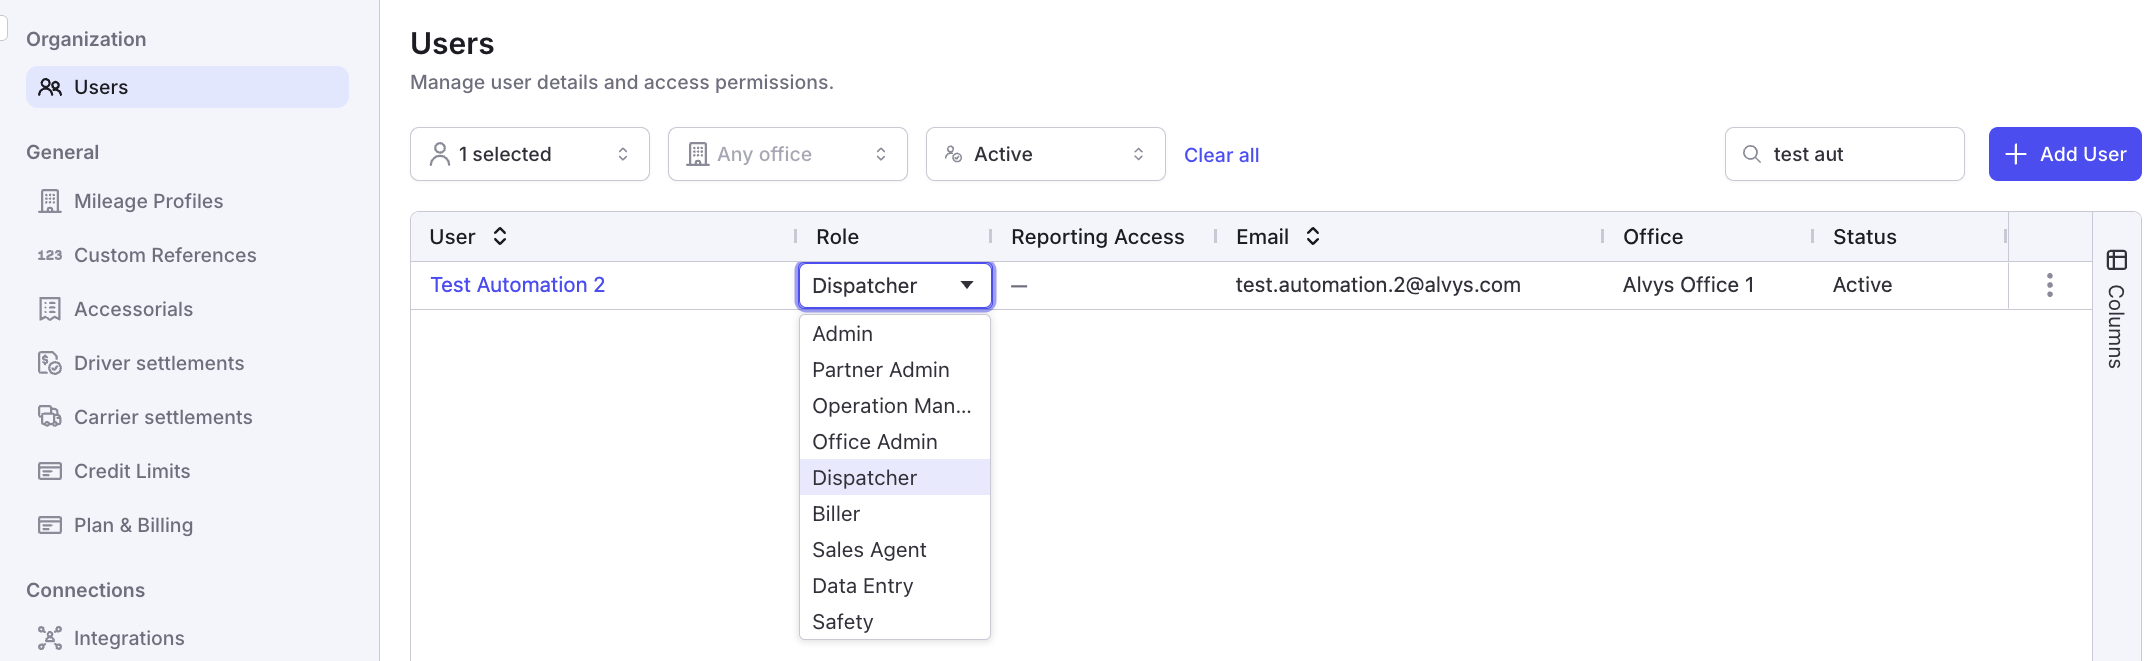
- Adjust individual permission toggles as needed, then save.
✅ Best Practice: Review user profiles periodically, ideally quarterly, to ensure people only have access that matches their current job responsibilities.
Resetting a user’s password
If a user forgets their password or you need to reset access:- Open the user’s profile (steps above).
-
Select the Reset option next to the password field.
📷 Image: Password reset option on the user profile.
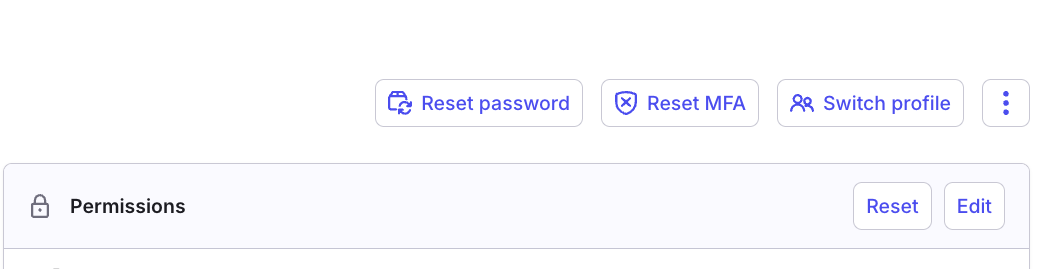
- Alvys sends a password reset link to the user’s registered email address.
- Notify the user to check their email and click the link to set a new password.
Deactivating and reactivating a user
Deactivating a user account is the correct action when someone leaves your company or takes an extended leave. Deactivation prevents the user from logging in immediately, preserves their historical activity log and audit trail in Alvys, and allows the account to be reactivated in the future if needed. To deactivate a user:- Find the user by name or email in the Users list.
- From the user row, select the status dropdown menu.
-
Set the account to Disabled.
📷 Image: Status dropdown on the user row showing Active and Disabled options. Upload from IC:14396325.
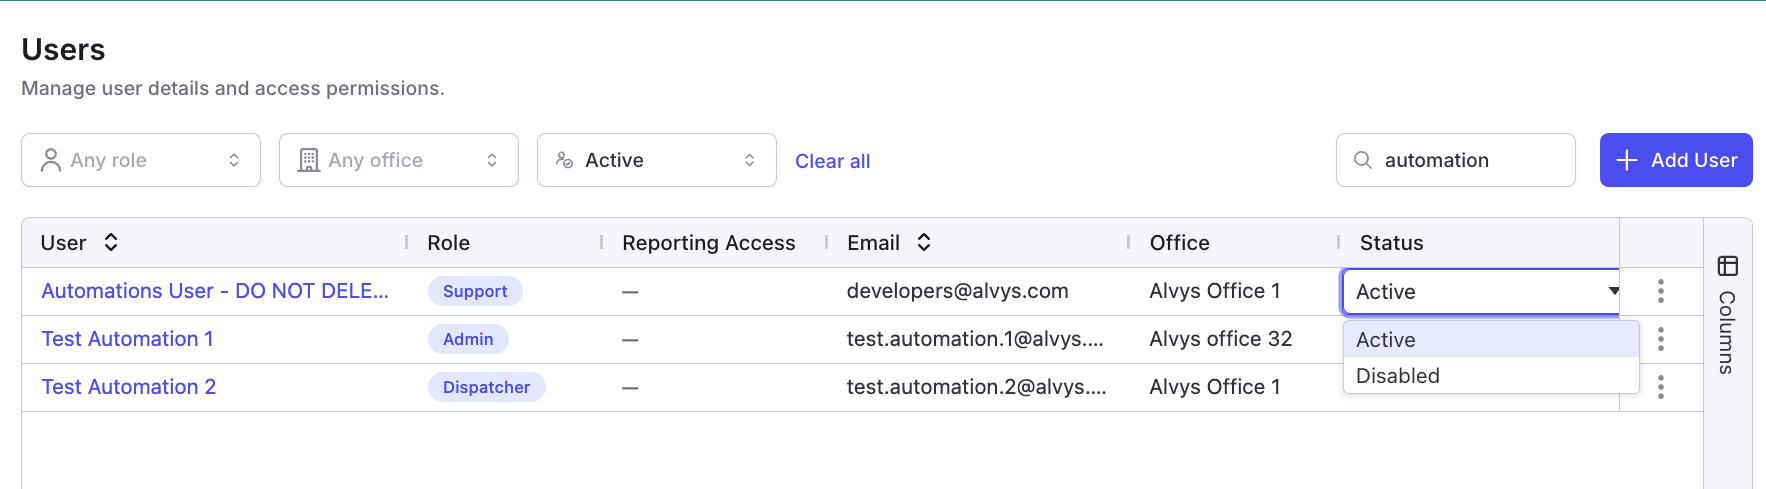
- Save. The user will be unable to log in from this point forward.
✅ Best Practice: Deactivate a departing employee’s account on their last day, ideally before their shift ends. Do not wait until their IT equipment has been returned or their email has been shut down, as an active Alvys login still allows access from any device.