
Summary
Canceling loads in Alvys depends on the load’s status and specific conditions. This guide walks through the cancellation steps by status, plus troubleshooting for common issues.General Prerequisites for Load Cancellation
Before attempting to cancel a load, ensure the following:- You have the necessary permissions to manage and cancel loads.
- The load is in a cancellable status (e.g., Open, Covered, or Dispatched).
- Admin-level user approval (or Support assistance) may be required for certain statuses.
Step-by-Step Instructions by Load Status
1) Canceling Loads in Open or Covered Status
- Open the load in Alvys.
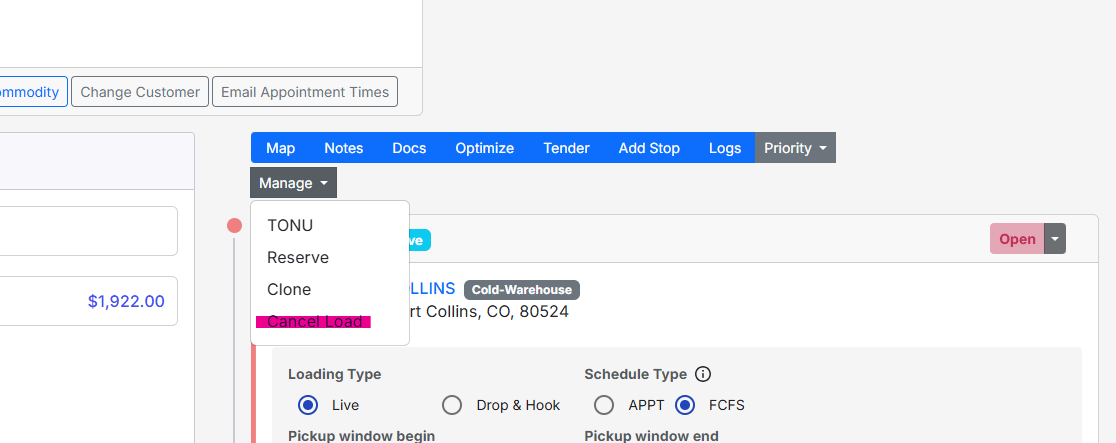
- Navigate to the Manage menu.
- Select Cancel Load.
- Confirm your action by clicking Yes in the pop-up window.
- Optionally, add a note explaining why you are canceling the load.
2) Canceling Loads in Dispatched Status
- Open the load and click Manage.
- If the driver has not checked in to the Pickup stop, the Cancel Load option will be available.
- Open (no asset assigned)
- Covered
- Dispatched (only if the driver has not yet checked in to the Pickup stop)
3) Canceling Loads in Delivered Status
If a load is Delivered but still needs to be canceled, you must work backward through statuses:- Open the load and go to the Pickup stop.
- Change the Pickup stop status to Open.
- Refresh the load by marking the last stop as Covered.
- Return to the Manage menu and select Cancel Load.
4) Canceling Loads in In Transit Status
If a load is In Transit but still needs to be canceled:- Open the load and locate the first stop.
- Unmark the first stop as Picked Up to revert the load to Dispatched status.
- Once in Dispatched status, the Cancel Load option will appear under Manage.
Canceling Loads in Delivered or In-Transit Status (UI walk-through)
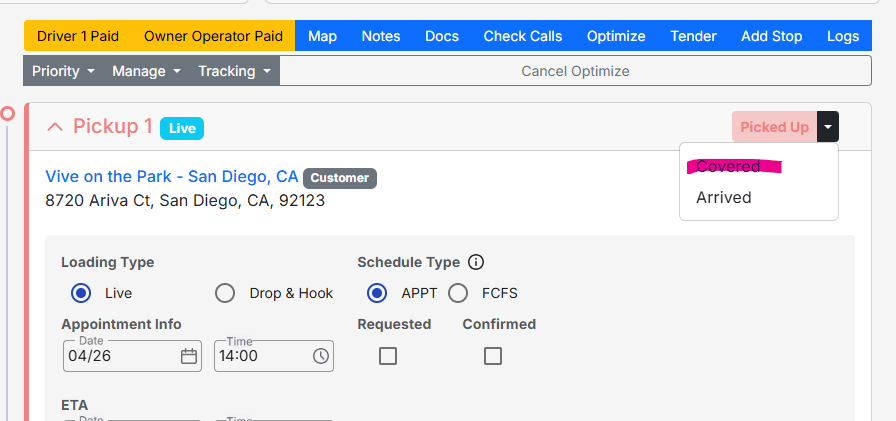
- Open the load and click the downward arrow next to the stop status, as shown below.
-
Change the status to Covered to revert the load to Dispatched status.
5) Canceling Loads in Queued or Invoiced Status
Queued and Invoiced are further along the workflow than Released, so canceling from these statuses takes two phases: first get back to Released with Support’s help, then continue reverting yourself down to a cancelable status.- Contact Support. They will revert the load status to Released. This step requires Support assistance and cannot be done by the user directly.
- Released is not itself a cancelable status. Once the load is back at Released, continue reverting it yourself the same way you would for a Delivered or In Transit load (see sections 3 and 4 above), working backward through the stop statuses until the load reaches Open, Covered, or Dispatched (pre-check-in).
- Once the load is in one of those three statuses, select Cancel Load from the Manage menu as usual.
6) Canceling Loads in a Batch
- Remove the load from its batch and set the load status to Released.
- Open the load and mark the last stop as Covered to continue reverting the load toward a cancelable status.
- The Cancel Load option will then appear under Manage once the load reaches Open, Covered, or Dispatched (pre-check-in).
7) Canceling Non-Revenue Loads
- Non-revenue loads cannot be canceled directly from Released status.
- Request Support assistance to handle the cancellation.
8) Canceling Loads Already Paid to Drivers
- Remove the payment from the driver’s paystub before attempting to cancel the load.
Troubleshooting Common Issues
Missing Cancel Option in the Manage Menu
- Confirm the load is currently in Open, Covered, or Dispatched (pre-check-in) status. Cancel Load will not appear in any other status, including Released.
- Ensure the Pickup stop is set to Open.
- Switch to the second or third tab in the load details before accessing the Manage menu.
Unable to Cancel Loads in Completed Status
- Change the load status through admin actions to enable cancellation.
Cancel Option Not Available for Delivered Loads
- Revert the load status to Covered or Open before attempting cancellation.