
Watch the walkthrough
Where to find it
Go to Accounting → Driver Settlements. You’ll see three tabs:First-time setup checklist
- Create a pay period. Go to Settings → Pay Periods, then click New Pay Period. Set how often you want to pay these drivers and choose which drivers the schedule applies to.
- Configure driver rates. Set these up on each driver’s profile individually, or use a rate plan to apply the same rates to a whole group of drivers at once.
- Check the Open tab. A delivered trip will appear here once that driver has both a pay period and at least one rate configured.
- Approve payable items. Select the line items you want to include and click Approve. The driver then moves to the Drafts tab.
- Review the draft. Preview the amounts, add any notes you need, and share it with the driver if you’d like their input before finalizing.
- Generate the statement. This moves it to the Statements tab, and it’s emailed to the driver automatically if email delivery is turned on for your account.
Configuring driver rates
- Open the driver’s profile from Drivers.
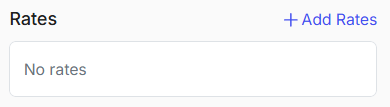
- Scroll down to the Rates section. Any rates already set up are listed there, each with a small menu (the three dots) so you can edit or delete it.
- Click + Add Rates.
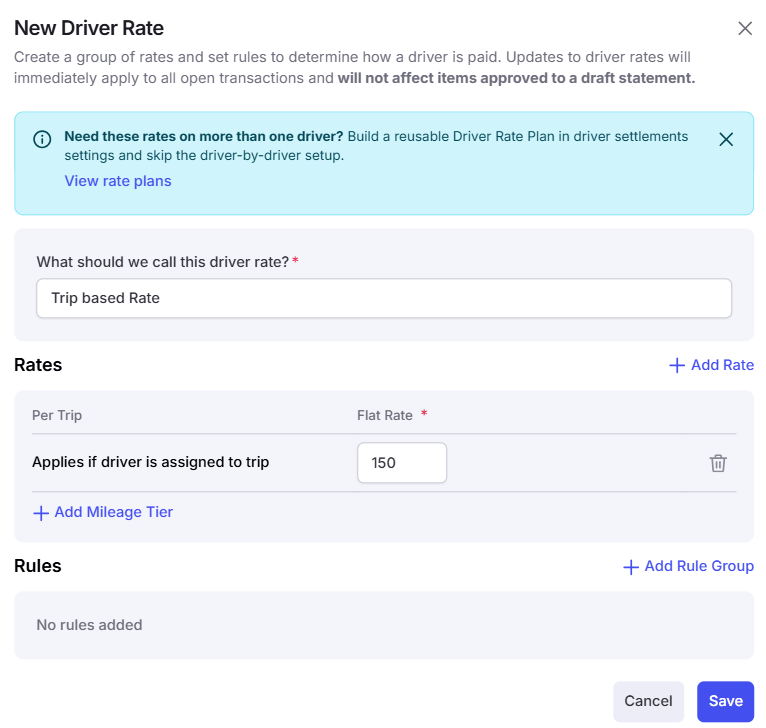
- Give the rate a name and choose a rate type.
- Enter the rate amount.
- If needed, add a rule to restrict when this rate applies (see Rate rules, below).
- Click Save.
Rate rules
- Load-level rules restrict a rate by customer, so the rate only applies when the trip is for that specific customer.
- Trip-level rules restrict a rate by the Number of Drivers on the trip, or by Equipment Type.
- TONU rules let you scope a rate to TONU (Truck Ordered Not Used) loads specifically, with three options to choose from: Non-TONU only, TONU only, or Any.
- Rule groups let you combine several conditions using “or” logic, so the rate applies whenever any one condition in the group is met, rather than requiring all of them at once.
- Team driver pay: to split pay between two drivers working the same load, use a trip-level rule scoped by Number of Drivers, with a separate rate configured for each driver.
Rate plans
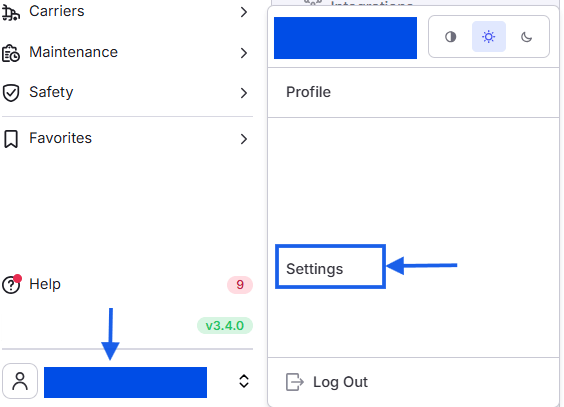
Driver Rate Plans are reusable templates that bundle together rates, optional trip rules, and a group of drivers, called a segment. They replace the older approach of entering the same pay structure on every driver’s profile one at a time. Rate plans and profile-level rates can be used together. A driver can be paid from their own profile rates, from one or more rate plans, or from a combination of both, and all matching rates are added together on the statement. To create a rate plan:- Click your account name in the bottom-left corner, then click Settings.
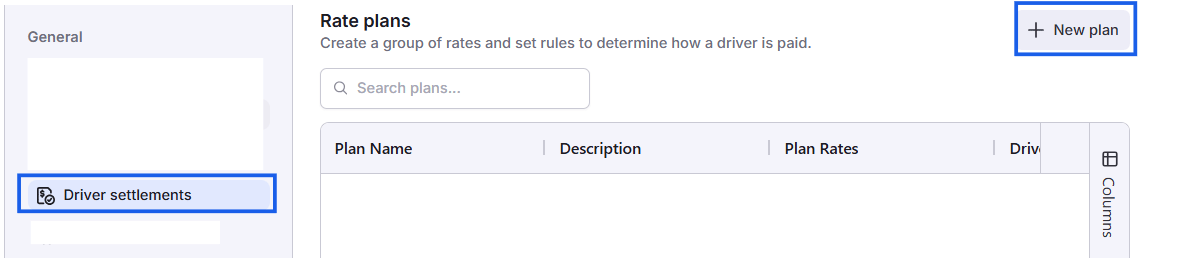
- Under General, open the Driver Settlements settings.
- Go to Rate Plans, then click New Rate Plan.
- Define which drivers this plan applies to. Depending on what’s enabled for your account, you can group drivers by fleet, subsidiary, terminal, driver type, tenure (how long they’ve been with the company), or by selecting specific drivers individually.
- Before saving, review the preview showing which drivers currently match this plan.
- Click Save.
- To confirm it applied the way you expect, open a matching driver’s profile and check the Rates section for the plan you just created.
Generating a statement
Step 1: Approve payable items- Go to Accounting → Driver Settlements, and open the Open tab.
- Click a driver’s name to open their transaction view.
- Click any trip to expand its line items.
- Use the checkboxes to select which items to include.
- Choose the Pay Period this statement belongs to.
- Click Approve. The driver moves to the Drafts tab.
- Click New Transaction on the driver’s settlement view.
- Select the transaction type, such as a deduction, reimbursement, bonus, or escrow deposit or withdrawal.
- Enter the amount. If you don’t know the exact amount yet, you can enter $0.00 as a placeholder and fill in the real amount later.
- Click Save.
Gross and Net totals on the Drafts and Statements tabs
The Drafts and Statements tabs show Gross and Net totals for the rows in the grid, so you can check what a pay run adds up to without exporting it. The totals follow what you are looking at:- With no rows selected, they total every row the current filters leave on the grid.
- With rows selected, they total only the selected rows that also match the current filters. Changing a filter so a selected row is no longer on the grid takes that row out of the totals too.
Statement status: Queued, and reverting a statement
A statement can show a status of Queued in two situations: right after it’s first generated, and while a revert is in progress. While a statement is Queued, it’s locked, meaning you can’t download, share, or revert it yet. It should move to Processed within a few minutes. If it stays Queued for more than 30 to 45 minutes, contact Alvys Support with the statement number. Reverting a statement. Click Revert Statement to send a generated statement back to Draft status so you can edit and regenerate it. This is a single action with one choice to make: whether to return the statement to Draft, or all the way back to Open. If a revert doesn’t behave the way you expect, the message shown on screen isn’t always the full explanation. If this happens, contact Alvys Support rather than assuming the on-screen message tells the whole story. If you revert a statement that’s already synced to your accounting system, what happens next depends on which platform you use (QuickBooks Online, QuickBooks Desktop, Sage, Business Central, or NetSuite). Contact Alvys Support with your specific platform so they can walk you through the exact behavior.How mileage totals are counted on a statement
The mileage totals shown throughout the app, including the Approved Items panel and the draft and processed statement lists, match what prints on the statement PDF. Which miles get counted depends on a company-wide setting called Always Show Miles, found under Settings → Company Profile → Driver Settlements (this may also appear as Driver Statement Settings, depending on your account). When this setting is turned off, which is the default, the total only counts miles that were actually rated on the statement. For example, a trip paid only for accessorials, with no mileage-based pay, contributes zero miles to the total. When this setting is turned on, the total counts every mile driven, whether or not it was rated. Either way, an individual trip row always shows that trip’s own full mileage. Only the summary total at the top changes based on this setting.Trip value visibility
Whether trip value appears on a driver’s statement is controlled by a setting on that individual driver, not a single company-wide switch. Each driver has their own setting. Changing it for one driver has no effect on any other driver’s statements. It does, however, apply to both that driver’s regular statement and their truck statement together, since both are generated from the same underlying trip value. Changing this setting only affects statements generated after the change. A statement that’s already been generated keeps whatever display it had when it was created. To update an existing statement, you’ll need to revert it to draft and regenerate it.Truck statements (owner operators with multiple trucks)
Truck statements group all of an owner operator’s trips by truck into a single view, instead of one combined statement per driver. This is useful when you pay by truck, or want to review truck-level totals before finalizing a driver’s overall pay. Truck statements don’t replace a driver’s regular paystub; both exist side by side. Before you can use truck statements, three things need to be true: the driver is classified as an Owner Operator, the person turning it on has the Edit Assets permission, and the driver has two or more trucks. With only one truck, a driver statement and a truck statement would show identical numbers, so the option isn’t offered. To turn on truck statements for a driver:- Go to Assets, then Drivers, and open the owner operator’s profile.
- Turn on the Truck Statements toggle. If you don’t have permission to do this, ask your administrator.
- Open the driver’s Settlements tab.
- Find the statement period you want and click Generate to create the truck-grouped statement.
Deductions, escrow, and splitting
Escrow deposits and withdrawals are supported as their own transaction types. To use them, click New Transaction and choose Escrow Deposit or Escrow Withdrawal. To split a deduction between a driver’s regular pay and their escrow balance, add the deduction as usual, then add a separate Escrow Withdrawal transaction for the portion you want moved into escrow. This is the current, correct way to do this, and it keeps your accounting sync accurate. To split a deduction across multiple statements, use the three-dot menu on the deduction line and choose Split. If you don’t see this option, contact Alvys Support. Custom deduction categories: the category field accepts free text with autocomplete, so it isn’t limited to a fixed list, even if you’ve seen guidance elsewhere suggesting otherwise. An item can be excluded from a statement without being deleted. Look for an “Excluded from Settlement” label, or a per-transaction toggle (for example, under a driver’s fuel card settings) that controls whether that item shows up on a statement.Accounting and QuickBooks sync
Generating a statement doesn’t, by itself, pay the driver or move any money. It creates the record, emails it if you have that configured, and syncs it to your accounting system. Owner operator and company driver statements both sync to your accounting system the same way. There’s no separate payroll integration required for either one, and no need to enter company driver pay manually just because of how that driver is classified. If you’d rather keep a driver’s statements out of your accounting sync entirely, for example because you already run that driver’s pay through a separate W2 payroll provider, there’s a setting called Process Statement By Tax Category in your accounting integration setup. Turning it on excludes statements from syncing for any driver whose tax category is set to W2, while drivers set up as 1099 continue to sync as usual. This setting is off by default, so unless you’ve turned it on, every driver’s statements sync the same way regardless of how they’re classified. It also isn’t specific to QuickBooks; the same setting works the same way across QuickBooks Online, QuickBooks Desktop, Sage, Business Central, and NetSuite.Search
Right now, Driver Settlements search only matches by Trip Number. Searching by driver name or truck number isn’t supported yet. We’re aware this would be useful and it’s something we’re tracking for a future improvement, but for now, Trip Number is the reliable way to search.Permissions
Access to Driver Settlements is controlled by individual permissions rather than a single job title. The two permissions that matter most are Pay Driver and Pay Owner Operator, both found in the Billing category. These are what gate the Driver Settlements page itself. Permissions are granted to individual users under Settings → Organization (or Users) → Permissions. They aren’t bundled automatically based on someone’s job title, so if a user isn’t seeing the access you expect, check their individual permissions rather than assuming their role covers it.Who can revert a statement
Reverting a statement is a permission-gated action, controlled by the Revert Driver Statement permission, enabled by default for the Admin, Partner Admin, and Biller roles. If the Revert button appears greyed out for you, you most likely don’t have the permission needed to use it. Contact an administrator on your account, who can either revert it for you or grant you that permission if you need it regularly.Troubleshooting
A load isn’t showing up in Driver Settlements. Check these possibilities in order: the load might already be sitting in a draft or a completed statement, so check those tabs first; the driver might not be assigned to a pay period, or the pay period’s date range might not include the load’s delivery date; the entity filter might be set to Driver when the load actually belongs to an Owner Operator, or the other way around; the load might be classified as Brokerage, and Brokerage loads never generate driver pay, this is expected behavior, not a bug; or there might simply be no rate configured on the driver’s profile. If you can see a bill for the load in QuickBooks but nothing in Driver Settlements, the driver’s rate most likely didn’t apply. Contact Alvys Support with the load number. The Revert button is greyed out. This is usually a permissions issue. See Who can revert a statement above. A statement has been stuck in Queued status for more than 30 to 45 minutes. Contact Alvys Support with the statement number. A driver is missing from the Drafts tab. Drivers only appear there once their payable items have been approved from the Open tab. If a statement was reverted all the way to Open rather than to Draft, its items return to Open, not Drafts. An inactive driver is still showing up. Inactive drivers remain visible as long as they have outstanding payables. Once those payables are cleared, they disappear automatically. If you’d like to intentionally keep showing inactive drivers with open payables, there’s a setting for that in Company Profile. Trips with a $0 payable aren’t appearing. This is controlled by two separate settings in Company Profile, both off by default: Allow $0 line items on driver statements and Include trips with no payables to display in settlements. If a trip’s only payable would be $0, turn on “Allow $0 line items on driver statements” to have it appear (a trip that’s $0 only because part of it was already settled on a prior statement stays hidden either way). If a trip never generated a payable line item at all, turn on “Include trips with no payables to display in settlements” instead.Frequently asked questions
Can I generate a statement for a driver with no pay period assigned?
Can I generate a statement for a driver with no pay period assigned?
Why don't a driver's $0 trips appear on the statement?
Why don't a driver's $0 trips appear on the statement?
Why don't the mileage totals match the miles shown on individual trip rows?
Why don't the mileage totals match the miles shown on individual trip rows?
How do I correct a trip's mileage if it was entered incorrectly?
How do I correct a trip's mileage if it was entered incorrectly?
How do I edit a trip's value?
How do I edit a trip's value?
How do I filter trips by date?
How do I filter trips by date?
Can I pin or hide columns in the table?
Can I pin or hide columns in the table?
I reverted a statement by mistake. Can I get it back?
I reverted a statement by mistake. Can I get it back?
What happens if I revert a statement that's already synced to my accounting platform?
What happens if I revert a statement that's already synced to my accounting platform?
Do statements sync to QuickBooks?
Do statements sync to QuickBooks?
How do I show a company name instead of a driver's personal name on the statement?
How do I show a company name instead of a driver's personal name on the statement?
Is Driver Settlements a paid add-on?
Is Driver Settlements a paid add-on?
Can I search by driver name or truck number instead of just Trip Number?
Can I search by driver name or truck number instead of just Trip Number?
A statement was generated with the wrong pay period dates. How do I fix it?
A statement was generated with the wrong pay period dates. How do I fix it?
My statement looks wrong after a driver crossed a tenure milestone mid-pay-period. What's happening?
My statement looks wrong after a driver crossed a tenure milestone mid-pay-period. What's happening?
Can I split pay between two drivers working the same load (team driving)?
Can I split pay between two drivers working the same load (team driving)?
Why did a TONU load get paid $0?
Why did a TONU load get paid $0?
Why did a trip value or truck statement change unexpectedly after I updated a driver's settings?
Why did a trip value or truck statement change unexpectedly after I updated a driver's settings?