
Dispatch Planner
Dispatch Planner v2 is a real-time planning workspace that shows unassigned trips alongside available drivers and assets, so dispatchers can match and assign loads without switching between screens.
Overview
Dispatch Planner v2 gives your team a live, side-by-side view of trips waiting for assignment and the drivers and assets available to cover them. The planner surfaces availability windows, priority tinting, and smart assignment suggestions so you can dispatch faster and with more confidence. The workspace has two main tables: a Trips table on the left showing Open and Planned loads, and a Drivers/Assets table on the right showing available assets. Selecting a trip or a driver filters the opposite table to show only compatible matches, turning a multi-step dispatch into a single workflow. The planner also supports inline editing of key fields, driver notes, driver events, bulk actions, and in-app driver chat: all without leaving the planning screen. To see what every column in both tables shows and how its value is worked out, see the Dispatch Planner column reference.Where to Find It
Navigate to Loads and Trips > Dispatch Planner v2 in the main navigation menu. All authenticated users can access Dispatch Planner v2. Certain configuration options within the planner are restricted to specific roles; those restrictions are described in Settings & Permissions below.Key Concepts
Trip Eligibility
Only trips that meet both of the following conditions appear in the Trips table:- The trip’s load must be tendered as a carrier subsidiary. Loads tendered as a brokerage subsidiary are excluded from Dispatch Planner v2.
- The trip must be in Open status.
Asset Eligibility
An asset (driver or truck) appears in the Drivers/Assets table only when it has an assignment preference configured. Assets without an assignment preference are not shown in the planner, regardless of their active status or availability. The more complete the configured preferences, the more accurate the dispatch suggestions the planner can surface. Assignment preferences are set up in Assets > Assignment Preferences. See Settings & Permissions below for the setup steps.Deactivated Drivers and Inactive Trucks
Drivers that have been disabled and trucks that are no longer active are left out of the planner when you are choosing who covers a trip. They do not appear in the Drivers/Assets table, and they are not returned when you search for a truck during assignment, so the only assets offered are ones that can actually take the work. This applies to the assignment step specifically. Work a deactivated driver or an inactive truck already carries is unaffected, and the asset becomes selectable again once it is active in your account. If a driver or truck you expected is missing from the planner, check its active status before anything else — that is the most common reason an asset you know exists is not on the list.Availability Calculation
The planner calculates driver availability using the following logic:- Available at: the exact date and time the driver becomes available, calculated as last trip delivery time plus average dwell time
- Available for: the duration the driver will be free before their next planned trip
- Next planned at: the start time of the driver’s next scheduled trip
- Available in: the location where the driver becomes available, which is where their current trip delivers
Priority and Row Tinting
Each trip can be assigned one of four priority levels: None, Low, Medium, or High. The Trips table uses row tinting to reflect priority: no color for None, a light tint for Low, a medium tint for Medium, and a dark tint for High. Priority can be set inline directly from the grid. Priority is a load-level value. Setting it from one trip applies it to every trip on that load, and the grid repaints those rows together.Assignment Actions
Two assignment actions are available when pairing a trip with a driver:- Assign: assigns the selected assets to the trip without dispatching. The trip moves to Covered status. Use this when you want to lock in assets but are not yet ready to dispatch.
- Assign and dispatch: assigns the selected assets and dispatches the trip in one step. The trip moves to Dispatched status. Use this to complete the dispatch in a single action.
Covered means assets are assigned but the trip has not been dispatched. Dispatched means the trip has been released to the driver and is ready to move.
Bulk Actions
Bulk Actions lets planners select multiple trips in the Trips table and apply an operation to all of them at once, turning an hours-long one-by-one workflow into a two-click operation. Six operations are available:- Bulk Assign — moves selected trips from Open to Covered.
- Bulk Dispatch — moves selected trips from Covered to Dispatched.
- Bulk Assign & Dispatch — moves selected trips from Open to Dispatched in a single step.
- Bulk Unassign — returns selected Covered or Dispatched trips to Open.
- Bulk Change Dispatcher — reassigns the dispatcher on selected trips without changing their status.
- Bulk Set Priority — sets the priority level on selected trips without changing their status.
Three-Level Availability Settings Hierarchy
Availability settings follow a three-level hierarchy: Alvys platform defaults apply first, company-level settings override those defaults, and fleet-level settings override the company setting for individual fleets. This means a fleet can be configured differently from the rest of the company.How to Use It
Dispatch Planner v2 supports several interconnected workflows. Refer to the dedicated how-to articles for step-by-step instructions:- Assigning and dispatching a trip (trip-first and driver-first flows)
- Configuring trip columns, sorts, and filters
- Configuring asset columns, sorts, and filters
- Adding and editing driver notes
- Adding and editing driver events
- Sending a driver chat message from the planner
- Using Bulk Actions (bulk assign, dispatch, unassign, change dispatcher, and set priority)
Settings & Permissions
Set Tender As and Carrier on Trips
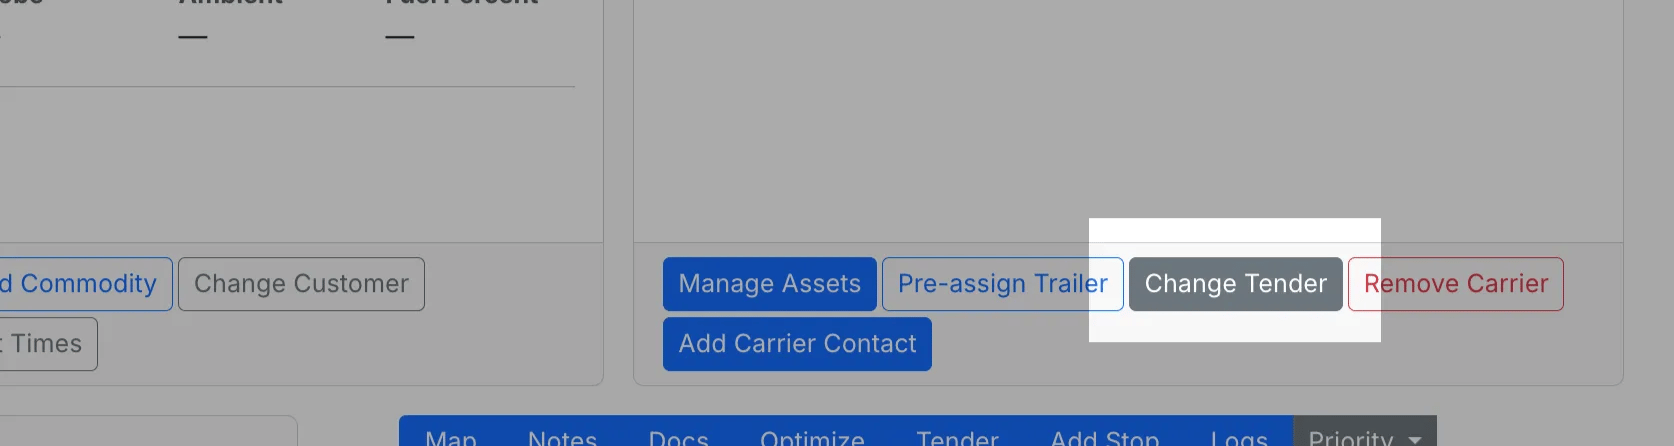
Before a trip appears in Dispatch Planner v2, its load must be tendered as a carrier subsidiary. To set this:- Open the load details page for the load you want to appear in the planner.
- Locate the Carrier Details section in the top-right panel of the load details page.
- Click the Change Tender button.
- Set the Tender As field to the carrier subsidiary (not a brokerage subsidiary).
Configure Availability Settings (Optional)
Availability settings control the thresholds the planner uses to calculate when a driver is eligible for a new trip. This is optional; the planner uses Alvys platform defaults if no company or fleet overrides are set. Availability settings are reached at Settings > Planning configuration. Any authenticated user with access to the Settings area can view and edit them; no dedicated permission gates these fields.- Navigate to Settings > Planning configuration.
- Locate the Driver Availability section on the page.
- Set the “Available for” minimum field. This is the minimum free time a driver must have to be considered available. The Alvys default is 4 hours.
- Set the Average dwell time field. This is the estimated time a driver spends at a delivery location before becoming available again. The Alvys default is 2 hours.
- Click Save.
Set Up Assignment Preferences
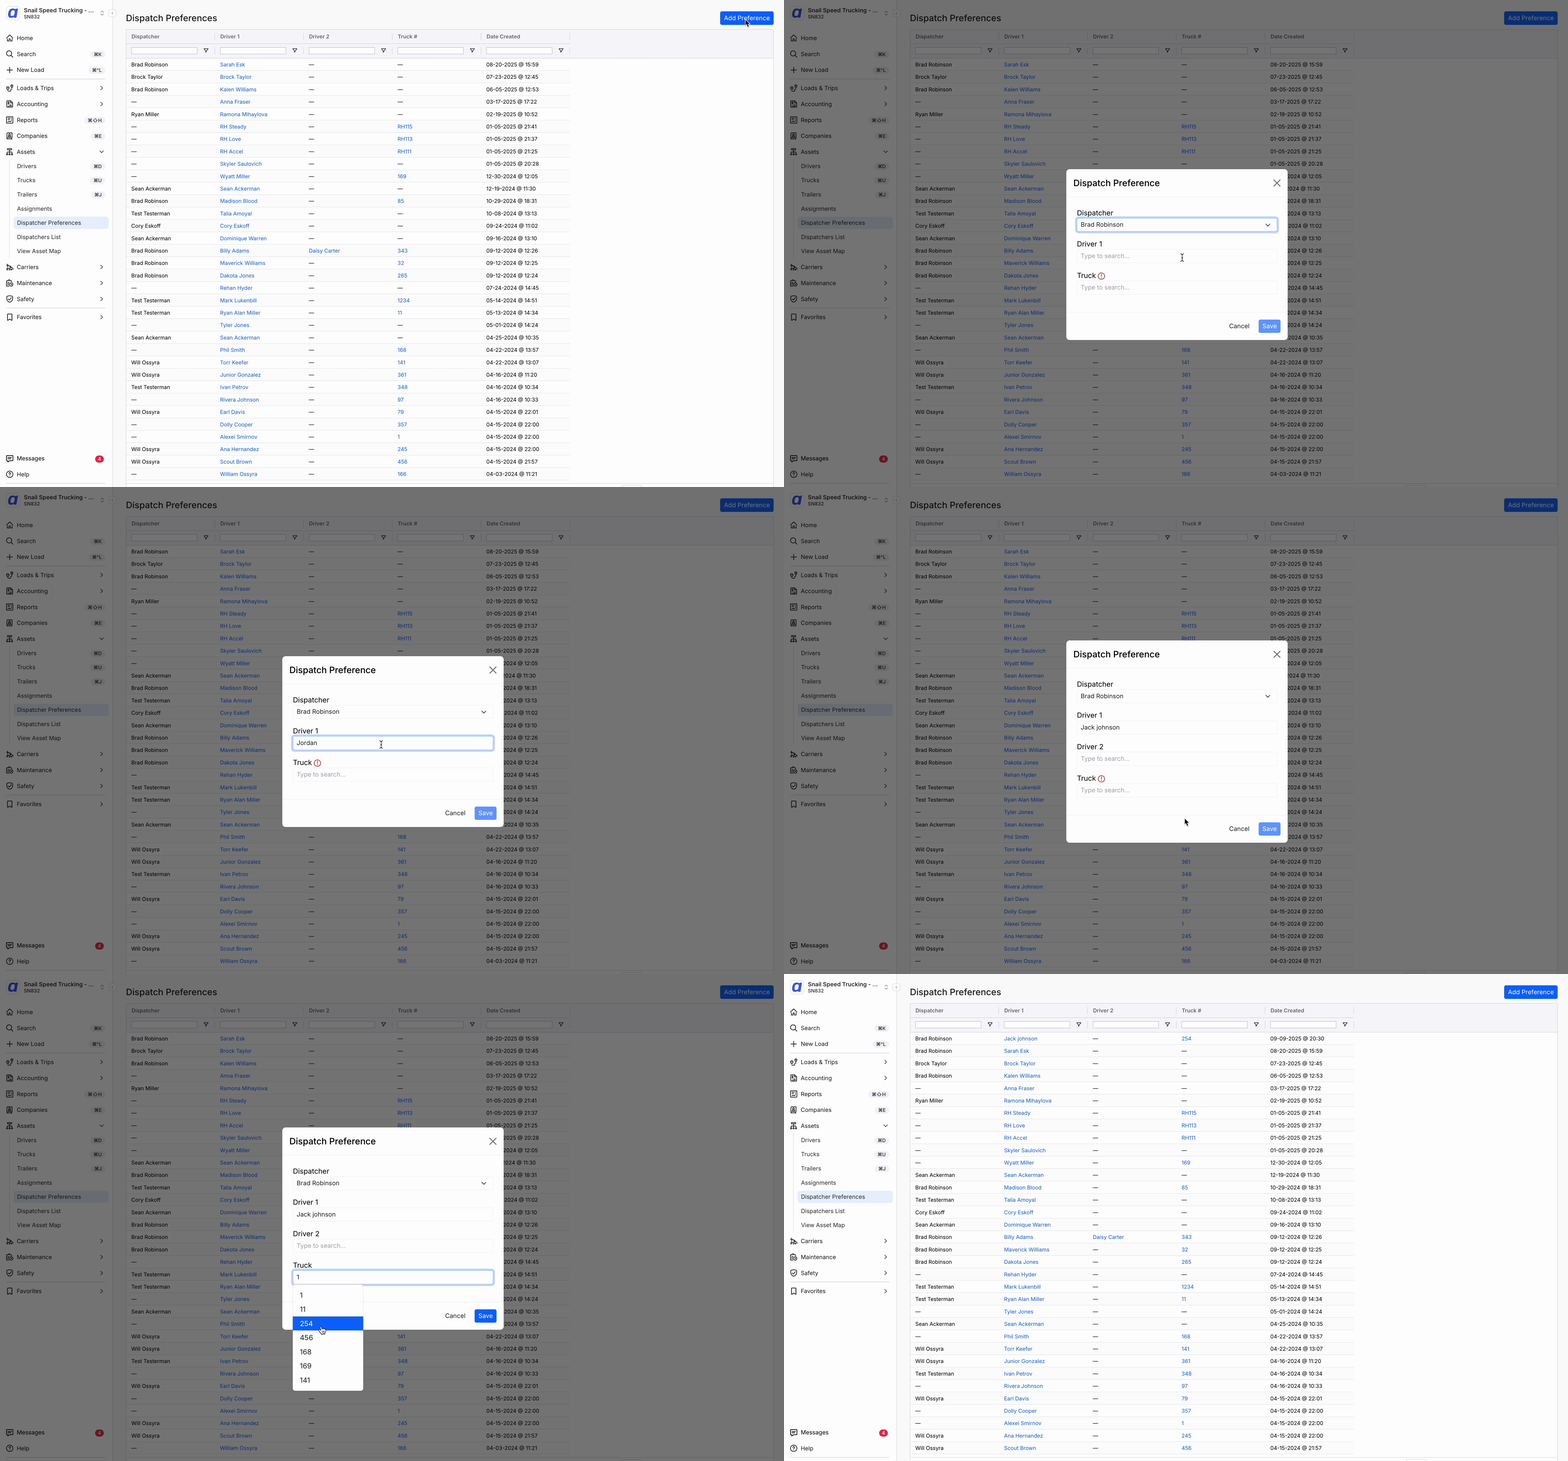
Assets must have an assignment preference configured before they appear in Dispatch Planner v2. This is required for every driver and truck you want the planner to surface. Viewing and managing assignment preferences requires the “ViewDrivers” and “ViewTrucks” permissions.- Navigate to Assets > Assignment Preferences.
- Click the blue + New Assignment button for the asset you want to configure.
- Complete the preference fields for that asset and save.
Limits & Behavior
Trips Table
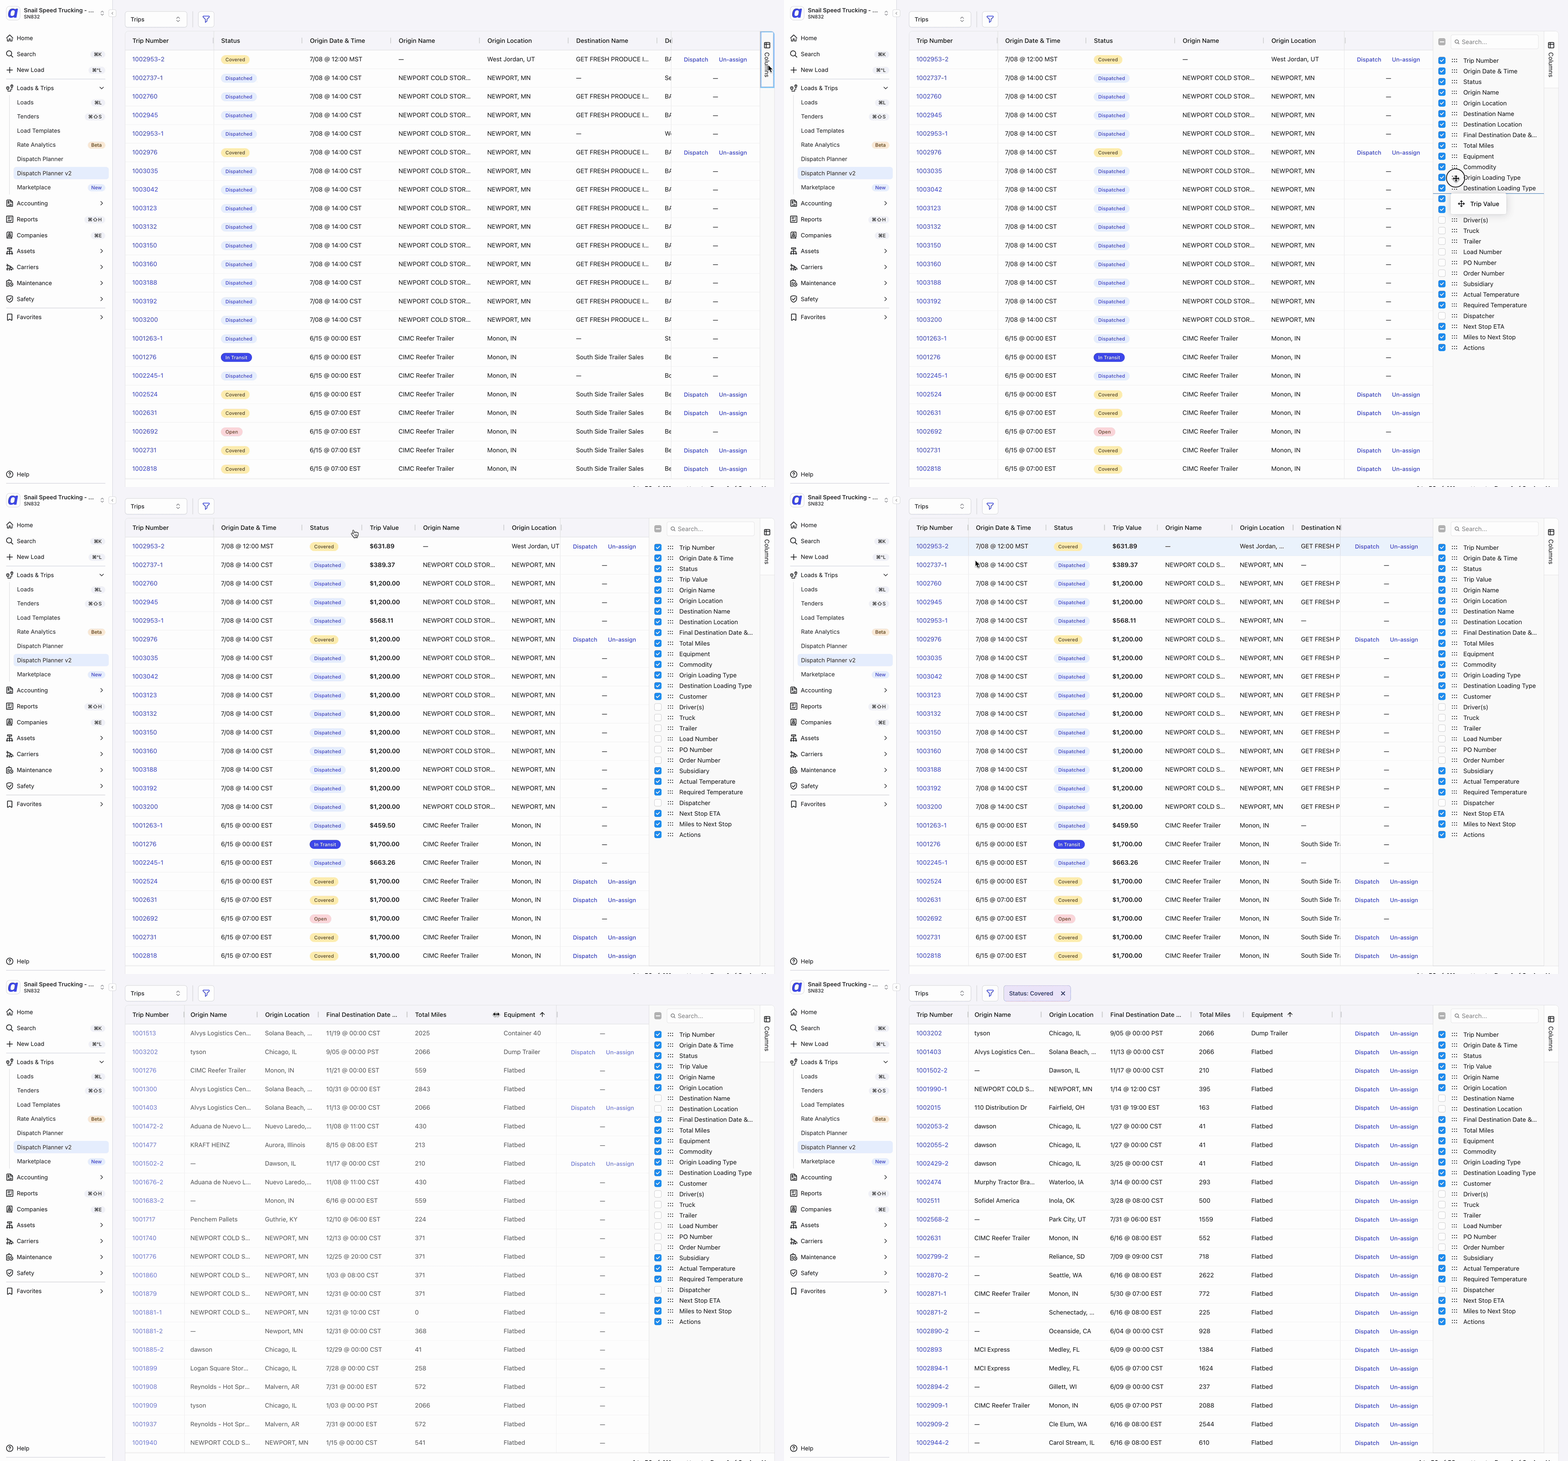
The Trips table supports configurable columns, sorts, and filters. Use the column configuration menu to show, hide, or reorder columns. Three fleet columns are available in the column picker. None is shown by default, so add them from the column configuration menu when you want them:- Driver Fleet: the fleet of the driver assigned to the trip. When two drivers are assigned as a team, the column shows Driver 1’s fleet, matching how the Drivers table behaves. When no driver is assigned, the column shows a dash.
- Truck Fleet: the fleet of the truck assigned to the trip. When no truck is assigned, the column shows a dash.
- Trailer Fleet: the fleet of the trailer assigned to the trip. When no truck is assigned, the column shows a dash.
Created Column
The Created column shows when each trip was created, so you can tell at a glance how long a trip has been sitting unassigned. The time is shown in your own local time zone, for example 08/25/2026 @ 09:22 CDT. The column is hidden by default. Add it from the Trips table column configuration menu, the same way you add the fleet columns. Once it is showing, you can sort by it and filter it by date.Dispatched Date Column
The Dispatched Date column shows when a carrier was assigned to the trip, so you can tell how long a trip has been on the road without opening it. The date and time are shown in your own local time zone, for example 04/08/2026 @ 10:30 CDT. The column is hidden by default. Add it from the Trips table column configuration menu. Once it is showing, you can sort by it and filter it by date. A dispatched trip can still show a dash in this column. The date is recorded when a carrier is assigned to the trip, so a trip whose carrier was set another way has no date to show. Read a dash as “no assignment date recorded”, not as “not dispatched”.Tracking Status Column
The Tracking Status column shows where each trip stands on tracking, as a colored badge, so you can spot the trips that need attention without opening each one. The color follows the status: green when tracking is running or finished as expected, yellow when something needs attention before tracking can start, red when tracking failed or was refused, and gray when tracking was canceled. A trip with no tracking status shows a dash. The column is hidden by default. Add it from the Trips table column configuration menu. Once it is showing, you can sort by it, type into the filter to match the status text you can see in the cell, or pick one or more statuses from the filter list. The filter list offers every tracking status, not only the ones on the page you are looking at.Posted Rate Column
The Posted Rate column shows the rate the load is advertised at to carriers on the load boards, so you can compare posted rates across open trips without opening each load. The column is hidden by default. Add it from the Trips table column configuration menu. Once it is showing, you can sort by it and filter it as a number. A trip with no posted rate shows a dash. This column depends on your account having a connected load board. Where no load board is connected, the column does not appear in the grid and is not offered in the column picker.Load Weight Column
The Load Weight column shows the load’s weight, so you can plan around heavy freight from the grid instead of opening each trip. The weight is shown in the unit it was entered in, for example 42,000 lbs or 19,000 kg. A load with no recorded weight shows a dash. The column is hidden by default. Add it from the Trips table column configuration menu. Once it is showing, you can sort by it and filter it as a number.Sorting and filtering compare weights in pounds, so trips stay in the right order even when your loads are recorded in different units. The filter box is labeled Weight in lbs for that reason: enter pounds there, whatever unit the cell shows.
Appointments Column
The Appointments column shows how many of a trip’s stops have a confirmed appointment, so you can tell which trips still need calls without opening each one. The column reads as a count of confirmed stops against the total, with a colored dot:- A green dot and 3/3 Confirmed when every stop is confirmed.
- A yellow dot and 1/3 Confirmed when some stops are confirmed.
- A gray dot and 0/3 Confirmed when none are.
Carrier Sales Agent Column
The Carrier Sales Agent column shows the carrier sales agent on each trip, so you can see who owns the carrier relationship without opening the trip. The column is hidden by default. Add it from the Trips table column configuration menu, the same way you add the fleet columns. Once it is showing, you can sort by it and filter it.Load Planner Column
The Trips table has a column showing the load planner assigned to each trip, so you can see who planned a load without opening it. The column is hidden by default. Add it from the Trips table column configuration menu, the same way you add the fleet columns. Once it is showing, you can sort by it and filter it, and the filter includes an option for trips with no load planner assigned, so you can bring unplanned work to the top of the grid. Trips with no load planner assigned show a placeholder rather than an empty cell.Carrier Rate Column
The Trips table also has a column showing the carrier rate on each trip, so you can compare rates across open trips without opening each load. The column is hidden by default. Add it from the Trips table column configuration menu. Once it is showing, you can sort by it and filter it. This column is permission-gated. Where your account does not allow you to see carrier rates, the column does not appear in the grid and is not offered in the column picker, so it cannot be sorted or filtered either. It is a visibility column only: adding it does not change who may edit a rate, and it does not restrict anything that was previously allowed.Right-Click Menu on a Trip
Right-clicking a trip opens the Alvys menu. It is available on the main Trips grid and in the details view, including the Dispatch Assist suggestion rows pinned at the top. The menu offers:- Open In New Tab and Open In New Window — the load’s details page.
- Lane Report — opens the lane in the lanes page.
- Dispatch — opens the dispatch dialog. It appears only on a trip that can be dispatched, meaning a Covered trip with a driver assigned.
- Priority — set Critical, Important, or Caution, or remove the priority. This asks you to confirm first, unlike the inline Priority cell, which applies the change straight away.
- View Notes — opens the trip sidebar on the Notes tab.
- View Logs — opens the load’s history in a dialog over the grid.
- Copy and Export.
Priority set from the right-click menu is a load-level value, the same as the inline Priority cell. Setting it on one trip applies it to every trip on that load.
View Logs
View Logs sits directly under View Notes on the trip right-click menu. It opens the load’s history in a dialog over the grid, so you can see who changed what and when without leaving the planner or opening the load. The dialog shows every log entry for the load and its customer, newest first. Where an entry names a document, the document name is a link: click it to open that document, such as the rate confirmation. View Logs is available from Dispatch Planner v2. Open the load itself to review its history from anywhere else.Inline Editing
Certain columns in the Trips table support inline editing. An editable cell displays a visual indicator when you hover over it. To edit inline:- Click the editable cell.
- Make the change.
- Press Enter or click away to save.
- The change is reflected in the table immediately.
- Dispatcher
- Priority (options: None, Low, Medium, High)
- Fleet
- Trip-Level Custom References (four reference types)
Trip Sidebar
Clicking any row in the Trips table opens the Trip Sidebar on the right side of the screen. The sidebar displays:- Fixed Header: trip ID, status, and key metadata
- Static Map: origin and destination
- Stops Timeline
- Scorecard: rate metrics for the trip
- Details Section
- Customer and Carrier Sections
- Smart Footer: status-aware action buttons
- Open trips: a Show Drivers button and a Dispatch button are shown.
- Covered or Dispatched trips: an Un-assign button is shown.
- In Transit or completed trips: no action buttons are shown.
Assets Table
The Drivers/Assets table supports configurable columns, sorts, and filters. Use the column configuration menu to show, hide, or reorder columns. GIF showing the Assets table column configuration: opening the column menu, toggling columns on and off, and reordering them
Contractor Type Column
The Contractor Type column on the Drivers/Assets table shows how each driver is engaged, so you can plan around company drivers and contracted drivers separately without opening each driver record. The column is hidden by default. Add it from the Assets table column configuration menu. Once it is showing, you can sort by it and filter it.Driver Notes
Driver notes are visible to dispatchers and are stored on the driver record. The planner shows the 10 most recent notes for each driver.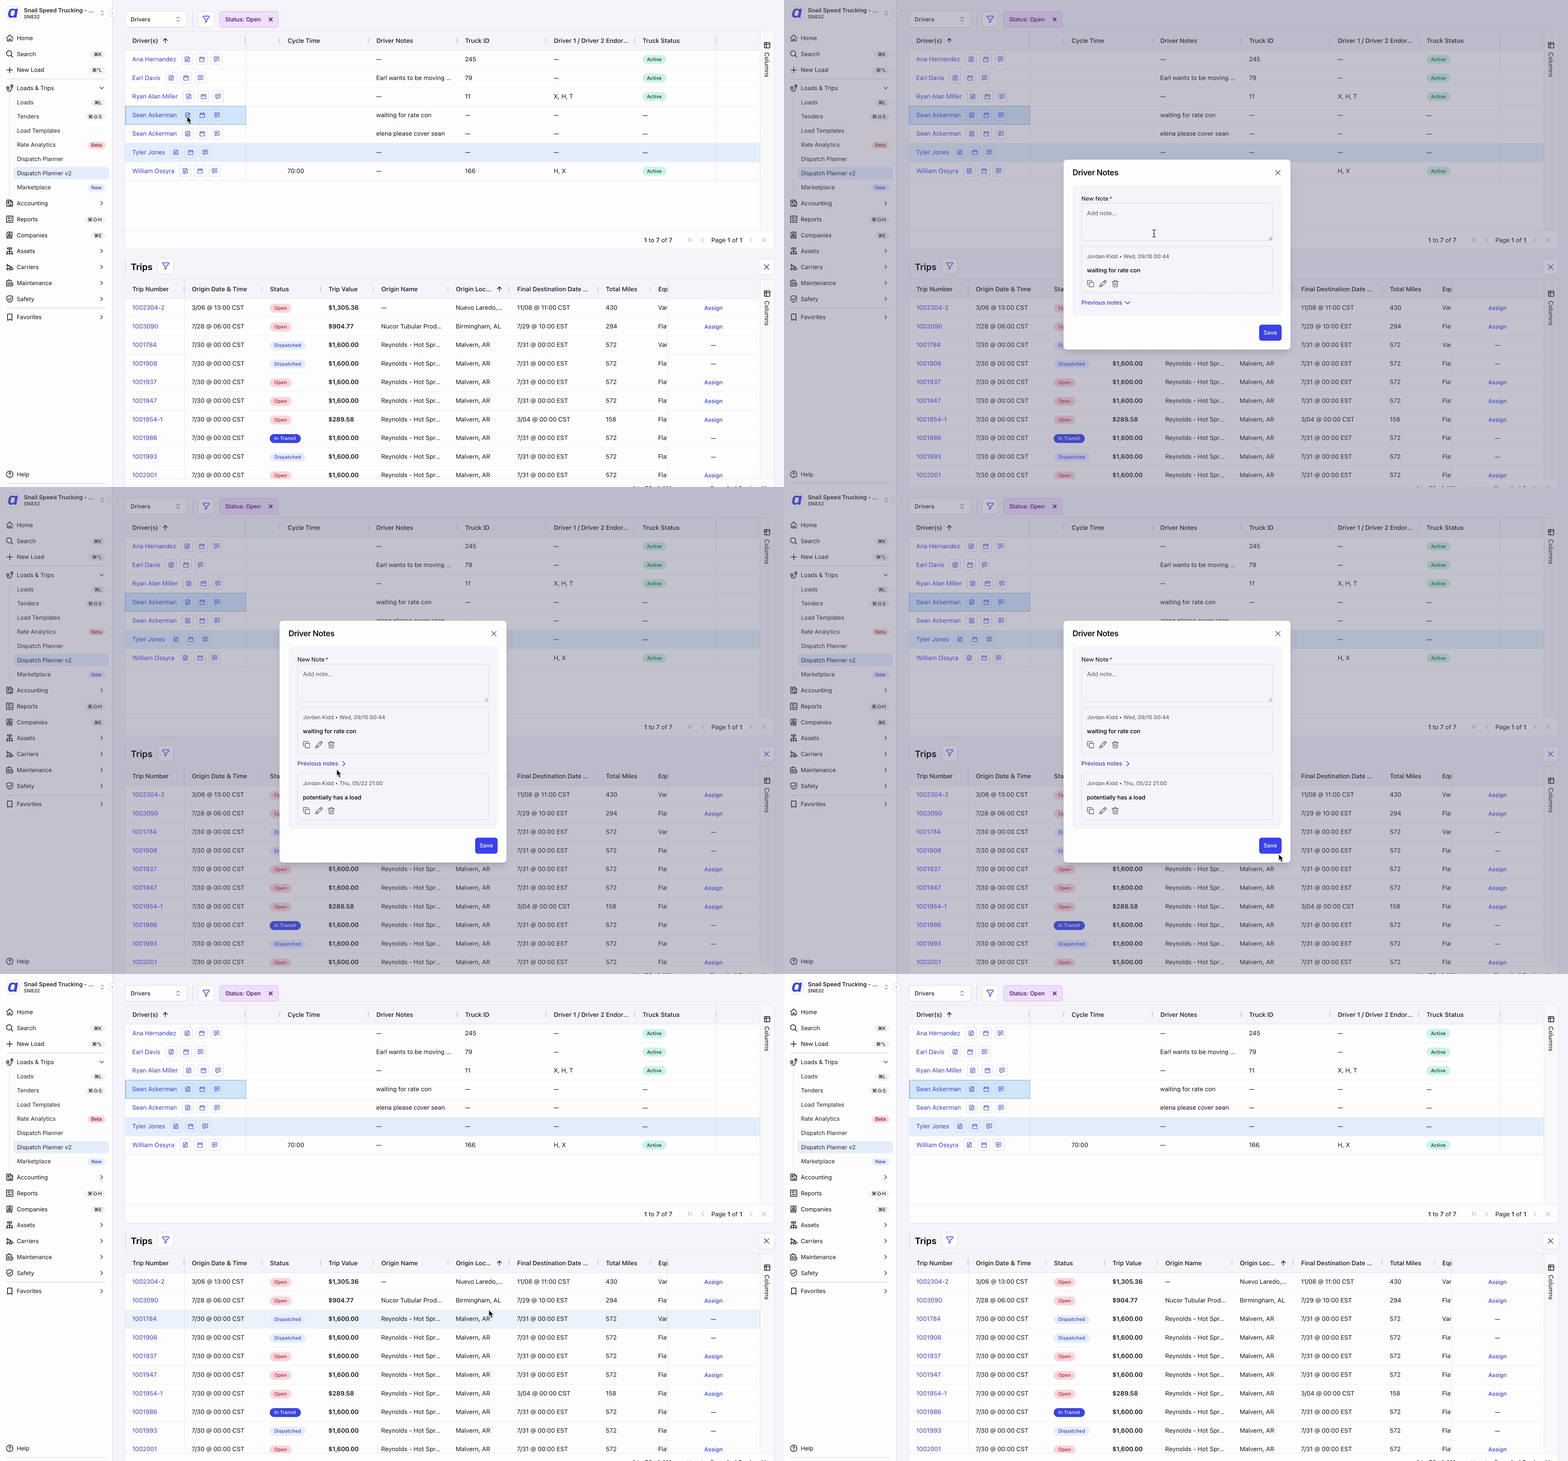
Driver Events
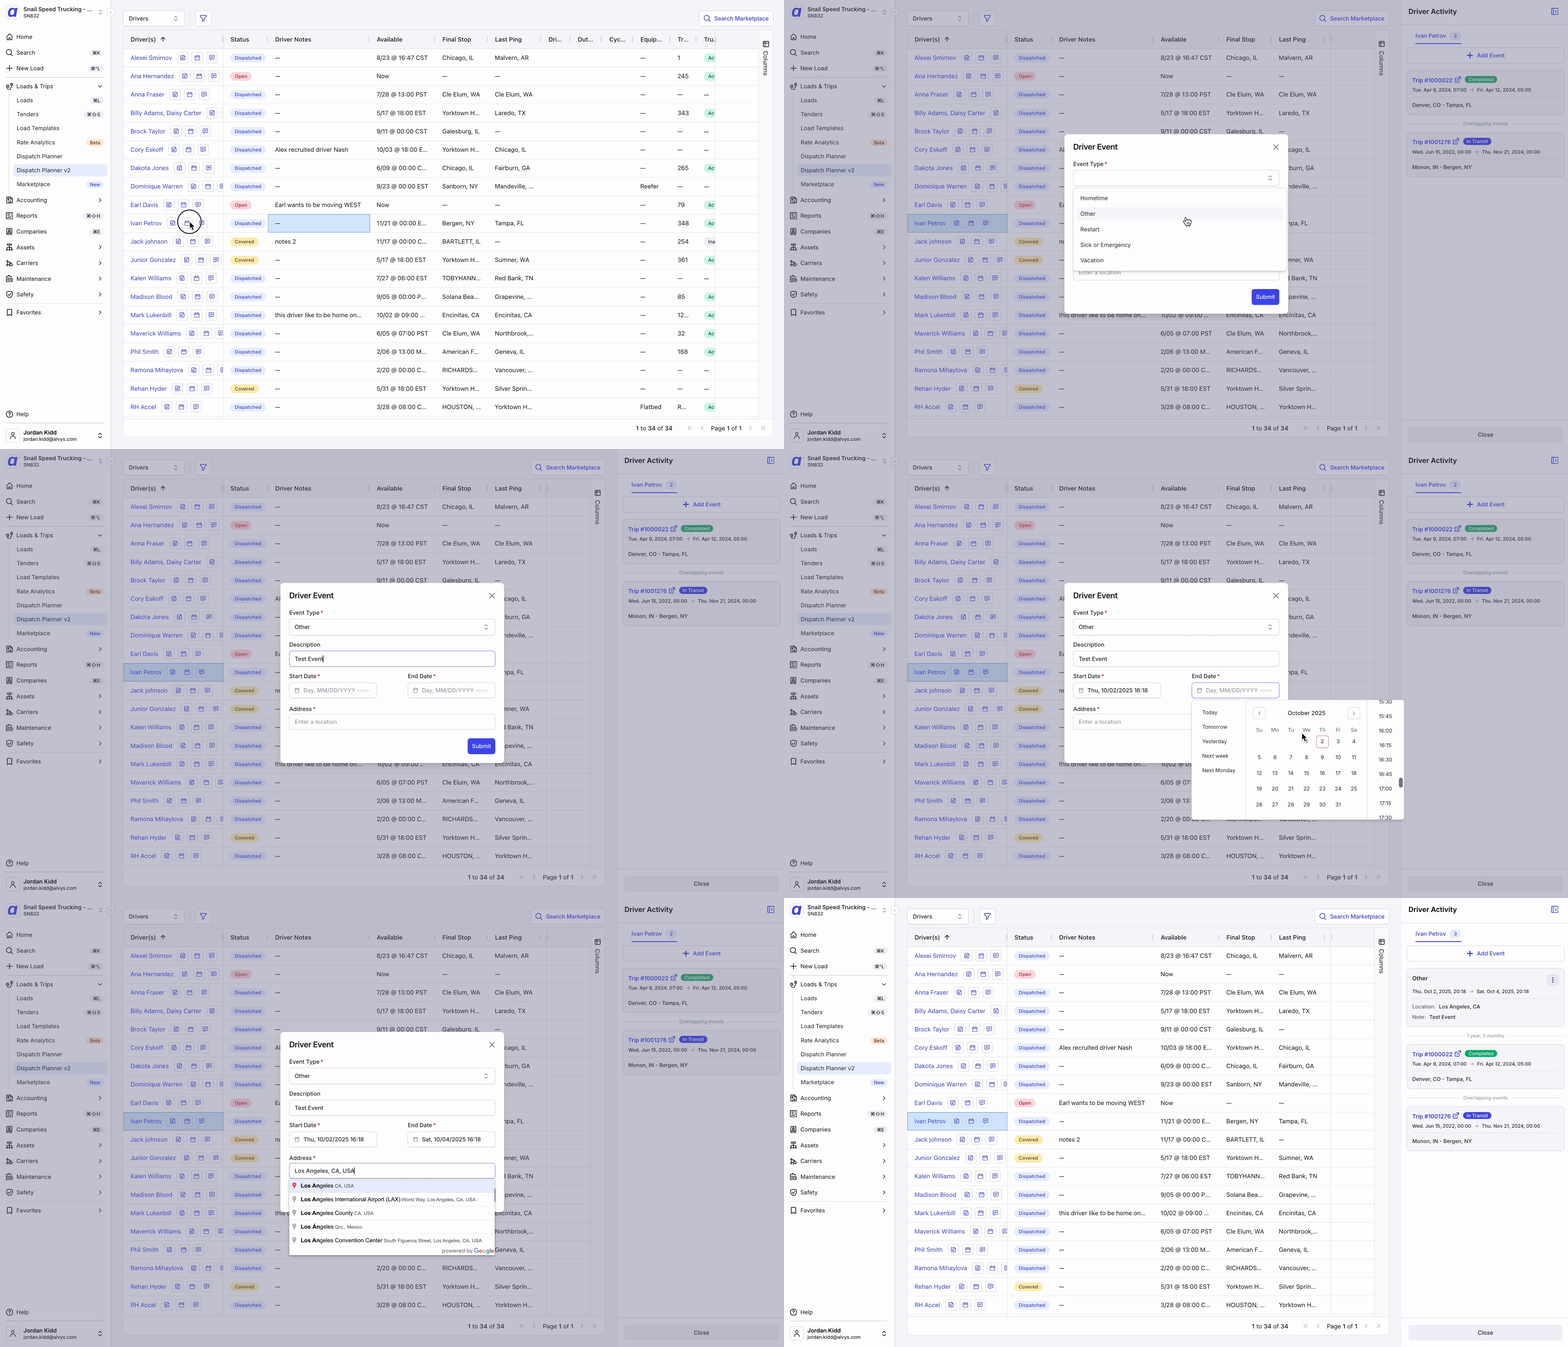
Driver events record activity that affects a driver’s availability and appear in the driver’s activity timeline in chronological order. To add a driver event:- Open the Driver Activity sidebar for the driver.
- Click Add Event.
- Enter the event details: type, date and time, and any notes.
- Save. The event appears in the driver’s chronological activity timeline.
Per-Stop Times in the Driver Activity Timeline
The driver activity timeline shows scheduling detail for each stop on a trip, so you can answer “when is this driver due, and when did they actually get there” without opening the load. Each stop is judged on its own. A stop that has a recorded arrival or departure shows those actual times. A stop that does not yet have them continues to show its scheduled information. On a trip part-way through its stops, that means the completed stops read as actual times and the stops still ahead read as scheduled times, in the same timeline. The same expandable timeline is available on the Fleet Map. It is read-only there: review the stop times from the map, and make changes from the planner or the load itself. This is available to every account. There is no setting to switch on and no permission to grant.These times are not shown in the driver mobile app. A driver checking their own schedule sees what the mobile app shows them, which is unchanged.
Driver Chat
You can send a message to a driver directly from Dispatch Planner v2 without leaving the screen.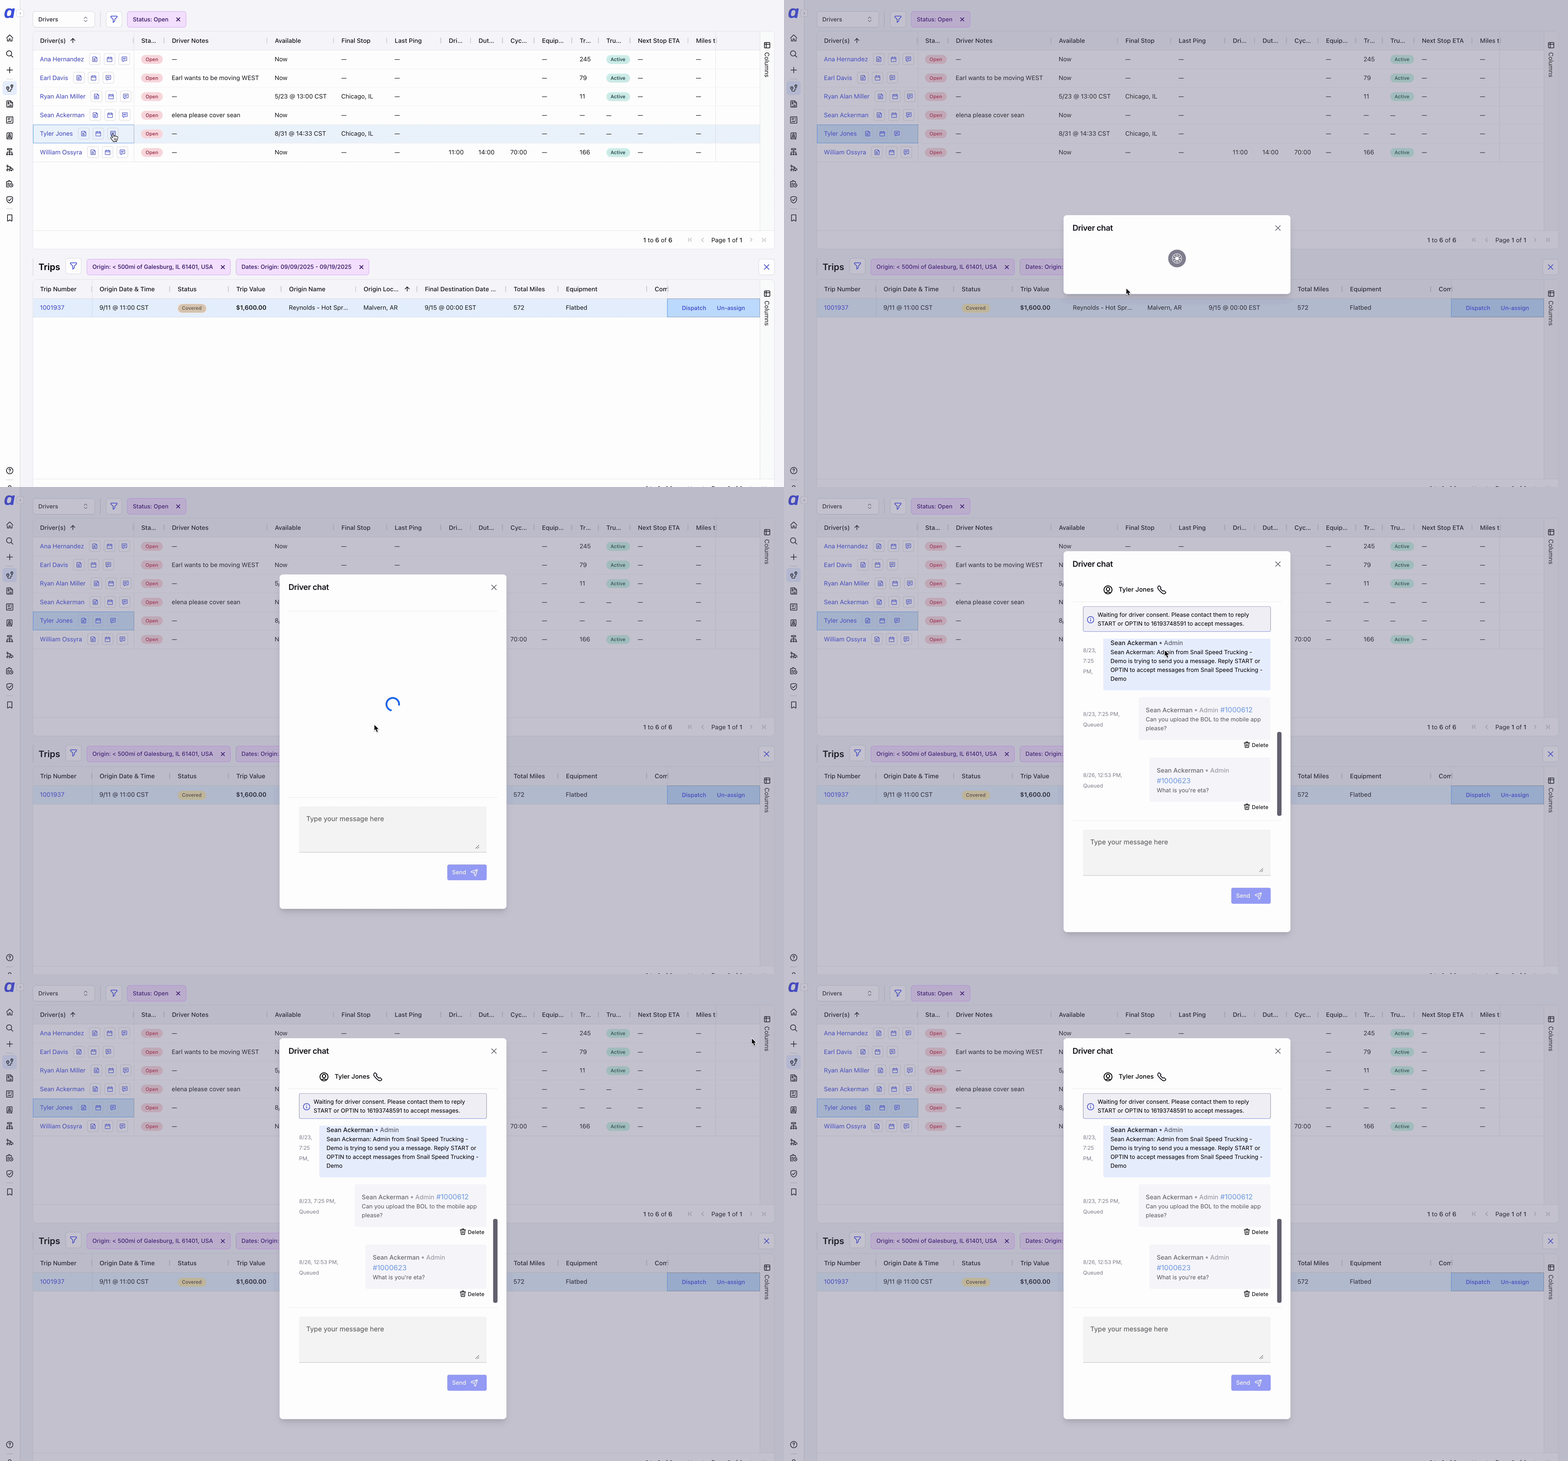
Trip Assignment
Trip assignment can be initiated from either the trip side (trip-first) or the driver side (driver-first). Trip-first: Select a trip row in the Trips table. The Assets table displays a pinned suggestion row at the top showing the recommended asset match. Click Assign or Assign and dispatch to complete the assignment. Driver-first: Select a driver row in the Assets table. The Trips table updates to show only compatible Open trips for that driver. Select the trip you want to assign, then click Assign or Assign and dispatch. Whichever way round you start, only active drivers and active trucks are offered. Disabled drivers and deactivated trucks are filtered out of the drivers grid and out of truck search, so an asset that cannot take the work cannot be picked by mistake.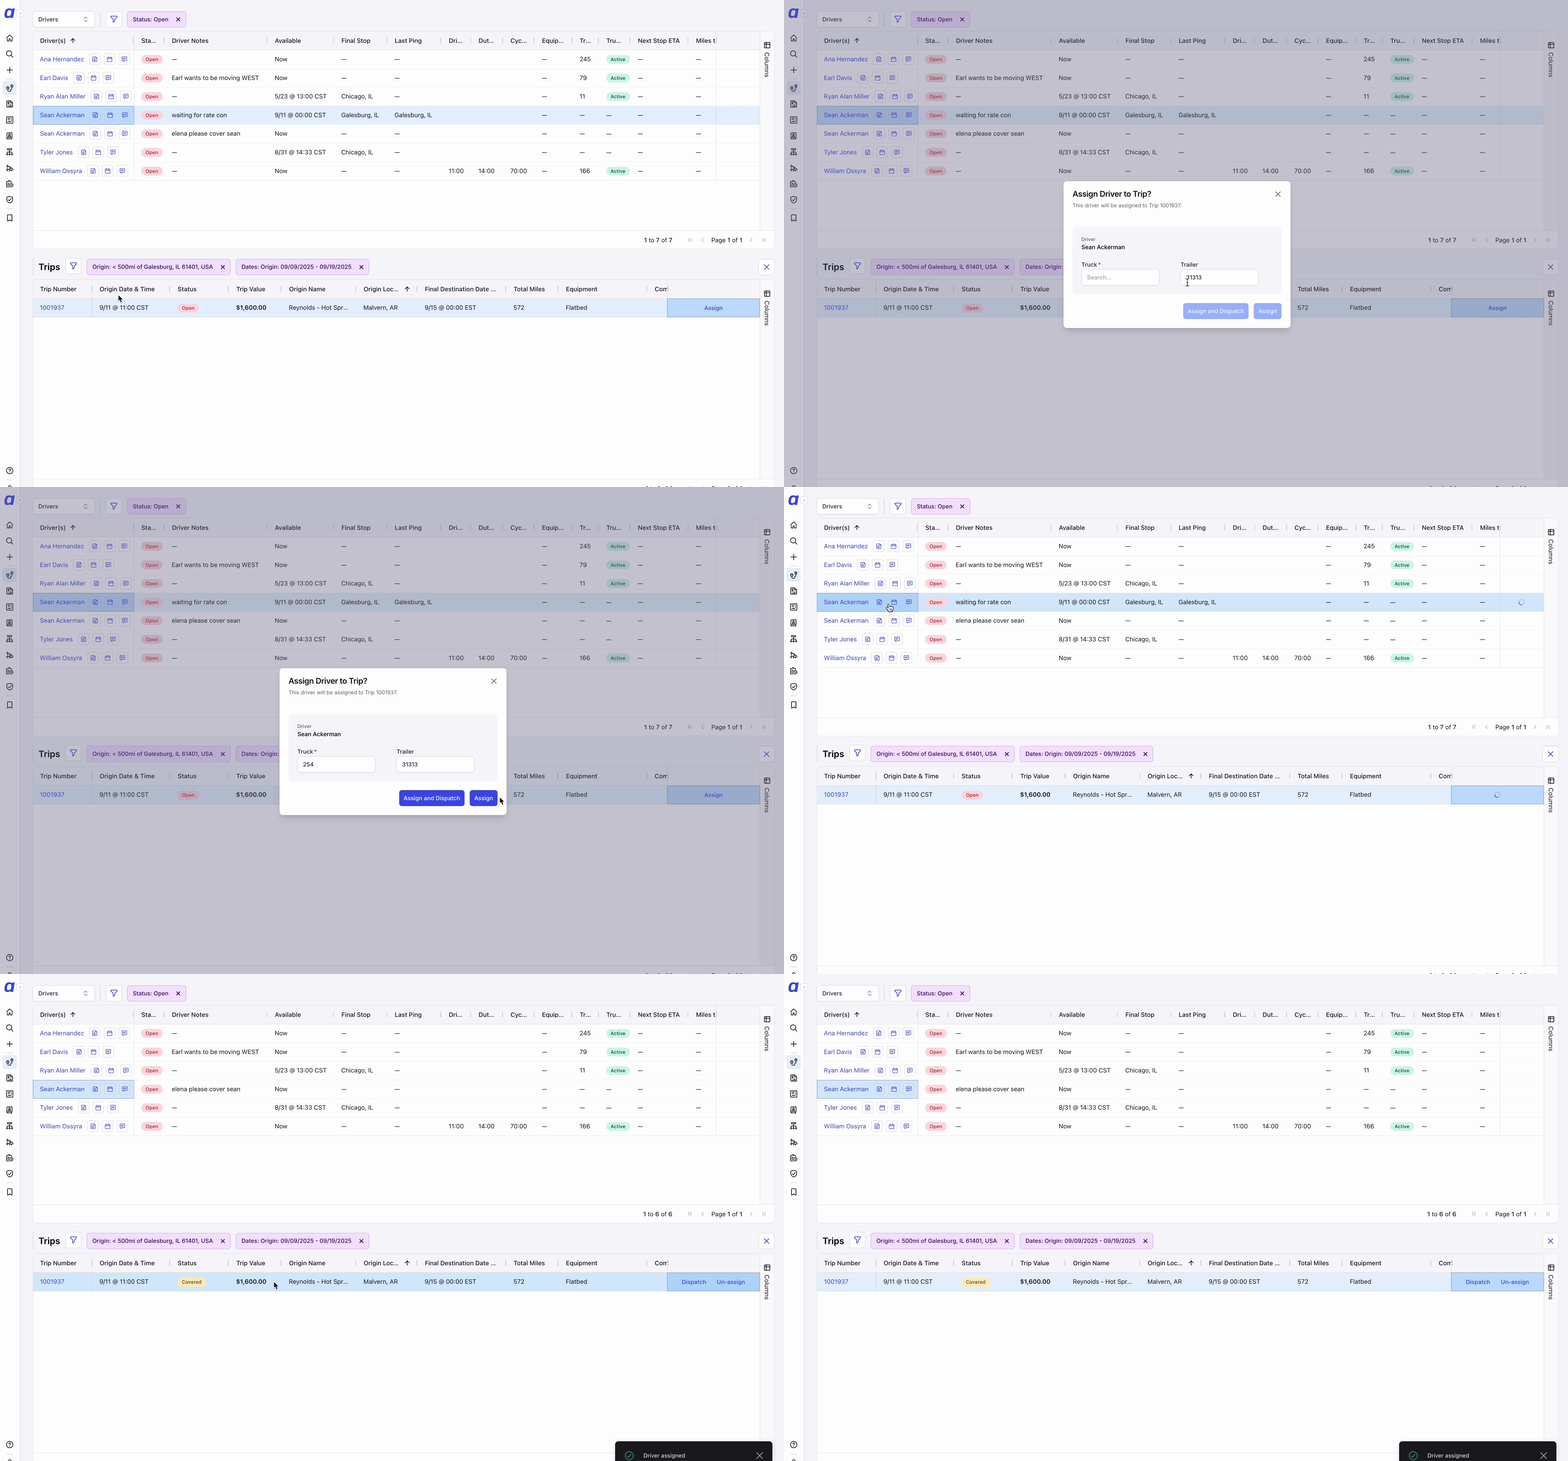
Availability Columns
The Assets table includes five availability columns that show at a glance when each driver is free:- Available at: the exact date and time the driver becomes available
- Available for: how long the driver will be free before their next planned trip
- Next planned at: the start time of the driver’s next scheduled trip
- Available in: the location where the driver becomes available, which is where their current trip delivers
- Next planned event: what the driver’s next commitment actually is
Where a Driver’s Last Reported Position Comes From
A driver’s last reported position comes from the truck the driver is currently assigned to. If that truck has not reported a position, the driver has no last reported position and the value is blank. A blank value is normal and does not mean tracking is broken. The usual reasons are:- The driver is not currently assigned to a truck.
- The truck the driver is assigned to has not reported a position yet.
- The truck is not set up to report positions at all.
Asset Sidebar
Clicking any row in the Assets table opens the Asset Sidebar. The sidebar includes two tabs:- Overview Tab: driver and asset details, notes, and availability summary
- Activity Tab: chronological timeline of driver events